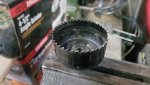
Those hole saws you have look like the inexpensive Home Deblow disposable type. I would expect like 4 good holes then the smoke. The new drill will push it thru. You want to run on slow for cutting the holes not high.
I like those cutters cause the glass will kill the expensive drill hole blades.
When those lead drill bits break or crack off I just load up with whatever bit I have lying around that fits and continue.
Tip.....
start hole to leave a circle mark
switch out bit to regular bit slightly larger than width of circle Mark
drill 6 to 8 holes and then switch back to hole saw
what this does is give the hole saw a place to eject cuttings as it penetrates and they don't bind in the side of the bit and get the bit hot.
Let's say 2" hole.... start your 2" hole around 1/32 deep. A hole saw cutting width is about 1/8 so grab a 3/16 bit and drill several holes in the mark you made with the hole saw. Imagine it was a clock. Drill every hour. That gives you 12 small holes. Switch back to hole saw and drill.
And a Corona.
I got my hole saw at ace. It didnt get dull. And I made the holes before I installed the deck.
I do wonder if my issues is that I soaked the ply with resin, and put CSM on the bottom, then CSM + 10oz Mat on the top
I think that is exactly what was killing them. I had one side done with csm. made the holes from the wood side. Then installed the deck foamed and all the other glassing.