1987 Power Play XLT-185 - floors, stringers, and upholstery

kcassells

Fleet Admiral
Joined
Oct 16, 2012
Messages
8,600
Good start....way too clean there lol. How do ya know the bow area is good structure?
 

todhunter

Canoeist
Joined
Sep 15, 2020
Messages
1,244
Good start....way too clean there lol. How do ya know the bow area is good structure?

Thanks! I've gotta have a clean work area, haha. Cut a little, vacuum a little, repeat. The stringers stop at the bulkhead shown and under the tank in the bow it's just foam. There is a wood deck over the tank, but after removing the kick panel, I can see between the tank to the underside of this deck that is over the tank. It looks really good up in there. Even though I pulled out the entire inner stringers, the front 12 inches of them looked way better than the rest. I just figured I'd replace the whole thing instead of trying to scarf into such a small stub. Based on the way things have looked, the rot in this boat started in the ski locker - the bottom of the deck and the top 2 inches of the stringers are exposed, unfiberglassed wood.

As of right now I'm planning on leaving the outer stringers as they look pretty good. The port one has a small area that's soft, but I think I'll just inject it in that area and cap all of them with fiberglass. The floor of the ski locker seems solid too.

Do you guys have any tips for drilling samples from stringers and the transom? I need to see how far back I'm going to need to cut in the bilge, or if I need to pull the engine and cut it all out. What size drill bit? Just drill about 1/2" in (assuming 3/4" wood)? What to plug the hole with if the sample looks good?
 

kcassells

Fleet Admiral
Joined
Oct 16, 2012
Messages
8,600
!/4"/3/8" bit would do it, just look for moist shavings. Additionally a 1/2" hole saw completely thru and if good just pb the plug back in.
 

todhunter

Canoeist
Joined
Sep 15, 2020
Messages
1,244
Well boys, transom is rotten (though not nearly as bad as the stringers), as I probably should have expected. But...wet is wet. It's got to go.

fetch

Here is where I drilled the transom. Near the bottom by the transom plate, on the port side.


fetch

Wet wood shavings.
 

Attachments

  • photo340663.jpg
    photo340663.jpg
    176.8 KB · Views: 284
  • photo340664.jpg
    photo340664.jpg
    173.8 KB · Views: 287

todhunter

Canoeist
Joined
Sep 15, 2020
Messages
1,244
I've been making some progress today. I've got the back of the boat stripped of exhaust tips, swim decks, trim tabs, and I also pulled the outdrive. I've also been disconnecting things in the engine compartment in preparation for pulling the engine next weekend. This past week I finally got the trailer registered and tagged, and was even able to get a permanent tag. This was a painful process since the guy I bought it from didn't have a title for the trailer. With the back of the boat disassembled, I was able to put the tongue back on the trailer and back it the rest of the way in the garage so that the door can shut. I replaced the bolts that hold the tongue on with new grade 8 bolts.

fetch
Disassembly at the back of the boat.


fetch
Drive removed and in a stand I built from some thread on this site.
 

Attachments

  • photo340799.jpg
    photo340799.jpg
    173.8 KB · Views: 274
  • photo340800.jpg
    photo340800.jpg
    172.7 KB · Views: 274

todhunter

Canoeist
Joined
Sep 15, 2020
Messages
1,244
What's the direction most folks go with pulling the cap - stripping it down prior to pulling it or leaving things like steering, wiring, windshield, etc. in place? I'm not planning on painting or re-gelcoating the exterior of the boat, so if it's acceptable to just leave all that stuff attached to the cap, I'd prefer to do that.
 

Scott Danforth

Grumpy Vintage Moderator still playing with boats
Staff member
Joined
Jul 23, 2011
Messages
47,542
if you are not touching the exterior gel, leave it attached. I used ratchet straps on the Avanti rebuildand hung the cap from the rafters
 

todhunter

Canoeist
Joined
Sep 15, 2020
Messages
1,244
Appreciate that - that will make my life easier. I like the idea of hanging it from the rafters, but unfortunately I don't have the room in my garage to do that. I'm planning on having a crew of guys come over after I have it separated and help walk it out to the back yard to put on a stand and cover with a tarp. I'm watching FB Marketplace and the local CraigsList for a deal on an aluminum carport to park the boat under when I'm finished. If I find one sooner, I'll put the cap under that.
 

todhunter

Canoeist
Joined
Sep 15, 2020
Messages
1,244
Got the engine pulled today! One of my friends who owns a boat offered to help me pull the engine with his track hoe - saved me from spending $ on lumber to build an A-frame. Now I can dig into inspecting the bilge area for rot.

I did manage to catch it on the teak that hides the raw edge of the fiberglass in the engine compartment...bummer. Not a huge deal...I can make a new one. At least it didn't damage the fiberglass.

20201010_103308.png

20201010_111611.png
 

Baylinerchuck

Commander
Joined
Jul 29, 2016
Messages
2,726
I should have told the wife I needed a mini-ex instead of building the gantry. Dang it , too late now, :unsure:
 

todhunter

Canoeist
Joined
Sep 15, 2020
Messages
1,244
I should have told the wife I needed a mini-ex instead of building the gantry. Dang it , too late now, :unsure:
Yeah, I should just tell her it's in the tool budget for the boat. 😅

Got a little more done on the boat today.

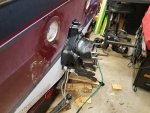
I got the bilge cleaned up and the trim pump removed, allowing me to pull up the last piece of carpet in the bilge:
1.png

I also went ahead and removed the rub rail. It looks/feels like there is just a bead of silicone between the cap and the hull that I'll have to cut once I remove the screws holding the two halves together. I've still got to disconnect a few things up in the bow before I'm ready to separate the halves.
2.png

I used my multi-tool to cut out the plywood pieces that were tabbed into the sides of the cooler/bench seat to separate the bilge from the place where people sit. There were two on each side.
3.png

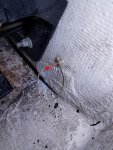
I drilled few more holes in the transom to explore how bad things were. At the bottom of the transom the chips are noticeably dark, but about 6" up from there, the chips are light colored and dry. I guess the transom isn't totally gone yet. Maybe I'm just still slightly in denial about needing to rip the transom out?
4.png5.png
 

Baylinerchuck

Commander
Joined
Jul 29, 2016
Messages
2,726
I agree. Although it doesn’t look too bad, the dark chips mean it’s been wet. It’s best to take it out now, and install new, better than factory.
 

todhunter

Canoeist
Joined
Sep 15, 2020
Messages
1,244
Thanks for the input / reassurance that I just need to do the transom. This week I towed a small trailer back to my friend's house to pick up my engine and bring it back home. Last night I built a dolly for it. Space is super tight in my 20x20 one-car garage where I'll be doing the restoration, so having this thing on wheels so I can move it around is going to be the best bet. After finishing winterization, I plan on wrapping it in plastic (like the drive in the background) to keep it mostly dust free.

I got the parts needed to upgrade my vacuum to make working on the boat easier during the restoration. Up until this point I had been setting the vacuum (12 gallon wet/dry) in the boat while working since it only has a 6 ft hose. This was cumbersome and made a tight space feel even more cramped, and the fiberglass dust has been making the filter clog up quickly. So, I got a dust deputy and a washable filter bag to cover the filter. These should greatly increase the life of my vacuum filter. I also got a 13 ft hose and a remote control outlet. This will allow me to have the vacuum sitting on the floor outside the boat, then all I have to do is press the remote control button to turn it on/off now. This should give me much more space to work!2.png
 

todhunter

Canoeist
Joined
Sep 15, 2020
Messages
1,244
I started separating the cap today. I was able to get all the way around and have the cap sitting up on blocks of wood all the way around. After removing the aluminum rub rail and screws beneath that, I went all the way around the boat with a 3" paint scraper to work between the joint. It appears the boat builder used silicone caulk all the way around the boat to seal the cap to the hull.

In the next week I hope to be building a frame to store the cap in my back yard and then the following weekend pull it off and set it back there. I hate to put the project on hold for nearly 10 days, but I'm going drag racing this weekend...probably for the last time until spring.

I also found a local supplier who carries fiberglass supplies and resin. I'll at least be buying my resin from them so I don't have to pay crazy shipping and hazmat fees. They did say the only fabric they sell by the yard is CSM though...all other fabric has to be purchased by the roll (~90 yd), so I'll probably be ordering my 1708 from US Composites.

20201021_191002.jpg
 

todhunter

Canoeist
Joined
Sep 15, 2020
Messages
1,244
The cap is fully separated from the hull and sitting up on 2x4's. Hoping to move the cap to a frame in the back yard this coming weekend. I'm ready to get this thing off so I can start measuring and then really dive in to working on this thing.

20201025_153030.jpg
 

Baylinerchuck

Commander
Joined
Jul 29, 2016
Messages
2,726
Moving right along. How do you plan on bracing the hull to prevent it from being mis-shaped during the rebuild? The remote vacuum switch is a great idea. You will certainly run out of room quickly in the boat.

I did most of my grinding outside when there was a slight breeze. It made things much more bearable. When I was 100% complete with the grinding, I took it for a ride to the local car wash. I got some rather bizarre looks, but it was worth it for a high pressure rinse.
 
Top