1987 Larson DC-215 restoration

sms986

Petty Officer 1st Class
Joined
Sep 18, 2017
Messages
334
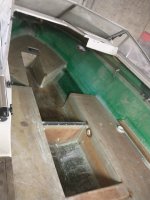
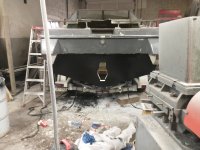
After some reading, I found that the gelcoat I got can work with epoxy. I faired the transom to the best of my ability three days ago and today I went in and sanded hard. I got it fairly flat all the way across. Minimal divots and scratches. I'm not completely convinced that three layers of gelcoat won't fill these. Even if they don't, I have no idea other than formality why I'm gelcoating this, as I'm putting sharkskin overtop. Just wanted to do it like they did at the factory, and gelcoat is not too expensive at all.

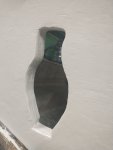
My main concern is the keyhole. Side to side it's fine, but up and down from top to bottom of the transom, it's bowed about 1/16 of an inch. Maybe less. Will this be an issue? I tried to plane it best I could.
 

Attachments

  • image000001 (1).jpg
    image000001 (1).jpg
    313.1 KB · Views: 9
  • image000002 (1).jpg
    image000002 (1).jpg
    325.2 KB · Views: 9
  • image000000 (3).jpg
    image000000 (3).jpg
    340.4 KB · Views: 9

sms986

Petty Officer 1st Class
Joined
Sep 18, 2017
Messages
334
image000000 (4).jpgimage000001 (2).jpgimage000002 (2).jpg

Got a good bit done this weekend. I tabbed in the outside deck. I plan on getting the cabin deck tabbed in tomorrow. Also foamed underneath the outside deck in addition to the areas where foam was originally poured. If I have enough foam I'll be able to skin the deck this week too.
 

sms986

Petty Officer 1st Class
Joined
Sep 18, 2017
Messages
334
IMG_20210101_204518828.jpg

I was able to get the front deck tabbed in. There was also a piece of reinforcing wood along the keel above the front deck that I replaced with composite. I have to order a bit more glass and foam then I can foam and skin that last piece of the deck. After that I'm going to go through and sand/grind/debur the whole boat, fill any bubbles, and glass over and exposed wood. Once the boat is cleaned out from that I can roll on the deck coat and as far as I'm concerned the actual "gut and restore" is done!

Next phase will be pulling the cap to reseal and resealing all of the thru-hulls.
 

sms986

Petty Officer 1st Class
Joined
Sep 18, 2017
Messages
334
Got the last bit foamed and skinned.

Still a long way to go until I'm on the water, but the restoration is pretty much done. I started some final sanding tonight (why the boat's a mess), and I'll finish it up tomorrow and get the boat cleaned out really well. Only thing left to do after that is to put on the deck coat, then the resto is done.

Oh, and after 2 years I finally got it back on the trailer!
 

JASinIL2006

Vice Admiral
Joined
Feb 10, 2012
Messages
5,553
Got the last bit foamed and skinned.

Still a long way to go until I'm on the water, but the restoration is pretty much done. I started some final sanding tonight (why the boat's a mess), and I'll finish it up tomorrow and get the boat cleaned out really well. Only thing left to do after that is to put on the deck coat, then the resto is done.

Oh, and after 2 years I finally got it back on the trailer!

Famous last words!

Seriously, though, it's looking good. You're getting close!
 

sms986

Petty Officer 1st Class
Joined
Sep 18, 2017
Messages
334
Oh I know. Still a long way to go.

I live in nc and the boat is at my family's warehouse in PA. Once a month I took a few days to go up and I had to rush and spend my vacation back home working on the boat. We had to get it out ASAP because it was blocking the garage door and we are selling some equipment in there. Once I get the deck coated, the work I've done will be water proof and the boat is now on the trailer and structurally ready to be hauled. So in March it'll be a huge relief to get the time constraint of my back and since I'm taking it to my house I'll be able to work on it through the week and on weekends instead of 4 days a month. That's why it feels like a huge achievement at this point.
 

todhunter

Canoeist
Joined
Sep 15, 2020
Messages
1,254
My boat project was in another state for about the first month I owned it and I was going to work on it on weekends - that got old really quick. Having your project at home will feel good.
 

sms986

Petty Officer 1st Class
Joined
Sep 18, 2017
Messages
334
Got the finishing touches done on the glasswork today. I also cleaned the hull out the best I could and got the primer for the deck coat on as well as the antifouling paint for the transom. The next few days I'm just going to be coating the deck and the transom.
 

Attachments

  • IMG_20210304_154820329.jpg
    IMG_20210304_154820329.jpg
    2.5 MB · Views: 19
  • IMG_20210304_154809435.jpg
    IMG_20210304_154809435.jpg
    3.6 MB · Views: 19

sms986

Petty Officer 1st Class
Joined
Sep 18, 2017
Messages
334
By the way, that dripping milk looking stuff all over the hull is the primer. It goes on pretty drippy but it evens out and turns clear after a few minutes.
 

sms986

Petty Officer 1st Class
Joined
Sep 18, 2017
Messages
334
ok, so I wrestled her under the carport this week and I'm getting to work today. First order of business is to reseal the cap and all existing fittings. Took about an hour, but I got the cap off. Not too bad.

I have wo questions. First, any tips or tricks to get the old silicon sealer off? I've been using a razorblade but it takes forever. Could use caustic but that would be pretty tough to do safely and clean.

Second, any recommendations on sealers? I think I'll use 5200. I will never pull the cap again and I think the adhesive strength of the 5200 will keep it from slightly separating and breaking the water seal under shock or stress.

Thanks!
 

todhunter

Canoeist
Joined
Sep 15, 2020
Messages
1,254
I've been using Harbor Freight plastic chisels to clean the silicone off. They are less likely to damage the gelcoat than razors but they are still pretty tough. The edge does get worn out pretty quick, but a run across some 400 grit paper brings it back to life. If you've got a chisel sharpening guide, use it when reviving the edge to keep the angle correct.
I'm planning to just go back with a clear silicone for the cap/hull bond. I'll use 4200 above the water line on the transom, 5200 below the water line on the transom, and RTV for my exhaust pipes.
 
Last edited:

sms986

Petty Officer 1st Class
Joined
Sep 18, 2017
Messages
334
One thing after another.

Put the garboard plug in. Sealed it up with 5200, tapped it into the drilled hole, and screwed it in with 3 SS screws.

Top two screws went in fine. Bottom one broke off while hand tightening. It broke off in the glass, so I can't even get a pair of vise grips on it to back it out. Think I'll be ok with 2 screws and 5200?
 

sms986

Petty Officer 1st Class
Joined
Sep 18, 2017
Messages
334
By the way, I tried the stripe off wheel, plastic chisels, and razor scrapers.

The stripe off wheel worked ok for parts of it. Plastic chisels and razor scrapers got the bulk of it off. I ended up using a bristle wheel to get it all off. It scuffed the gelcoat a bit but I don't care. It didn't get nearly through the gelcoat and I test-buffed a small section before going all the way around. Anything that shows on the edges of the rub rail can be buffed out pretty easy-I intend to do some gelcoat touch up and buffing anyway.

Cap is all cleaned up and ready to be sealed. I just have to figure out how to rig a pulley system to drop this thing back on.
 
Top