1986 Brougham Bridger Yukon Delta Fishing boat renovation

Jeff Fro

Petty Officer 1st Class
Joined
Nov 17, 2017
Messages
202
Thanks for the compliments. Ran out of daylight last night, have about 6 feet left to glue and screw to get the two halves together. Next is y pipe, motor mounts, hydraulic lines for the hydraulic steering.
 

Jeff Fro

Petty Officer 1st Class
Joined
Nov 17, 2017
Messages
202
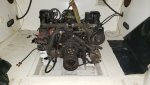
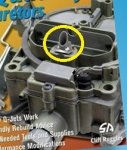
Been a tad bit busy at work, oh well. With the shorter days, I tend to run out of daylight to work on the boat. However, I have gotten a few things done. Been running the motor on the stand. Bought a kit to rebuild the carburetor (several times). Followed the directions, and well, that got me. Had an enormous amount of fuel pour out of the bowl vent. Thought I had fuel pressure issues or the float was messed up. After messing with that all day Sunday, come to find out even though the kit directions say to set the bowl to 0.25, it should be set between 0.38 and 0.4 for the model of quadrajet that I have. Thanks to the guys on Facebook Quadrajet page for their help.

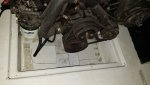
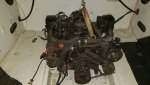
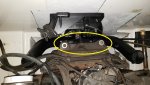
Anyways, i had two lower bolts on the transom ring to correctly seal up. Took care of that last night as well as sitting the motor almost in place. Since I have no Idea of what motor this boat had in it, I put everything back the way it was when we tore everything out. I'm thinking I may have got lucky. The motor mount boards could have been an inch or so farther forward, but I think they'll work as is. I'll have to trim the back of the starboard mount boards off by 1 1/2" or so to get the bell housing to slide in place. Right now the alternator bracket is hitting the floor on the side of the bilge opening. Not too concerned at this time about that until the motor is lined up better than what it is. You can see in one of the pics that the rear motor mount bolts aren't lined up very well. This is because of the need to trim the back of the motor mount. I will also be trimming the forward area of the bilge to gain a bit of room in there for the motor to sit in there better.
 

Attachments

  • photo340700.jpg
    photo340700.jpg
    122.4 KB · Views: 11
  • photo340701.jpg
    photo340701.jpg
    92.9 KB · Views: 10
  • photo340702.jpg
    photo340702.jpg
    120 KB · Views: 9
  • photo340703.jpg
    photo340703.jpg
    121.4 KB · Views: 9
  • photo340704.jpg
    photo340704.jpg
    100.7 KB · Views: 9
  • photo340705.jpg
    photo340705.jpg
    133 KB · Views: 9
  • photo340706.jpg
    photo340706.jpg
    140.8 KB · Views: 11

Baylinerchuck

Commander
Joined
Jul 29, 2016
Messages
2,726
My motor mounting platform toward the rear of the engine has a notch for the starter to clear. The mount runs and ties into the transom for more strength, but has a step in it for clearance. I wouldn’t be too worried about the alternator bracket at this point either since the motor will most certainly need to be adjusted up to properly align the coupler with the drive shaft of the outdrive.

The fuel splashing out of the vent is a bit concerning if you are talking about the vent in the air horn next to the choke flap. That vent doesn’t sit directly over hole in the gasket for the bowl. If fuel is on top of that gasket.....that’s a problem since the fuel would be higher than the idle tubes, main and secondary discharge nozzles. The chart I have for float level has one application where the float height is set for 11/32”. Most others are between the range of 7/32 and 9/32. Obviously fuel height is critical in the proper function of a QJ. Maybe I’m misunderstanding what you’re calling the vent. I attached some exploded views of the main body, and air horn. I have a thorough rebuild I’ve documented in the Mercruiser section if you’re interested.

68306625-5ABE-4930-972A-60C63B5C6FFA.jpeg

24CE1D65-A628-4F64-92F3-DA1B4FE10AA2.jpeg
 

Jeff Fro

Petty Officer 1st Class
Joined
Nov 17, 2017
Messages
202
Excellent write up on the Q-jet rebuild and good pics Chuck. However, the bowl vent is on the top...lol. I think that is what it's called. Although I had fuel coming out all over the top, including the accelerator pump.
 

Attachments

  • photo340719.jpg
    photo340719.jpg
    27.9 KB · Views: 1

Baylinerchuck

Commander
Joined
Jul 29, 2016
Messages
2,726
I just sent the pictures so that if fuel was burping out somewhere else, you could describe it. You definitely circled the vent. Since fuel was coming out in all the areas you mentioned it definitely was NOT that the float was set too high. The fuel level would have been way below the top of the bowl, even with the float height set at 1/4”. Fuel was most definitely being pushed through the needle and seat. So either that was leaking, or the float was getting hung up on the splash guard. You can check the splash guard to make sure it’s not warped. There should be a new gasket between the seat, and the casting, the old gasket should have been removed. A new float should also been installed. Plastic floats do absorb gas over time and get heavy.

If you give me the number off the side of the carburetor, I can tell you what the float height should be for that specific carburetor. Float height is extremely important. After a rebuild, the valve should be vacuum tested to ensure the needle will seat. I have a vacuum tester for that, but in the past I’ve simply flipped a carb upside down, and sucked on the fuel inlet to make sure the valve closes. Ironically I’ll be covering that in my next post in that thread.
 

Jeff Fro

Petty Officer 1st Class
Joined
Nov 17, 2017
Messages
202
So far it seems to be running ok. I'll know more when it warms up a bit more than 45 degrees.

We finally got it off of the trailer and moved into the garage. Had to wait a day for it to defrost, dry off, and warm up. Started to prep for the wiring by installing the tubing for the wire ways. My gf will be removing all of the tape residue this week. NEVER, EVER, use gorilla tape on fiberglass. What a mess. Damn gorilla tape. Really sticks.

iboat_100.jpg


iboat_102.jpg


iboat_103.jpg
33
 

Jeff Fro

Petty Officer 1st Class
Joined
Nov 17, 2017
Messages
202
Thanks Mickey. We can't wait until its done as well.

Ran the pvc wire way on Saturday should only need one.
 

kcassells

Fleet Admiral
Joined
Oct 16, 2012
Messages
8,600
Thanks Mickey. We can't wait until its done as well.

Ran the pvc wire way on Saturday should only need one.
Yea that looks GREAT! Sweet boat. Been there with the gorilla tape, nothing but nightmares. Especially if you leave it on for any period of time. Total bugger.
Looks nice!!
 

Jeff Fro

Petty Officer 1st Class
Joined
Nov 17, 2017
Messages
202
Been out of town for work for a couple of weeks. My gf finally got all of the gorilla duct tape off of the boat. We now have a new found respect for gorilla tape.

Anyways, the console is now sanded with some of the holes filled and a new hole for switches.

Before
iboat_110.jpg


After
iboat_111.jpg
 

Jeff Fro

Petty Officer 1st Class
Joined
Nov 17, 2017
Messages
202
Went to the KC Boat show a week ago. Saw some really cool foam flooring called SeaDeck and I think AquaDeck....Quote for my boat....$3,000 to $3,500.

No way in hell. It's getting some roll in bed liner...red neck style.

Did see a couple of Pursuit boats...Show special pricing...$389,000. Super nice boats.
 

briangcc

Commander
Joined
Jul 10, 2012
Messages
2,116
It's expensive but its darn nice on the feet! I have SeaDek on my swim platform and let me tell you it is darn near ice cold in the blazing sun where you would leave skin on vinyl.

Best $700+ I ever spent on a boat and I'd do it again in a heartbeat.
 

Timr71

Petty Officer 1st Class
Joined
Jul 19, 2012
Messages
326
Went to the KC Boat show a week ago. Saw some really cool foam flooring called SeaDeck and I think AquaDeck....Quote for my boat....$3,000 to $3,500.

No way in hell. It's getting some roll in bed liner...red neck style.

Did see a couple of Pursuit boats...Show special pricing...$389,000. Super nice boats.

you can find non-branded eva flooring (same material) on ebay and cut it yourself for a fraction of the cost of GatorStep, SeaDeck, etc. I'll find a flooring link and post it for you.

Not sure if iBoats sells this or not, Someone will be along if this link is not allowed.

ebay Marine EVA flooring
 

Timr71

Petty Officer 1st Class
Joined
Jul 19, 2012
Messages
326
Here's a link to an EVA flooring install. I've read a bunch of threads on the topic, the key seems to be surface prep and your ability to create a template and then use a router to make all of the necessary cuts. Hope this helps.

Tige' EVA Floor
 

kcassells

Fleet Admiral
Joined
Oct 16, 2012
Messages
8,600
Here's a link to an EVA flooring install. I've read a bunch of threads on the topic, the key seems to be surface prep and your ability to create a template and then use a router to make all of the necessary cuts. Hope this helps.

Tige' EVA Floor
Anything is better than carpet. JMHO.
 

Timr71

Petty Officer 1st Class
Joined
Jul 19, 2012
Messages
326
Anything is better than carpet. JMHO.
Agreed. I'm ready to rip it out of my ski boat and refloor it. Another popular flooring type is spaghetti mat. Again, it's like a poor mans decadence if you've seen that flooring before.
 

Jeff Fro

Petty Officer 1st Class
Joined
Nov 17, 2017
Messages
202
Thanks for the links, I'll be checking them out. Carpet was thought of for a brief moment, then the foam, then the bed liner. I do like the foam for the simplicity of it, just not the prices I was quoted at the show. The pattern for the front was done before we went to the boat show.
iboat_113.jpg

My gf text me with some good news this morning, she's on target to finish the initial sanding of the boat, including the repairs by this evening. We had some fairly large spider cracks in the gel coat caused by the wooden sub-structure being rotten and having people walk on it. I'll be picking up the acetone, rags, plastic, and 1x2s for the paint booth on my way home today.

We'll go over the entire boat to make sure we didn't miss anything prior to setting up the paint booth.
 

Jeff Fro

Petty Officer 1st Class
Joined
Nov 17, 2017
Messages
202
The sanding is coming to an end. We have about a 20" section of the forward keel to sand the repairs down and about a 3' x 4' area of the floor to sand down. When all is done, the bilge area will get another layer of gel coat on it as well.
iboat_114.jpg

This is my hard working gf, partner in crime, and better half sanding the aft lower bottom of the boat.
iboat_116.jpg

This is one of the pieces that I will need to replace. It ran completely around the boat under the aluminum rub rail. Anyone know where I can find this? It measures 0.6 x 0.750 x 0.6.
iboat_115.jpg
 
Top