1986 Brougham Bridger Yukon Delta Fishing boat renovation

Woodonglass

Supreme Mariner
Joined
Dec 29, 2009
Messages
25,927
Have you core sampled the longitudinal stringers that are circled in red. They MUST be solid and free from rot. Critical to the structural integrity of the hull. Hull repair should be done first and then the "TUB" can be addressed.
 

Jeff Fro

Petty Officer 1st Class
Joined
Nov 17, 2017
Messages
202
Woodonglass, I think we are saying the same thing. However, I want to make sure that we are. Take a look at the attached pic and let me know.

Also, the transom is about 42-44" tall by about 94" wide. Would it matter much if I used two strips of 25" wide overlapped 1708 instead of one 50" wide piece to cover it?

Thanks for your input.
 

Attachments

  • photo294284.jpg
    photo294284.jpg
    63.8 KB · Views: 8

briangcc

Commander
Joined
Jul 10, 2012
Messages
2,360
Now I sees it.. I had to look at an outside photo of your transom. The large glassed forms that look like stringers are actually channels if you will. No wood in those. Attached to those channels are 2x4 stringers which you are looking at replacing. Do I happen to have it right?

BTW: Very unique project.
 

Jeff Fro

Petty Officer 1st Class
Joined
Nov 17, 2017
Messages
202
Now I sees it.. I had to look at an outside photo of your transom. The large glassed forms that look like stringers are actually channels if you will. No wood in those. Attached to those channels are 2x4 stringers which you are looking at replacing. Do I happen to have it right?

BTW: Very unique project.

Yes, you are correct Briangcc. Those 2x4 stringers are coming off later tonight or tomorrow afternoon. I'll have the sides clamped to the measurements I have and will go from there.

I went and had the boat weighed yesterday and found out that we removed 900 pounds of river dirt (now in flower pots), carpet, and rotten wood out of it.
 

Woodonglass

Supreme Mariner
Joined
Dec 29, 2009
Messages
25,927
Ok are you saying that the Wide looking longitudinal runners (appear to be 3" wide" are NOT stringers and are part of the fiberglass hull? If so, I don't agree. They may in fact be hollow with NO wooden core but...they are still main structural components of the hull.
 

mickyryan

Rear Admiral
Joined
Apr 18, 2016
Messages
4,214
wood those are tunnells.. got me too :)
wonder if they were there to match the trailer to make it easier for a person to load a trailer and gert it just right?
fetch
 

Woodonglass

Supreme Mariner
Joined
Dec 29, 2009
Messages
25,927
Well cut my legs off and call me shorty!! I SEE now said the Blind Man to his deaf and dumb Daughter!!! I'm Soooo sorry for NOT understanding. But...I keep telling EVERYONE that I Truly am just and OLD DUMB OKIE! this is Just more PROOF!!!
 

mickyryan

Rear Admiral
Joined
Apr 18, 2016
Messages
4,214
it got me too man i kept looking then someone else mentioned so i went back and looked i was like hmm wth lol
 

Jeff Fro

Petty Officer 1st Class
Joined
Nov 17, 2017
Messages
202
Nah, you guys are fine. It's a boat that took quite a bit of research and looking before I finally understood it.

It is a Sea Camper hull. They were made so that the channels/tunnels would line up on two vertical bunks and help align it the same way on the trailer every time. However, I have no idea who made the top. It does have a "Bridger Boats" metal plate on the inside as well as on the back. With "YDH" as the first three in the HID number.

I have a place in St. Louis that I will be picking up my glass and resin. Was hoping to find someone close by that had Cabosil in smaller bags other than 10#.

I measured the transom cavity last night and it was between 1 7/8" and 2" thick depending on where I measured it. I'm thinking two pieces of 1" plywood, drilled, screwed, and ventilated for squeeze out.

Shorty...well Woodonglass, I appreciate all of your input and knowledge on my adventure with this critter. I have spent quite a bit of time in the last 3 or 4 months in Tulsa for work, not knowing that a huge amount of glassing and boating knowledge was just 2 hours away.

Mickyryan....I think I have read your restoration thread several times. Very informative. Thanks for your input as well on this critter.

Everyone else, feel free to add your $0.02 as well.
 

mickyryan

Rear Admiral
Joined
Apr 18, 2016
Messages
4,214
do not use 1"
use 3/4 so you have plenty of room for your pb and final glassing or it might put you over the limit of 2 1'8th
3/4x2 plus the outside skin puts you close to 1.11/16ths to 1 3/4 then your skins and accounting for pb will put you extremely close to 2" if not dead on :p) also get a jig for drilling your holes for new cut out so they are on correct angle
 

Jeff Fro

Petty Officer 1st Class
Joined
Nov 17, 2017
Messages
202
Correct angle? Looks like the angle of the studs coming out of the gimbal mount are pretty close to 90 degrees from what would be the surface of the transom. I haven't put a square on them yet to make sure.
 

briangcc

Commander
Joined
Jul 10, 2012
Messages
2,360
Hey I'm glad I had enough battery life in my dim flashlight to get everyone on the same page.

Question...and not trying to stir anything up now, back in WOG's post #37, it appears that the glass over the tunnels may be a bit light in a couple areas. Perhaps there was structure there above it which you needed to remove? The blue circles and just above, close to the transom. Any plans on grinding some of that out and then building it back up for strength??

Just trying to learn something, can tell me to bugger off if needed.
 

Jeff Fro

Petty Officer 1st Class
Joined
Nov 17, 2017
Messages
202
Briangcc, the lighter spots that you are referring to were where the supports for the rear fuel tanks were glassed in. Unfortunately, the only part that was glassed on the tank supports were the ends. Can ya think as to why the supports rotted in the middle? I'll put new supports there glassed all around.
 

mickyryan

Rear Admiral
Joined
Apr 18, 2016
Messages
4,214
Correct angle? Looks like the angle of the studs coming out of the gimbal mount are pretty close to 90 degrees from what would be the surface of the transom. I haven't put a square on them yet to make sure.

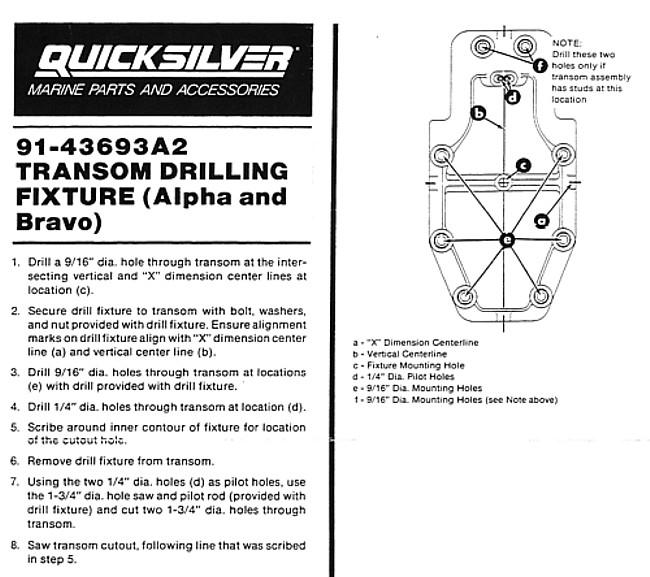
your transom is angled some folks make the mistake of drilling strait thru instead of 90 degrees to the angle.
transomfixture2.jpg

I personally used a 15 dollar jig with one of these templates
2Q==

2Q==
71jBx-1khLL._SX679_.jpg

fetch
 
Last edited:

Jeff Fro

Petty Officer 1st Class
Joined
Nov 17, 2017
Messages
202
Sounds logical about the holes being perpendicular to the hull surface. I have a similar drill guide that I use for stuff like this. Seems I already have the holes located, I just have to bring them the rest of the way through. I was planning on getting some glass grinding done this afternoon and this evening, however, mother Nature had other things going on that would prevent it. Tornado warnings, heavy rain, and lots of wind kept me in the house.

I picked up the fiberglass, resin, and plywood early this afternoon, so I'm almost ready for tomorrow.
 

sheboyganjohn

Senior Chief Petty Officer
Joined
Aug 2, 2005
Messages
753
That is one cool looking boat. It took me reading a number of posts to finally figure out the whole hull not stringer thing, but now it makes sense.

For the transom take a look at my Sea Ray build. To make it easier to tab the transom board to the sides I tapered the perimeter, minus the bottom. Made it a lot easier to fill in between the wood and the hull sides, no risks of voids. The only thing I would have done different is fill it in a bit where the corner of the transom meets the floor of the boat. With the taper it created an indent into the corners that holds water. It would have been an easy fix if I found it before I started with the gel coat. May still fix it on mine at some point.
 

Jeff Fro

Petty Officer 1st Class
Joined
Nov 17, 2017
Messages
202
And the grinding starts shortly.

Attached is a pic of the transom with a silhouette of the old lower unit versus one of the lower I have to go on. Can anyone tell me what was on there before? Maybe a pre-alpha 1?
 

Attachments

  • photo294417.jpg
    photo294417.jpg
    1.8 MB · Views: 7

sheboyganjohn

Senior Chief Petty Officer
Joined
Aug 2, 2005
Messages
753
The keyhole that you have there there is the same one for my MC-1 drives, commonly referred to as pre-alfa.
 
Top