1986 Brougham Bridger Yukon Delta Fishing boat renovation

Jeff Fro

Petty Officer 1st Class
Joined
Nov 17, 2017
Messages
202
Spent the weekend cleaning and removing items, prepping it for the splitting on the hull/top by next weekend. My GF spent Sunday scrubbing the front deck of the boat. What I thought was pitted, was actually some type of algae. And that discovery cuts down on the work load. Removed all of the windows, which will need all new seals and gaskets.
 

Attachments

  • photo292775.jpg
    photo292775.jpg
    85.9 KB · Views: 17
  • photo292776.jpg
    photo292776.jpg
    74.7 KB · Views: 17
  • photo292777.jpg
    photo292777.jpg
    78.9 KB · Views: 16
  • photo292778.jpg
    photo292778.jpg
    81.9 KB · Views: 17
  • photo292779.jpg
    photo292779.jpg
    120.8 KB · Views: 18
  • photo292780.jpg
    photo292780.jpg
    98.3 KB · Views: 18
  • photo292781.jpg
    photo292781.jpg
    63.3 KB · Views: 18
  • photo292782.jpg
    photo292782.jpg
    73.5 KB · Views: 18
Last edited:

Jeff Fro

Petty Officer 1st Class
Joined
Nov 17, 2017
Messages
202
I'm hoping so. I still want to get it weighed before splitting, like to know how much weight I'm expecting the Mercruiser 260 to push around.
 

Jeff Fro

Petty Officer 1st Class
Joined
Nov 17, 2017
Messages
202
Truck, trailer, and boat weighs in at 10,120#. Now the boat still has some dirt/mud from the last rain. Although no engine or out drive. The trailer is hodge podged together with way more steel than was needed in the wrong places. And the trailer frame has a lot of dirt packed in the tubing as well.

This afternoon, we start building the cradles and the overhead lifts to separate the two halves.
 

Jeff Fro

Petty Officer 1st Class
Joined
Nov 17, 2017
Messages
202
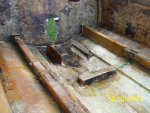
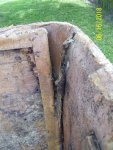
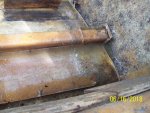
What can I say...it's split. A little bit more than I was expecting, but yet easier than I was guessing.

I have no stringers to replace...there aren't any.

There is two sheets of plywood that go between the inverted stringers. A couple of small pieces of plywood under each fuel tank. And of course the rotted transom.
 

Attachments

  • photo293162.jpg
    photo293162.jpg
    113 KB · Views: 19
  • photo293163.jpg
    photo293163.jpg
    160.4 KB · Views: 18
  • photo293164.jpg
    photo293164.jpg
    115.7 KB · Views: 19
  • photo293165.jpg
    photo293165.jpg
    156 KB · Views: 19
  • photo293166.jpg
    photo293166.jpg
    156.2 KB · Views: 19
  • photo293167.jpg
    photo293167.jpg
    174.8 KB · Views: 19
  • photo293168.jpg
    photo293168.jpg
    150.1 KB · Views: 19
  • photo293169.jpg
    photo293169.jpg
    129.4 KB · Views: 19

Jeff Fro

Petty Officer 1st Class
Joined
Nov 17, 2017
Messages
202
Had a pretty good weekend working on the boat. I was amazed at the way the plywood transom had turned to paper. I used a grinder with a cut-off wheel to get the fiberglass off of the transom. Then used just my hands to get it to this point.
 

Attachments

  • photo293165.jpg
    photo293165.jpg
    156 KB · Views: 17
  • photo293166.jpg
    photo293166.jpg
    156.2 KB · Views: 16
  • photo293168.jpg
    photo293168.jpg
    150.1 KB · Views: 16
  • photo293283.jpg
    photo293283.jpg
    147.6 KB · Views: 16
  • photo293284.jpg
    photo293284.jpg
    149.8 KB · Views: 16
  • photo293285.jpg
    photo293285.jpg
    169.5 KB · Views: 16
  • photo293286.jpg
    photo293286.jpg
    160.5 KB · Views: 16
  • photo293287.jpg
    photo293287.jpg
    152.5 KB · Views: 17

Jeff Fro

Petty Officer 1st Class
Joined
Nov 17, 2017
Messages
202
With the transom being as rotted as it was, should I go all the way to where the transom meets the side of the boat? Or just go as far as the old one did?
 

Attachments

  • photo294078.jpg
    photo294078.jpg
    160.4 KB · Views: 6

kcassells

Fleet Admiral
Joined
Oct 16, 2012
Messages
8,715
I would...take it to @ 1/2" off sides then work the squeezes out pb when you mount it. Check out Woodonglass thumb nail below his signature. You will find it helpfull.
Looking good!
 

Jeff Fro

Petty Officer 1st Class
Joined
Nov 17, 2017
Messages
202
There were several layers of fiberglass that I had to cut through to get to the transom. I would like to replace them with similar glass. Would 1.5 oz CSM work for this? Overlapping 1708 tabs to the hull.

Also, on the bottom side of the top, there are supporting plywood panels that are glassed in. They all need to be replaced. If following along with the transom idea, PB on the top side of the resin coated plywood, pressed into place, and covered with 1.5 oz CSM, would this work?

I have a place locally that will sell me a full roll of 1708 50" or 25" wide x 80 yds, a full roll of 1.5 oz CSM 50" and 35" wide x 80 yds, or will cut the CSM to what I need. However, they won't cut the 1708, but they have it in 10" wide x 80 yard rolls.

I know that 80 yards seems like a lot, but like anything else, will go pretty fast once started.

Any suggestions? Thoughts?

Plans are to glass the transom and the supports in the hull this weekend.
 

Jeff Fro

Petty Officer 1st Class
Joined
Nov 17, 2017
Messages
202
I have read that link several times. I'm just trying to figure out how much of the 1708 to buy. Don't really want a full roll, but seems that's all I can get around here.

How many layers of 1708 over the transom would one go for decent strength but not over kill?

Would I use the PB between the bottom side of the top and the new plywood support panels, then cover with 1708 or CSM?

And how many layers?

Thanks Woodonglass for chiming in.
 

Woodonglass

Supreme Mariner
Joined
Dec 29, 2009
Messages
25,927
Transom will need approx. 2-3 yards of 1708. 2 layers is fine. First layer extends 6" onto hull sides and bottom. Last layer extends 12". A thick coat of PB is used to adhere the transom to the transom skin. Use enuf (1/2" thick) to get ample squeeze out around the entire perimeter of the transom. Use the squeeze out to fillet the transom to the sides and bottom. No CSM is required when using 1708. You can if you want but it just soaks up resin with NO significant strength increase for the laminate. Stringers will need about 5 yards of 1708. again 2 layers.First 1/2 way to the top and 3" out onto hull, 2nd to the top and 6" onto hull. I DO use Shredded CSM to cap the top of the stringers for waterproofing. Bed the stringers in Thickened resin. You'll need a minimum 0f 10-15 gallons of resin, 2 lbs of Cabosil, and 5 yds of CSM
\
This guy did one of the Best Transom replacements on the forum. Check it out...
https://forums.iboats.com/forum/boa...s-total-gut-and-rebuild?p=8512409#post8512409
 

Jeff Fro

Petty Officer 1st Class
Joined
Nov 17, 2017
Messages
202
Nurseman did an awesome job on his transom.

Ok, makes sense. However, I don't really have any stringers to replace. What I do have is two floor supports that are glassed to the two inverted stringers, two motor mounts, and a couple of floor supports.

With the PB, can the chopped strand be from either of the CSM or the 1708? As long as its chopped up?
 

Woodonglass

Supreme Mariner
Joined
Dec 29, 2009
Messages
25,927
CSM IS chopped strand matt. The CSM side Always goes on the down side of the fabric. Floor supports? Do they run length wise or side to side. Either way they need to be solid and bedded to the hull. This IS the skeleton and Bones of the hull. Without them being properly attached the hull WILL flex and not be safe.

This sure looks like a stringer to me...Anything that's attached to the bottom of the deck IS a structural component of the hull and needs to be solid and attached to the hull. Your boat has a "Tubbed" one piece build. This means all the interior components and the deck are molded as one piece at the factory and then place over and attached to the substructural components of the hull. Makes repairs under the deck a bit more complicated but still a necessary evil


Jeff Fro

Petty Officer 1st Class
Joined
Nov 17, 2017
Messages
202
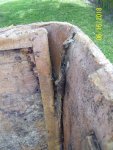
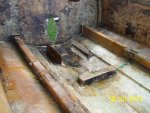
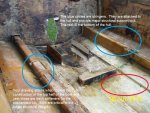
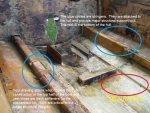
In the first pic, you can see what looks to be a full stringer. In the second pic, you'll see the two inverted stringers. These are what the plywood and 2x4 floor supports are glassed to. I may have to add a drawing to show it a bit better.
 

Attachments

  • photo294165.jpg
    photo294165.jpg
    149.8 KB · Views: 12
  • photo294166.jpg
    photo294166.jpg
    742.8 KB · Views: 12
  • photo294168.jpg
    photo294168.jpg
    43.2 KB · Views: 12
Last edited:

Woodonglass

Supreme Mariner
Joined
Dec 29, 2009
Messages
25,927
Soo this pic shows your stringers. Are you saying they have been core sampled and show no signs of water penetration or dampness? If so then OK, If not they need to be core sampled and replaced if found to be wet.
Your drawing shows what I was referring to as a TUB constructed boat and the longitudinal supports are critical to it's structural integrity. Not sure that these "Floor Supports need work but if so then I'd add another 5 yards soooo 20 yards should be plenty
Tub construction.jpg
 

Attachments

  • Tub construction.jpg
    Tub construction.jpg
    218 KB · Views: 7

mickyryan

Rear Admiral
Joined
Apr 18, 2016
Messages
4,214
my trophy has a tub , it had stringers that never touched the tub hoever the tub itself had one cross member then went across stringers that was shot totally so check underside of tub as well , flip and replace all the wood on that with arjay 6011 or seacast then you wont ever have to worry about the top tub again :)
 

Jeff Fro

Petty Officer 1st Class
Joined
Nov 17, 2017
Messages
202
Soo this pic shows your stringers. Are you saying they have been core sampled and show no signs of water penetration or dampness? If so then OK, If not they need to be core sampled and replaced if found to be wet.
Your drawing shows what I was referring to as a TUB constructed boat and the longitudinal supports are critical to it's structural integrity. Not sure that these "Floor Supports need work but if so then I'd add another 5 yards soooo 20 yards should be plenty

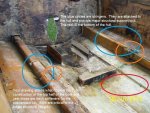
What you have circled in Blue and Red, are the same, they are all part of the same hull. The longitudinal supports are part of the hull. There is no wood in them. If I was to drill through them I would be drilling a hole in the hull. What I have circled in Orange, is actually the floor supports that are glassed to the inboard side of the "inverted" stringers. Now those floor supports are 2x4's and will be cut off of the "inverted" stringers and replaced with new wood. If you look at the drawing I uploaded, it will help explain how the hull is.
 

Attachments

  • photo294226.jpg
    photo294226.jpg
    220 KB · Views: 4

Jeff Fro

Petty Officer 1st Class
Joined
Nov 17, 2017
Messages
202
my trophy has a tub , it had stringers that never touched the tub hoever the tub itself had one cross member then went across stringers that was shot totally so check underside of tub as well , flip and replace all the wood on that with arjay 6011 or seacast then you wont ever have to worry about the top tub again :)

Everything that is attached to the underside of the top tub that is wood, will be replaced and re-glassed. Seacast would be a great thing to use, however, with the large area that needs to be replaced it would be way too much money.

Circled in Red is what the main deck/floor of the top tub sits on. It is a sheet of 1/2" plywood that sits on two 2x4 supports glassed to the inboard side of the "inverted" stringers.
 

Attachments

  • photo294227.jpg
    photo294227.jpg
    141.3 KB · Views: 7
Top