1984 Starcraft 16ft Glutton for Punishment [Splashed July 2019]

Status
Not open for further replies.

SHSU

Lieutenant Junior+Starmada Splash Of The Year 2019
Joined
Mar 8, 2017
Messages
1,725
St Peter at Heaven's Gates: So what did you do today?
Me: I put together a Starcraft and took her out for a cruise
St Peter: Sounds like fun, but that didn't get you killed?
Me: Nope, but I tried a bare aluminum hull will nothing but a 70 HP Evinrude at WOT and learned I could fly!!!!
St Peter: Well that sounds like fun
Me: It was!!!!! Until I landed and ended up here!!!!!!

My pathetic attempt at a joke

On a serious note, I have an older version of that Evinrude. I better not show the Admiral what could happen.... LOL
 

SHSU

Lieutenant Junior+Starmada Splash Of The Year 2019
Joined
Mar 8, 2017
Messages
1,725
Lol. Well, you are in Texas. Home of, "Hold my beer, watch this!"

I kid, I kid.


I wasn't born in Texas, but got here as soon as I could!!!

Plus, I do it while still holding on to my beer!!!

LOL
 

SHSU

Lieutenant Junior+Starmada Splash Of The Year 2019
Joined
Mar 8, 2017
Messages
1,725
So a couple pics, as I haven't really had anything to show ya'll.

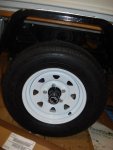
Upgraded Tires:
DSC03460.JPG

Added some bling to spare tire cover:
DSC03461.JPG

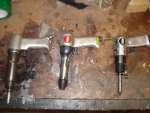
Progression of Rivet Guns:
Started with a Harbor Freight hammer, then got an Amazon special, and ended up with a used True Aircraft Rivet gun. The Amazon special took about 20 seconds of hammering to set rivets. Tested the aircraft rivet and its a 1 second tap tap with a 5 second burst and its all done. Amazing what the proper tool does for a job

DSC03482.JPG

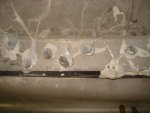
As you can see, wrong tools make for bad rivets.... Sad part is these aren't the worst. I will be drilling some out to replace with the new gun.
DSC03486.JPG

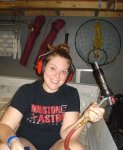
Admiral helping
DSC03477.JPG


On another note, got the wiring corrected on my switch for the Control Box. Tested it on the motor and everything works as it should!!!! Even had a little bit of a surprise with the engine starting. I didn't have any fuel hooked up and had decided to spray some fogging oil into the combustion chambers to make sure their was plenty of lubrication when the starter was moving the pistons. Immediately turned the switch to kill it and it stopped. So everything works!!!!

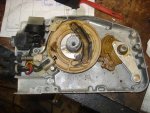
Will post pics of the rebuilt control box when done. But will show ya'll some pre pics. As you can see the grease that was in there was really old. I pulled everything out, re greased and replaced the broken safety piece for engine warm up.

DSC03462.JPG

Before Painting
DSC03473.JPG
 

Watermann

Starmada Splash of the Year 2014
Joined
Jan 12, 2013
Messages
13,787
Nice tool and you have a happy helper too!

Yeah those bucktails don't look so good from here and the 5200 is a bit much too. :lol: I put a stripe of 5200 on a paper plate, dip the rivet shaft in give a swirl, set the rivet and wipe excess off from around the head with a rag that has xylene on it. There's hardly any on the inside.

I hit the rivet with a half second burst to make sure it's all the way in, then tops 4 to 5 seconds to set it and I run my line air pressure down to around 40 - 50 PSI. The shaft of the rivet expands first filling the hole and then bucktails on the inside and that's when you stop hammering. If you're using the alloy rivets then you were hammering way too long to make the those bucktails squashed like that. Medium pressure with the bucking bar and let the hammer do the work.
 

redneck joe

Supreme Mariner
Joined
Mar 18, 2009
Messages
10,919
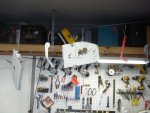
Back wall on the garage:

Fold up drinking chair
2 portable drinking chairs
Crab ring like we used when I was a kid in the PNW

Oh and in the boat a hot chick with a pneumatic tool in hand. Smiling.


you are one lucky man to have all that....
 

SHSU

Lieutenant Junior+Starmada Splash Of The Year 2019
Joined
Mar 8, 2017
Messages
1,725
Nice tool and you have a happy helper too!

Yeah those bucktails don't look so good from here and the 5200 is a bit much too. :lol: I put a stripe of 5200 on a paper plate, dip the rivet shaft in give a swirl, set the rivet and wipe excess off from around the head with a rag that has xylene on it. There's hardly any on the inside.

I hit the rivet with a half second burst to make sure it's all the way in, then tops 4 to 5 seconds to set it and I run my line air pressure down to around 40 - 50 PSI. The shaft of the rivet expands first filling the hole and then bucktails on the inside and that's when you stop hammering. If you're using the alloy rivets then you were hammering way too long to make the those bucktails squashed like that. Medium pressure with the bucking bar and let the hammer do the work.

Ya, the amazon special did not do a very good job, did one test rivet with the new to me aircraft rivet gun and it is a world of a difference. Will be going back and re doing many of the ones we already did. As for the 5200, I would squeeze it into the hole as well as the outside. What you are seeing, is the remints of hammering it home. I planned on taking my brass wire wheel to try and clean it up a little before gulvit. But depending on ya'lls recommendation may change that plan.
 

SHSU

Lieutenant Junior+Starmada Splash Of The Year 2019
Joined
Mar 8, 2017
Messages
1,725
Back wall on the garage:

Fold up drinking chair
2 portable drinking chairs
Crab ring like we used when I was a kid in the PNW

Oh and in the boat a hot chick with a pneumatic tool in hand. Smiling.


you are one lucky man to have all that....


Thanks!!!!! I am very blessed that she puts up with me. She likes to help where she can.
 

SHSU

Lieutenant Junior+Starmada Splash Of The Year 2019
Joined
Mar 8, 2017
Messages
1,725
Happy belated Father's Day to all you Dads!!!!!!

Nothing picture worthy, just plodding along with riveting... Was talking to my dad about it and he reminded me again about my time prediction.... He had asked me how long I thought it would take to rerivet the boat. I thought 1 to 2 days originally. Lets just say I am now 3-4 weeks in and have only completed about 1/3 - 1/2 of the rivets. :lol: It is what it is and still slowly plodding along.
 

EchoNovember

Petty Officer 1st Class
Joined
May 25, 2017
Messages
315
Happy belated Father's Day to all you Dads!!!!!!

Nothing picture worthy, just plodding along with riveting... Was talking to my dad about it and he reminded me again about my time prediction.... He had asked me how long I thought it would take to rerivet the boat. I thought 1 to 2 days originally. Lets just say I am now 3-4 weeks in and have only completed about 1/3 - 1/2 of the rivets. :lol: It is what it is and still slowly plodding along.

Want to re-rivet mine this winter when we start tearing into ours? ^_^
 

SHSU

Lieutenant Junior+Starmada Splash Of The Year 2019
Joined
Mar 8, 2017
Messages
1,725
Sure, but don't think you could cover my fee!!!!!! LOL As WM and EZ both have said, re-riveting isn't something I would want to do again. After you do a leak test, I would move forward accordingly. From below pictures you can see how badly mine needed them.

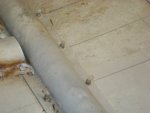
Open ended blind rivets with silicone
image_260899.jpg

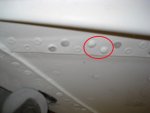
This is before blasting and don't have any new pictures. But what little bit of heads you do see came off when blasting occurred. This issue is all over and if I were to only do these and the open ended rivets I would still have to do 3/4 of the boat. So doing them all.
image_260900.jpg

After all of that, if you are still interested in re riveting I can defiantly give you some points there so you don't have to go through the growing pains I went through.

LOL
 

EchoNovember

Petty Officer 1st Class
Joined
May 25, 2017
Messages
315
I haven't found a hack job like that on mine yet, thankfully. I will be doing a leak test when everything is gutted. I think I'll just launch the empty hull without the drain plug in again. ><

My plan was to fill the boat with water, all the way full, and wipe down the hull with a towel to make sure it's dry, then watch for drips. We'll have to do that before it drops to freezing. Unless there is a better way to leak test.
 

SHSU

Lieutenant Junior+Starmada Splash Of The Year 2019
Joined
Mar 8, 2017
Messages
1,725
My plan was to fill the boat with water, all the way full, and wipe down the hull with a towel to make sure it's dry, then watch for drips. We'll have to do that before it drops to freezing. Unless there is a better way to leak test.


That sounds about right. I will be doing the same thing when I finally get all the riveting done. Also, since i replaced so many rivets I want to do a shakedown cruise with nothing in the boat so i can bang the seams and rivets around out in the water for real. That way I will feel comfortable nothing will be leaking or coming apart when I am done.
 

EchoNovember

Petty Officer 1st Class
Joined
May 25, 2017
Messages
315
That sounds about right. I will be doing the same thing when I finally get all the riveting done. Also, since i replaced so many rivets I want to do a shakedown cruise with nothing in the boat so i can bang the seams and rivets around out in the water for real. That way I will feel comfortable nothing will be leaking or coming apart when I am done.

That's probably not a bad idea.
 

Watermann

Starmada Splash of the Year 2014
Joined
Jan 12, 2013
Messages
13,787
Filling your boat all the way up with water is not a good idea especially with all the support structure removed (decking, side panels, consoles) At 8.3 Lbs per gallon the weight adds up quick and if you're doing that on a trailer that hasn't been worked on yet or have proper support you could damage your boat and trailer.

What I have done for leak testing is to run the trailer tongue jack all the way up and then add water submerging the seam in the stern area. Let it sit for 15 - 20 minutes and look for leaks dripping on dry pavement. Then run the jack down so the water moves to the front and do the same. DO NOT crawl under the boat / trailer without first blocking or using a jack stand under the trailer tongue otherwise you're staking your life on a $30 jack if it fails. Use a sharpee to mark the leaks.
 

SHSU

Lieutenant Junior+Starmada Splash Of The Year 2019
Joined
Mar 8, 2017
Messages
1,725
What I have done for leak testing is to run the trailer tongue jack all the way up and then add water submerging the seam in the stern area. Let it sit for 15 - 20 minutes and look for leaks dripping on dry pavement. Then run the jack down so the water moves to the front and do the same. DO NOT crawl under the boat / trailer without first blocking or using a jack stand under the trailer tongue otherwise you're staking your life on a $30 jack if it fails. Use a sharpee to mark the leaks.

Sounds like a man that speaks from experience. I like your way better then what i was planning on doing. Guess I will have to tell the Kido no pool. LOL
 

redneck joe

Supreme Mariner
Joined
Mar 18, 2009
Messages
10,919
and do NOT strive for perfection or we'll be seeing your posts from the looney bin. My tinny can sit in a slip for two weeks and take on a gallon or so. Running all day from the pressure I get 4-5 gallons. I live with it and from seeing / hearing what you are going thru I made a good decision.
 

EchoNovember

Petty Officer 1st Class
Joined
May 25, 2017
Messages
315
I'm more worried about sealing mine up enough so that it can sit in slip for up to a week and not sink. Beyond that, I'm good.
 

SHSU

Lieutenant Junior+Starmada Splash Of The Year 2019
Joined
Mar 8, 2017
Messages
1,725
and do NOT strive for perfection or we'll be seeing your posts from the looney bin.

What!!!! I thought I was already there when i agreed to get married :peep: Don't tell the Admiral!!!!!!

LOL

I live with it and from seeing / hearing what you are going thru I made a good decision

Yep, I agree that it isn't the best thing I ever decided to take on; however, I don't regret it. I love to tinker and it has been a lot of fun and extra experience. If I can get a day of fishing without sinking I can live with it. I don't think anything will ever be perfect but I will sure as hell try!!!!
 

SHSU

Lieutenant Junior+Starmada Splash Of The Year 2019
Joined
Mar 8, 2017
Messages
1,725
I'm more worried about sealing mine up enough so that it can sit in slip for up to a week and not sink. Beyond that, I'm good.


Currently don't have any plans to have boat in water more than a day but who knows
 
Status
Not open for further replies.
Top