1984 Starcraft 16ft Glutton for Punishment [Splashed July 2019]

Status
Not open for further replies.

SHSU

Lieutenant Junior+Starmada Splash Of The Year 2019
Joined
Mar 8, 2017
Messages
1,725
It wasn't that long ago that he was on his thread again and it's been a couple years since he applied the steelflex, post in his thread so others can see and if all else fails try to send him a PM about it.


Posted on his thread and will shoot PM if no response
Thanks WM
 

SHSU

Lieutenant Junior+Starmada Splash Of The Year 2019
Joined
Mar 8, 2017
Messages
1,725
Admiral and I are finally in the last stretch for riveting!!!! We finally finished the outer hull and have only the ribs and strakes left. For anyone interested, that is ~700 rivets to finish this part of the project!!!! Who would ever have thought ribs and strakes would need so many. I ordered 2000 3/16th rivets and have ~800-900 left (I am guessing). I never thought I would be using so many. My first estimate was 1200 total.... I think I was a little off. LOL. When I finally finish all the riveting, I will count how many I have extra (Or needed to order to finish project) once everything is done. We will see. Crossing fingers
 

Watermann

Starmada Splash of the Year 2014
Joined
Jan 12, 2013
Messages
13,787
and people thought I was crazy replacing a few hundred rivets :lol: but mine were bad with corroded shanks that were holding on only by a thread.
 

EchoNovember

Petty Officer 1st Class
Joined
May 25, 2017
Messages
315
I think after your experiences, I'm not replacing rivets unless they need replacing. Lol.
 

SHSU

Lieutenant Junior+Starmada Splash Of The Year 2019
Joined
Mar 8, 2017
Messages
1,725
and people thought I was crazy replacing a few hundred rivets :lol: but mine were bad with corroded shanks that were holding on only by a thread.


Ya, that corrosion will do it, plus open blind rivets with silicone :facepalm:. Well when I am finally done, I think anyone asking the question about rivteting a hull can easily reference this thread and learn NOT TO DO IT!!!!! I will say though, it has been a great learning experience!!!!
 

SHSU

Lieutenant Junior+Starmada Splash Of The Year 2019
Joined
Mar 8, 2017
Messages
1,725
I think after your experiences, I'm not replacing rivets unless they need replacing. Lol.


One happy viewer served!!!!

LOL, ya if you don't have to I wouldn't recommend it. From what I saw on your thread your boat is in great condition when it comes to the rivets. Just doing a leak test, replacing the couple bad ones and using gulvit will do wonders.
 

SHSU

Lieutenant Junior+Starmada Splash Of The Year 2019
Joined
Mar 8, 2017
Messages
1,725
Ok, so to finalize the riveting I will have to be able to get under the boat. I thought about flipping the boat, but the bucking bar would be the wrong direction and the Admiral wouldn't be able to hold it for very long. So thought about suspending it. You can see my bad attempt at drawing below. Want ya'lls thoughts on if you think this will work or if there are other options to get to these rivets.

1. Pull boat off trailer
2. Remove two strakes and keel
3. Attach rope to ceiling and make a sling to prevent boat from flipping
4. Lift and place it on two car jacks to support most of weight.
5. Rivet

Let me know ya'lls thoughts. Concerns I have are the boat flipping with admiral in it (That would be a bad day) or proper support of boat with admiral moving around as needed. Don't want the boat to bend or get any dents
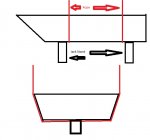
Suspending Boat.jpg
 

briangcc

Commander
Joined
Jul 10, 2012
Messages
2,360
My only concern with the jackstands is that they typically have a slight/mild V in them to cradle an axle/frame member/etc so as to not slip when used in an automotive application. What I would suggest is a piece of 1/2" ply or other between the boat and the jack stand so you don't end up with a couple of dings in the boat from the jack stands.

Also, I'd place (2) at the transom - as far out as possible as it'll be less likely to flip with the admiral inside...I agree that would be a very bad day in my household as well. I'd put at least (1) up on the bow - (2) would be preferable for the same reason I listed at the transom.

Other than that...solid plan with the straps as far as I am concerned. Can't have enough support, then again I over build things.
 

SHSU

Lieutenant Junior+Starmada Splash Of The Year 2019
Joined
Mar 8, 2017
Messages
1,725
My only concern with the jackstands is that they typically have a slight/mild V in them to cradle an axle/frame member/etc so as to not slip when used in an automotive application. What I would suggest is a piece of 1/2" ply or other between the boat and the jack stand so you don't end up with a couple of dings in the boat from the jack stands.

Also, I'd place (2) at the transom - as far out as possible as it'll be less likely to flip with the admiral inside...I agree that would be a very bad day in my household as well. I'd put at least (1) up on the bow - (2) would be preferable for the same reason I listed at the transom.

Other than that...solid plan with the straps as far as I am concerned. Can't have enough support, then again I over build things.


Fair points, I will add the extra 1/2" plywood or something similar. Also, I like the idea about the extra jack stands on the back. Will go pick some extra ones up just to make sure.
 

EchoNovember

Petty Officer 1st Class
Joined
May 25, 2017
Messages
315
Hang it from the ceiling, no supports underneath, and leave the admiral hanging. It's a new boat themed swing!
 

EchoNovember

Petty Officer 1st Class
Joined
May 25, 2017
Messages
315
There is a bracket that attaches to the side of the hull and to the transom near the eye bolts in my boat. You can kind of see the bracket here, and the eye bolts about 6-8 inches to the left of it. Let me know if your boat has these or not. If not, I'll get pictures and measurements so you can have them fabricated. The brackets go all the way up to near the top of the stern.

20170625_185707.jpg

There are three bolts for the bracket. 1/4" x 3" panhead aluminum machine screws.

bracket bolts.jpg

Hope this helps!
 

Attachments

  • 20170624_164051.jpg
    20170624_164051.jpg
    282.3 KB · Views: 12

SHSU

Lieutenant Junior+Starmada Splash Of The Year 2019
Joined
Mar 8, 2017
Messages
1,725
Hang it from the ceiling, no supports underneath, and leave the admiral hanging. It's a new boat themed swing!

LOL, admiral in a swing!!!!! I don't think I would be able to use the swing like I would want to LOL :whistle:

There is a bracket that attaches to the side of the hull and to the transom near the eye bolts in my boat. You can kind of see the bracket here, and the eye bolts about 6-8 inches to the left of it. Let me know if your boat has these or not. If not, I'll get pictures and measurements so you can have them fabricated. The brackets go all the way up to near the top of the stern.


There are three bolts for the bracket. 1/4" x 3" panhead aluminum machine screws.


Hope this helps!

Yep, we have those as well. We just reinstalled them this past weekend and added a couple extra 1/4 rivets to really secure it. Really firmed up up the gunwales!!!!
 

SHSU

Lieutenant Junior+Starmada Splash Of The Year 2019
Joined
Mar 8, 2017
Messages
1,725
Sooooo not sure how much work I am going to be able to do this weekend..... I was testing using some brazing rods on my gunwales to fill some holes. Well IDIOT me decided not to wear any PPE.... :doh: Bare foot i stepped into some melted aluminum rod that had dripped onto the floor then as i reacted to that I placed my right hand into the flame of my MAP torch..... :censored: Lets just say I have a nice second degree burn on my right hand. Lesson learned, ALWAYS WEAR PPE
 

EchoNovember

Petty Officer 1st Class
Joined
May 25, 2017
Messages
315
LOL, admiral in a swing!!!!! I don't think I would be able to use the swing like I would want to LOL :whistle:


Yep, we have those as well. We just reinstalled them this past weekend and added a couple extra 1/4 rivets to really secure it. Really firmed up up the gunwales!!!!

LOL!!!

How did it firm up the gunwales? Ours are pretty solid as it is. I want to reinforce them near the bow, specifically under the cleats in the event we need a tow. It's advised to not use the bow eye to get towed. No one ever plans to break down on the water, but if we do I want to make sure we can be safely towed back to shore without damaging the boat.

Oh, and I added extra fender washers behind my transom eyes. A large one and a small one to reinforce it further. Since the transom eyes are stainless steel, I used stainless steel washers. I think they're pretty solid now.
 

SHSU

Lieutenant Junior+Starmada Splash Of The Year 2019
Joined
Mar 8, 2017
Messages
1,725
LOL!!!

How did it firm up the gunwales? Ours are pretty solid as it is. I want to reinforce them near the bow, specifically under the cleats in the event we need a tow. It's advised to not use the bow eye to get towed. No one ever plans to break down on the water, but if we do I want to make sure we can be safely towed back to shore without damaging the boat.

Oh, and I added extra fender washers behind my transom eyes. A large one and a small one to reinforce it further. Since the transom eyes are stainless steel, I used stainless steel washers. I think they're pretty solid now.


With how bad the riveting was, it was loose already. Just re-securing it properly stiffened it up immensely. For the Bow eye, I upgraded to 3/4 inch rivets when we redid it to improve its strength too. Where did you see not to use the bow ring for being towed? From my quick research it seems they recommend you use the bow eye if you are being towed. Not sure that just adding anything under gunwale will help improve the structural strength of the cleats for towing. If I was offering to tow someone, i would use my transom eyes with a bridal as I know those will have substantial strength.
 

EchoNovember

Petty Officer 1st Class
Joined
May 25, 2017
Messages
315
I'd have to find it again. It was mentioned to use the cleats if possible as it provides better control. That said, I'd still prefer to reinforce the bow eye and cleats if possible.
 
Status
Not open for further replies.
Top