1984 johnson 90hp carb leaking fuel out air cleaner

oldboat1

Fleet Admiral
Joined
Apr 3, 2002
Messages
9,612
Think I would borrow a working portable tank and line, and empty contents. Use a gallon of fresh gas @ 25:1 and see if it will fire for you. It has to spin at somewhere around 300 rpm for proper ignition, so next step would be to at least disassemble and clean (electrical cleaner) the starter, then try again.
 

Catchafish

Petty Officer 3rd Class
Joined
Oct 27, 2020
Messages
85
Sorry, forgot to mention it's brand new starter from dB electric on eBay. Doesn't mean it's not bad but.... I will still test armature.
I am using a separate gallon gas tank 2-3ft from motor @ 25:1. The gas just doesn't want to go into the crankcase.
I have read a sheared flywheel key could be the culprit as well.
also,, I know Joe reeves said there are some carbs that have a single passage that if its blocked, no gas can get past the carb into the intake, however that was a 30hp or similar he was speaking too but didn't know if that might apply to me as well. Picked up the new coil today. Will work on it Sunday or Monday as time permits. Maybe I should soak the carbs or boil them?.?.
 

ct1762@gmail.com

Master Chief Petty Officer
Joined
Jan 17, 2019
Messages
859
i would never buy those cheapo aftermarket ones after a customer brought me a 200hp that it took about 4 flywheel teeth out the bendix slammed so hard! those starters are really really easy to rebuild with new brushes and springs. kits are $10-$15 to get them spinning like new. i use gun cleaning spray to get all the old carbon out. get base of armature shinning to were it looks like a penny in good condition... need all the continuity you can get.
Just a tip on first start: give it the absolute minimum amount of timing/throttle to get her to start, then don't touch it for 10 full minutes. let it idle. no throttle. check head temps 125-152.5 degrees. 25:1 and premium fuel for the first 9 hours. after 45 minutes of going up to 50% throttle, gently give it full throttle if your boat planes easily. at this point you are really home free, just avoid full throttle for more than a minute or so, which of course is easy if your boat is light and fast.
 

ct1762@gmail.com

Master Chief Petty Officer
Joined
Jan 17, 2019
Messages
859
carbs: don't boil them! just use a syringe and alchohol to clear the passages out. sounds like your idle jets might be clogged. has 2 little tiny air bleeds that need to be clean, all holes behind those core plugs clean but those are large. did you not touch the carbs at all after the rebuild?
 

Catchafish

Petty Officer 3rd Class
Joined
Oct 27, 2020
Messages
85
I replaced the coil and got 1/2inch spark on all 4 now.
My plan is to attempt to start the motor by spraying gas/oil mix into the carb throats. But isnt the primer essentially doing the same thing, as spraying fuel/oil in the throat? If it starts, then need to revisit the carbs again.
If it doesn't start, possibly a timing/sync issue? I did not do a timing and sync.
 

ct1762@gmail.com

Master Chief Petty Officer
Joined
Jan 17, 2019
Messages
859
I replaced the coil and got 1/2inch spark on all 4 now.
My plan is to attempt to start the motor by spraying gas/oil mix into the carb throats. But isnt the primer essentially doing the same thing, as spraying fuel/oil in the throat? If it starts, then need to revisit the carbs again.
If it doesn't start, possibly a timing/sync issue? I did not do a timing and sync.
you would be doing yourself a big disservice by not rebuilding the carbs. takes me maybe 45 minutes removal to installation! the throttle cam needs to advance BEFORE the throttle butterflys move, in a nutshell. as long as they are closed at idle and just begin to open when the timing mark is aligned with the roller, it will atleast idle.
 

Catchafish

Petty Officer 3rd Class
Joined
Oct 27, 2020
Messages
85
you would be doing yourself a big disservice by not rebuilding the carbs. takes me maybe 45 minutes removal to installation! the throttle cam needs to advance BEFORE the throttle butterflys move, in a nutshell. as long as they are closed at idle and just begin to open when the timing mark is aligned with the roller, it will atleast idle.
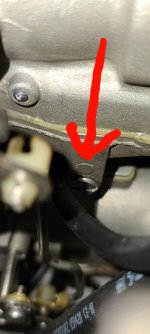
I have gone through the carbs and replaced what looked worn. I can go through them again . The manual states I have a type III carb that has a low, intermediary and high speed orifice. It states the low speed orifice is located where I have drawn an arrow on the attached photo. Is that supposed to come out somehow? The manual shows a plug there instead of what I am seeing. Maybe I am looking at a different model???
 

Attachments

  • 20210105_170940.jpg
    20210105_170940.jpg
    313.5 KB · Views: 5
Last edited:

racerone

Supreme Mariner
Joined
Dec 28, 2013
Messages
37,829
Sorry----I see a plug where the red arrow points.----That is NOT an adjusting screw for mixture !!----Some carburetors you have to remove the float bowl to get at the low speed orifice plug.------You have to take that plug out to find the high speed orifice plug ( calibrated hole ) for fuel.-----Perhaps carburetors are not factory original.
 
Last edited:

Catchafish

Petty Officer 3rd Class
Joined
Oct 27, 2020
Messages
85
Sorry----I see a plug where the red arrow points.----That is NOT an adjusting screw for mixture !!
Just to be clear we are not talking about the high speed orfice which has the drain screws at the very bottom. Were talking about the possible orfice immediately above, correct. If so, I don't know how to go about removing it.
 

racerone

Supreme Mariner
Joined
Dec 28, 2013
Messages
37,829
Well----There should be a low speed orifice there ! ----One for each side of the bowl..
 

ct1762@gmail.com

Master Chief Petty Officer
Joined
Jan 17, 2019
Messages
859
the screw you were pointing to in the pic is to be removed, exposing the HIGH SPEED orifice deep inside, with an identical setup on the other side of the carb for a total of 4 high speed jets. now, once the carb bowl is removed, you will see a second SET of low speed jets. something like size #25 or 26. they are a different style than the high speed jets. on the smaller hp 1 5/16 ones, i believe there is a relief hole under the idle channel cover on top. make sure both the idle channels and that hole is clear, along with the 2 tiny air bleeds pointing down into the carb opening throats. basically clean the whole thing really well with alchohol and syringe or an ultrasonic cleaner with some de-greaser in it.
 

Catchafish

Petty Officer 3rd Class
Joined
Oct 27, 2020
Messages
85
Sorry----I see a plug where the red arrow points.----That is NOT an adjusting screw for mixture !!----Some carburetors you have to remove the float bowl to get at the low speed orifice plug.------You have to take that plug out to find the high speed orifice plug ( calibrated hole ) for fuel.-----Perhaps carburetors are not factory original.
Good news, I am NOW working from an OMC manual.

There is an orifice there, you access it as you stated. I have already made sure those are clean. The high speed orifice you can get to without taking the float chamber(bowl) off.
I believe the carb is factory original. The lasered metal tag part number(attaches with a float bowl screw) matches the part number I see in the diagrams for this motor. 393769 and 393770

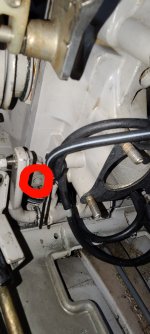
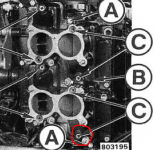
When removing the carbs , I noticed a small fuel leak at the bottom reed box screw, which the screw was not tight. Possibly this negatively impacted vaccum/suction of fuel to enter intake? Screw circled in red
1610062911494.png


The float chamber was full of gas, so I know gas is getting to the carb. I went over both carbs slowly, I was able to see light(flashlight on phone) on every hole and orifice possible. I also performed all the syringe and iso alcohol tests mentioned in the service manual, which all looked good. I can not understand why, during the suction/vaccum effect caused by the piston traveling upward, fuel is not coming up to the idle chamber via the idle emulsion tube, and out idle discharge passage to the intake.

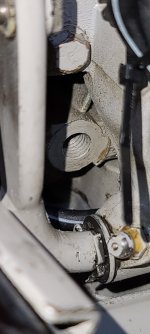
Is a bolt missing or is this not supposed to have a bolt, in the attached pics? I took one pic from further and one close up also circled in red.

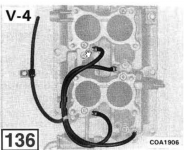
Finally, the cable routing of the recirculation hoses in the manual is different than the picture of the hoses before I dissasembled. Do I trust the manual or my picture? Below is the manual. my pic has the hoses running to the check valves on the same sides.
1610063143096.png
 

Attachments

  • 20210107_170742.jpg
    20210107_170742.jpg
    299.3 KB · Views: 9
  • 20210107_170825.jpg
    20210107_170825.jpg
    257.4 KB · Views: 12

racerone

Supreme Mariner
Joined
Dec 28, 2013
Messages
37,829
Those screws ( in red circle ) hold the reed boxes.----So you might have to look into that and replace those 4 gaskets.----That hole with the " missing bolt " might not be used for your year.-----I believe that hole was used for a shift pivot bolt on the 73 to 77 V-4 models.
 

Catchafish

Petty Officer 3rd Class
Joined
Oct 27, 2020
Messages
85
Those screws ( in red circle ) hold the reed boxes.----So you might have to look into that and replace those 4 gaskets.----That hole with the " missing bolt " might not be used for your year.-----I believe that hole was used for a shift pivot bolt on the 73 to 77 V-4 models.
I did put on 4 fresh gaskets and new intake to cc gasket. The screw wasn't tight. I loctited it with thread locker blue and tightened.
Any thoughts on the recirculation hoses.
Should I spray fuel oil mix into cylinders and piston to keep them semi lubricated. Getting nervous I am running out of oil, I have been testing spark and combustion with no fuel mix entering cylinders since assembly.
 

ct1762@gmail.com

Master Chief Petty Officer
Joined
Jan 17, 2019
Messages
859
is this a VRO/OMS motor? looks grey like an 84' model so i'm guessing premix. fuel pump mounted correctly? reed gaskets mounted correctly? i cant see how recirculation lines would prevent the crank case from pulling fuel out the carbs.
 

Catchafish

Petty Officer 3rd Class
Joined
Oct 27, 2020
Messages
85
is this a VRO/OMS motor? looks grey like an 84' model so i'm guessing premix. fuel pump mounted correctly? reed gaskets mounted correctly? i cant see how recirculation lines would prevent the crank case from pulling fuel out the carbs.
You nailed it. It's a 1984. Vro was pulled off. I am premixing. Reed gaskets should be good. It's the block fillers that we're giving me trouble. I proceeded with the install.
 

Catchafish

Petty Officer 3rd Class
Joined
Oct 27, 2020
Messages
85
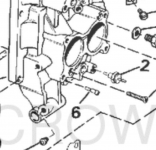
actually. Looking at the intake diagram. partnumber6 It looks like part number 6 should somehow screw into that bolt hole???????? If so, what attaches to the nipple and screws into the bolt hole??
20210107_170825.jpg

1610167000303.png
 

healey8390

Petty Officer 1st Class
Joined
Nov 19, 2010
Messages
215
actually. Looking at the intake diagram. partnumber6 It looks like part number 6 should somehow screw into that bolt hole???????? If so, what attaches to the nipple and screws into the bolt hole??
20210107_170825.jpg

View attachment 331550
That hole is not your issue. It's missing on mine as well and as much as I've been working on it over the last year or so I don't ever remember anything being in there. Plus you can see it's painted.
 
Top