1984 johnson 90hp carb leaking fuel out air cleaner

Catchafish

Petty Officer 3rd Class
Joined
Oct 27, 2020
Messages
85
What is the factory number on the old seal?----- The crankshaft METAL sealing rings and gaps are what they talk about.----Your motor has those !!-----I just ordered a factory original manual for a 2009 E-TEC off E-bay.-----Will get it in within 2 weeks.----No idea where you are looking and why you would have to wait 4 months for a common manual !!
The original lower is 321668 and I can't seem to find the upper. but again, that is identical to what I pulled out which is E330. If there is a factory number on it, it is faded and beyond recognition. I am more concerned about the lower seals, is seems I am replacing 1 original seal with two.

OEM manual part number is 0394607
I have tried crowleymarine.com boats.net marineengine.com ebay.com
I am not finding it to be common
 

Catchafish

Petty Officer 3rd Class
Joined
Oct 27, 2020
Messages
85
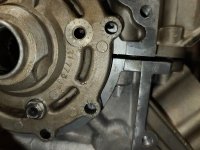
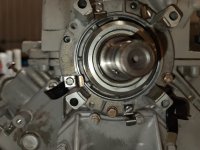
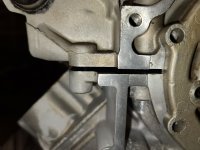
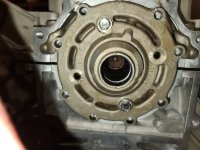
I really hope this is acceptable, and the case bolts will close the gap. But does the gap around the lower crankcase too far apart? I have the lower crankcase head installed on the crank, but the bolt holes on the lower crankcase head don't align with the crankcase itself. The upper crankcase head DOES align very closely and the gap between crankcase covers is much smaller. Please see attached. I messed with it a little but couldn't really get the crank and assembly to drop any lower inside the crank cover. It seems to be as far down as it will go. see attached.

Thanks for all the help.
 

Attachments

  • 1_lower.jpg
    1_lower.jpg
    312.1 KB · Views: 8
  • 1_upper.jpg
    1_upper.jpg
    862.4 KB · Views: 8
  • 2_lower.jpg
    2_lower.jpg
    1.1 MB · Views: 8
  • 3_lower.jpg
    3_lower.jpg
    1.1 MB · Views: 8

Catchafish

Petty Officer 3rd Class
Joined
Oct 27, 2020
Messages
85
The center bearing is properly fitted on the wee dowel pin ????
correct, i have quadruple checked this. even purposely rotated it off, to hear and feel it slide back in again. the upper crankcase sits pretty good, so I think that suggests center main bearing is seated, assuming the crankshaft is level.
 

racerone

Supreme Mariner
Joined
Dec 28, 2013
Messages
37,849
Something is wrong !-----I have never had to pull one together with gaps like that !!----And do not use brute force either.
 

Catchafish

Petty Officer 3rd Class
Joined
Oct 27, 2020
Messages
85
Ok, so gap is indeed to far apart. I will dig into it tomorrow and see what I can find. Ughhh......
Remembered this as I was typing this response. After installing the lower bearing plate and pounding on the bearing, I noticed the lazored word TOP on the bearing plate that is facing the driveshaft. I could thread figure this could make any difference with alignment as the holes are mirrored if it was flipped over. Don't see how that could be the problem tho. Just came to mind.
 

Catchafish

Petty Officer 3rd Class
Joined
Oct 27, 2020
Messages
85
The ball bearing assembly onto the lower crankshaft does not exactly slide right on. I had to use a puller to get the original ball bearing off, it was an extremely tight fit. After pounding the upper bearing into the assembly I assumed the same was for the ball bearing in the lower.
 

racerone

Supreme Mariner
Joined
Dec 28, 2013
Messages
37,849
Perhaps------Google----SKF induction bearing heater.------Bearings are heated for a painless installation.------Work experience counts here.
 

Catchafish

Petty Officer 3rd Class
Joined
Oct 27, 2020
Messages
85
Good too know. Dang they can get expensive.
Do you think the bearing plate could be the issue?? Or not likely?
 

racerone

Supreme Mariner
Joined
Dec 28, 2013
Messages
37,849
I digress---The retainer plate must be located in a " pocket " as well.---Not sure how you are working as I can not look over your shoulder.------How long in minutes did it take you to tighten the 8 connecting rod screws.----Did you dip them in oil and then torque to 370 INCH LBS ??----Work carefully and without a big hammer !----Bearings are installed using heat.----I have used hot water on $10,000 stainless bearings.-----Bearing heaters.----Bearing on 1/4" plate with wee torch underneath. ----Work carefully I say.
 
Last edited:

Catchafish

Petty Officer 3rd Class
Joined
Oct 27, 2020
Messages
85
The retainer plate seems pocketed, it sits snug into the lower crankcase head assembly. However I was not able to completely follow this in my manual. I didn't use the guide bolts but used to bolts into the retaining plate, as shown in the picture in previous post. It says "
The lower bearing retainer plate has two
ears which index into two recesses in the
lower bearing cap. Therefore, rotate the
retainer until the ears on the retainer plate
index with the two recesses in the bearing
cap, then install two 1/4x28 guide pins
through the lower bearing cap and into the
retainer plate"
It took me probably an hour for the 8 connecting screws. Following the manual, youtube and my powerhead instructions, trying to align all 3 sources when I can, is always a plus. I did 3 separate phases of torquing the screws and checking the break in the rod end caps with fingernail. to 30ft lbs(360 inch lbs). I did dip rod bolts in oil.

You would be beyond frustrated watching over my shoulder haha.

Dang!!!!! ya, $10,000 stainless bearings, I am NOT touching those!!!!!!!!!

Thanks for the help racer. Hoping I can determine why that crank is seating or fix the gap between the cases. I need to move forward.
 

Catchafish

Petty Officer 3rd Class
Joined
Oct 27, 2020
Messages
85
I took the upper and lower crankcase head assembly off, removed the connecting rods and crankshaft, and after watching it "teeter" in the center I new it had to be as racer initially mentioned, center bearing wasn't fitted on the centering dowel. After practicing (no joke) with the old center bearing, I put the crank back on and was able to get the center main bearing to drop into the dowel.

Now to reassembly.

Thanks Racer
 

Catchafish

Petty Officer 3rd Class
Joined
Oct 27, 2020
Messages
85
Amazing that you checked it 4 times , amazing as per post #64.
allow me to defend my newbie ignorance.........
When I rotated the main bearing, the break in the two halfs of that bearing would catch then click on the edge of the block mating surface. The crank is hard to rotate when the center main bearing is not on that dowel as there are "catches" when rotating the crank(RED FLAG). The click sound and the catch happened at the same time. Click + Catch = seated
Perfect storm I guess.
You buy it ^^^^^^^????

Now actually feeling the center main bearing seat in the dowel pin there is a noticeable difference, the main difference being it dropped into the crankcase deeper, which is what I was needing all along. Bolts in the upper and lower crankcase head assembly align perfectly.
 

ct1762@gmail.com

Master Chief Petty Officer
Joined
Jan 17, 2019
Messages
859
don't worry... the the 3 cyl i did this fall had me flummoxed as well. that one has 3 (yes, 3) dowl pins to align... 2 for the crank journals and 1 for the upper crank bearing. i've done a few of these powerheads before, but for some reason this one got me. finally, i took a pencil and marked were the dowl pins were by marking the crank flange . made it easy after that. but yea... the rods/crank will"tick" and partially catch if they aren't aligned.
 

Catchafish

Petty Officer 3rd Class
Joined
Oct 27, 2020
Messages
85
don't worry... the the 3 cyl i did this fall had me flummoxed as well. that one has 3 (yes, 3) dowl pins to align... 2 for the crank journals and 1 for the upper crank bearing. i've done a few of these powerheads before, but for some reason this one got me. finally, i took a pencil and marked were the dowl pins were by marking the crank flange . made it easy after that. but yea... the rods/crank will"tick" and partially catch if they aren't aligned.
Thanks ct1762, it was a great learning experience. Fun and frustrating. I couldn't imagine aligning three! Atleast at this point. Making notes to help when possible is becoming a more common practice as I continue to work.
I got the crankshaft all sealed and torqued today, just the accessory stuff left like exhaust, intake, bypass/port cover, reeds, carbs...etc. Feels good to progress past sealing that case. I spent all AM rehearsing and taking notes lol. stuff most people on this forum do in their sleep. But it went real slick. I owe a lot to racer and this forum.

Good luck on your future builds!!!
 

Catchafish

Petty Officer 3rd Class
Joined
Oct 27, 2020
Messages
85
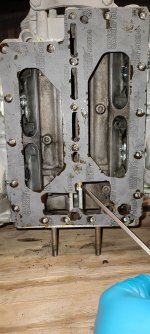
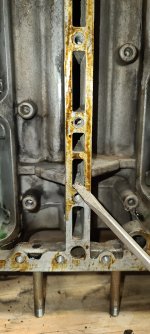
New gasket from WSM power head rebuild kit is partially covering bolt/screw hole and port directly above. Is this correct? Gasket sealer is setting so quick response most appreciated. see pics below. THANK YOU
20201204_075840.jpg

20201204_080042.jpg
 

Catchafish

Petty Officer 3rd Class
Joined
Oct 27, 2020
Messages
85
ok, i am seeing this is for the 140hp not my 90hp. So I use one of the other gaskets provided for the exhaust manifold.
 

ct1762@gmail.com

Master Chief Petty Officer
Joined
Jan 17, 2019
Messages
859
ok, i am seeing this is for the 140hp not my 90hp. So I use one of the other gaskets provided for the exhaust manifold.
that sealer should be non-hardening so you have plenty of time, but is that brp sealer or permatex aviation stuff?
 
Top