1984 johnson 90hp carb leaking fuel out air cleaner

Catchafish

Petty Officer 3rd Class
Joined
Oct 27, 2020
Messages
85
The WSM kits you can go in .010 sizes..you can get .010 /.020/.030/.040 OS pistons. 020 is usually the norm as it will clean up most cylinders except deep grooved ones.
Thanks for that explanation, makes complete sense. I see those power head rebuilt kits by wsm and Happiemac on ebay. Happiemac is a bit cheaper, but WSM seems to be prefered on this fine forum.
 
Last edited:

ct1762@gmail.com

Master Chief Petty Officer
Joined
Jan 17, 2019
Messages
859
Racer is it correct to assume #'s 1 and 3 are usually scored/loose rings because that stbd side doesn't get enough cooling water being up higher and getting the water last compared to port side? wouldn't it be wise to 1/8npt tap and thread an indicator elbow into the block on the outside starboard area to burp all the air out? i've been doing that and it seems to keep both sides quite even in temp
 

racerone

Supreme Mariner
Joined
Dec 28, 2013
Messages
37,829
Nope------There is nothing wrong with the capacity of the water pump for that little V-4 motor !!-----After all it is the same water pump / repair kit as used on the V-6 and V-8 outboards is it not !----No need to do any drilling / modifications at all !!
 
Last edited:

ct1762@gmail.com

Master Chief Petty Officer
Joined
Jan 17, 2019
Messages
859
interesting. i guess the majority of failures has to do with improper maintenance of the t stats and poppet valves, and water pump too
 

Catchafish

Petty Officer 3rd Class
Joined
Oct 27, 2020
Messages
85
Trying to get started rebuilding piston cyl and rings. However, whats the min and max allowable ring gap should be for rings that are .02" out? The service manual states "The maximum and minimum allowable ring gap is .07-.17" (1.8-4.3mm)" But I can't even find a feeler gauge that goes up to the size .17". Thats nearly an 1/8 of an inch. Is this a typo in the manual?
Thanks for the help
 

racerone

Supreme Mariner
Joined
Dec 28, 2013
Messages
37,829
??---An 1/8" would be 0.125"------0.170 " would be bigger yes.-----The 0.170 "is obviously a TYPO , no doubt about that here.----Use 0.017 instead as that is correct.------Are you using a factory manual or something that belongs in the wee house with the moon in the door.-----Sorry if this appears blunt to you.
 

Catchafish

Petty Officer 3rd Class
Joined
Oct 27, 2020
Messages
85
??---An 1/8" would be 0.125"------0.170 " would be bigger yes.-----The 0.170 "is obviously a TYPO , no doubt about that here.----Use 0.017 instead as that is correct.------Are you using a factory manual or something that belongs in the wee house with the moon in the door.-----Sorry if this appears blunt to you.
There are no manuals in stock, that I could find (4 months out if you order it today), so I am using the manual from boatinfo.no located below. Specifically this page here on 3-33 . Are these factor OEM manuals, I can't see any author or copyright info. They same "ok" but who am I to judge.
I will use 0.017, Thank you!!!
haha, no worries. I heard the seloc manuals were difficult to wipe with, so I am staying clear of them.
 

ct1762@gmail.com

Master Chief Petty Officer
Joined
Jan 17, 2019
Messages
859
Trying to get started rebuilding piston cyl and rings. However, whats the min and max allowable ring gap should be for rings that are .02" out? The service manual states "The maximum and minimum allowable ring gap is .07-.17" (1.8-4.3mm)" But I can't even find a feeler gauge that goes up to the size .17". Thats nearly an 1/8 of an inch. Is this a typo in the manual?
Thanks for the help
should be .017'', not .17''. mine always present those figures correctly... are you using some website or something?
 

Catchafish

Petty Officer 3rd Class
Joined
Oct 27, 2020
Messages
85
I am stuck attempting to remove the "Crankcase Head" on the lower part of the crank Part Number 12 so I can replace seals and bearings. My manual skims over this and I can't seem to find any good info on removing. I assume I am doing something stupid. All screws/bolts are removed. The upper crankcase head came right off. Do I need to break it free? I don't want to damage if something is still holding it on.
As always, thanks for the help.
 
Last edited by a moderator:

Catchafish

Petty Officer 3rd Class
Joined
Oct 27, 2020
Messages
85
I was hoping I wouldn't need all this hand holding but............
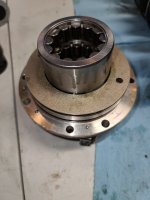
I used the torch method to heat up the upper bearing housing and beat the original bearing out using a socket and hammer. I heated up the housing, applied 2 stroke oil to the inside housing, and the bearing. I have been hitting the new bearing into place, using the old bearing with a cloth in between to avoid damage(in my mind). But it does not want to go in(about %20 in now). Do I need to REALLY heat up the housing to expand more, so bearing slides in? I have an infrared temp gauge if there is a sciency temp number to get the housing heated to. I do NOT want to heat the bearing as that will cause it to expand, correct? Do I freeze the bearing? I dont want to break anything obviously. see attached pic.
 

Attachments

  • 20201201_085254.jpg
    20201201_085254.jpg
    729.8 KB · Views: 6

racerone

Supreme Mariner
Joined
Dec 28, 2013
Messages
37,829
Near my " granpa's farm " the road used to wash out every spring.-----He would hide in the bushes with the team.------When folks came along , got out of the car and looked at the washout he said " for a 1 $ I will hook up the team and pull you through "------When they balked at the steep price he said " if you want me to hook up halfway through it is 5$ "
 

Catchafish

Petty Officer 3rd Class
Joined
Oct 27, 2020
Messages
85
Near my " granpa's farm " the road used to wash out every spring.-----He would hide in the bushes with the team.------When folks came along , got out of the car and looked at the washout he said " for a 1 $ I will hook up the team and pull you through "------When they balked at the steep price he said " if you want me to hook up halfway through it is 5$ "
my take away is I should have asked before attempting? I was fairly confident after reading on the forums specifically faztbullets post where he mentions a torch or oven "If you use a oven set it on top of a small saucepan and it wil drop out in pan when it gets hot enough. Have new bearing on hand and remove housing and just drop it in and as it cools the housing will tighten around it."
I will pound it back out and start over, unless I am missing your point.
 

Catchafish

Petty Officer 3rd Class
Joined
Oct 27, 2020
Messages
85
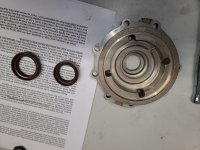
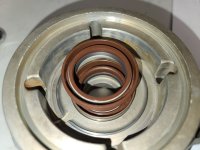
Can anyone tell me, or point me to a video, documentation...etc. of how to safely install the upper crank bearing without an arbor press?

Also, are the two seals in the attached picture supposed to be used or is one extra, just depends on what one fits??

Thanks
 

Attachments

  • 1.jpg
    1.jpg
    938 KB · Views: 6
  • 3.jpg
    3.jpg
    905 KB · Views: 6

Catchafish

Petty Officer 3rd Class
Joined
Oct 27, 2020
Messages
85
Can anyone tell me, or point me to a video, documentation...etc. of how to safely install the upper crank bearing without an arbor press?

Also, are the two seals in the attached picture supposed to be used or is one extra, just depends on what one fits??

Thanks
I ended up freezing the bearing and heating the upper crankcase head and bearing assembly, also upgraded to a 4lb soft mallot and was able to get it in. Can't be scared of the heat, lesson learned, I was being to overly cautious about damaging parts with the torch.

Still would appreciate help on the seals. From reading, it seems to be a grey area and highly dependent on your boat motor specifically. The seloc manual doesnt cover this aftermarket seal(s)
 

racerone

Supreme Mariner
Joined
Dec 28, 2013
Messages
37,829
The seloc manuals are best used in the wee house with the moon in the door.----Any numbers on the new seals ?----Any numbers on the old seal ?----Magnifying glass may be required to read numbers on the rubber .
 

Catchafish

Petty Officer 3rd Class
Joined
Oct 27, 2020
Messages
85
The seloc manuals are best used in the wee house with the moon in the door.----Any numbers on the new seals ?----Any numbers on the old seal ?----Magnifying glass may be required to read numbers on the rubber .
I know seleoc sucks, but as I mentioned, OEM is 4 months out.
All 3 seals say TTO on them. part number "d1129" and "d696" for what I assume to be lower, and upper is "E330" which actually looks identical to what I pulled out.
Google didnt turn up much for me.
I see in WSMs (ebay) instruction to "orient all crankcase seal rings, if equipped, with the gaps facing up" Which makes sense for the lower seals but NOT the upper seal, unless that seal was originally installed incorrectly.

The original lower is 321668 and I can't seem to find the upper. but again, that is identical to what I pulled out E330
 
Last edited:

racerone

Supreme Mariner
Joined
Dec 28, 2013
Messages
37,829
What is the factory number on the old seal?----- The crankshaft METAL sealing rings and gaps are what they talk about.----Your motor has those !!-----I just ordered a factory original manual for a 2009 E-TEC off E-bay.-----Will get it in within 2 weeks.----No idea where you are looking and why you would have to wait 4 months for a common manual !!
 
Top