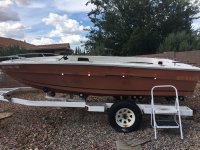
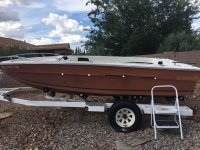
1981 Citation Marquis restoration...

Luposian

Petty Officer 2nd Class
Joined
Aug 15, 2015
Messages
111
Ok. Seems you are going to rebuild it the way you intended, any advice from people who have rebuilt boats correctly, including me, don't mean much to you. So with that said, I will not give my opinion on what should or should not be done.

You assume incorrectly. But you are dealing with someone who doesn't just blindly trust people. If I think I have reason to believe an unconventional tactic could actually work (to a certain degree) and someone comes along and says, "But that will kill you!", I simply want to know WHY, in an irrefutable way. HOW is going about it the way I've mentioned, so horribly disasterous, I might as well drill a hole in the bottom of the hull and name my boat "Titanic"? :-D

It's not like the foam is soaked with gasoline and producing explosive fumes. It's not moldy. It's not producing noxious rotting fumes. It's not producing black mold spores. It's incapable of providing whatever buyancy it USED to provide. Direct contact with it WOULD spread (wick) moisture into new wood. And, likewise, with the remaining rotted plywood... if there were direct contact between it and new plywood, I can see some concern. It is still moist, so there is possibilty that it could wick moisture/rot into new plywood, to some degree. How far? Unknown. However, this is why I would try to isolate the new plywood from the rotted plywood and the moist foam.
 

kcassells

Fleet Admiral
Joined
Oct 16, 2012
Messages
8,728
A full moon somewhere?
Werewolf-Smoking-Under-a-Full-Moon--50843.jpg
 

Luposian

Petty Officer 2nd Class
Joined
Aug 15, 2015
Messages
111
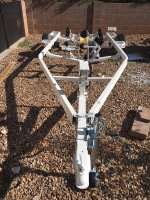
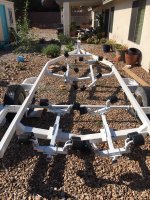
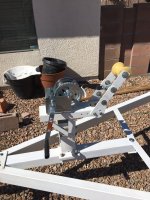
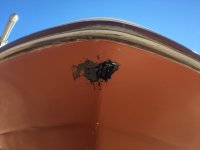
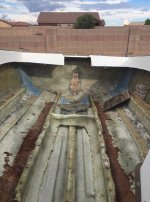
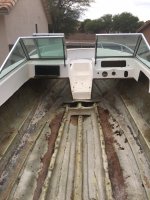
A little over 1 year later... I put my boat on a Brownell Boat Lifting System ($950) and pulled the trailer out... and restored it. New rollers, derusted it (Rustoleum Rust Removing Gel), and gave it a nice (if albeit sloppy (spray can)) white paint job, new wiring/lights, new winch/strap, etc. And I'm working on the boat again. Due to a lack of finances (and the whole Covid-19 fiasco), I'm having to do everything myself (like restoring the trailer), so things will be slow going but done to my satisfaction. Not perfect, but sufficient. I've also since patched (with grey Marine Tex) the bolt holes that some idiot previous owner put in the sides of the boat, to anchor fishing rod holders to (on the inside). Applied some to the keel (to cover/repair "beaching rash" down to fiberglass) and a couple spots on the bow. It's sanding out pretty well (fairly smooth). When I paint it (water-based, preferrably, due to fumes), it will probably look far from perfect, but at long as it's water-tight, perfect looks is not important. It's my boat and I'm proud of it...
 

Attachments

  • IMG_1542.JPG
    IMG_1542.JPG
    1.1 MB · Views: 6
  • IMG_1545.JPG
    IMG_1545.JPG
    1 MB · Views: 6
  • IMG_1682.JPG
    IMG_1682.JPG
    747.1 KB · Views: 6
  • IMG_2083.JPG
    IMG_2083.JPG
    597.8 KB · Views: 6
  • IMG_2085.JPG
    IMG_2085.JPG
    634.6 KB · Views: 6
  • IMG_2086.JPG
    IMG_2086.JPG
    619.5 KB · Views: 6
  • IMG_2089.JPG
    IMG_2089.JPG
    412 KB · Views: 6

Luposian

Petty Officer 2nd Class
Joined
Aug 15, 2015
Messages
111
Ok, picking up where we last left off, I've since removed the windshield (a 5-piece windshield, removed in 2 pieces... care to figure out how I managed that? :-D), pulled the rubrail "rubber" and preparing the hull for cap removal. Ah, the joy of drilling out all those rivets awaits me!

I'm attempting a reverse approach to hull stabilization. I'm going to use two or three 2x2's screwed to the inside of the hull, to prevent the hull from both bowing out as well as flexing in. I'm hoping to be able to use the previous holes that were made in the hull (which I filled in with epoxy about a year earlier). So I could use some help advising if I need two or three brace points. and if they can be made where the screw holes are or if they need to be higher up.

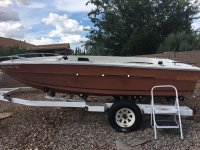
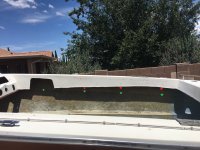
The two white dots are where existing holes were. The yellow dot is a middle point where I could add a third brace point (but would have to drill a new hole). Is this number of braces and spread of braces (distance/location) sufficient or do they need to be further apart?

The second picture shows what it will look like on the inside.
 

Attachments

  • 2x2 braces.jpg
    2x2 braces.jpg
    1.3 MB · Views: 7
  • IMG_3596.JPG
    IMG_3596.JPG
    1.1 MB · Views: 7

Baylinerchuck

Commander
Joined
Jul 29, 2016
Messages
2,726
Cradles on the outside are the way to go. I simply used some dimensional lumber between the rollers and the hull to help spread the load some. The idea is to keep the hull from flexing. Once you add structure after the hull flexes, it becomes impossible to get the cap to fit. Your method of bracing from inside will work, but all those braces will be a pain in the arse to work around.

Catching up on the project from the first post, you really need to remove all the foam and rot if you haven’t done so. Also the new foam when solid and bonded to the stringers and under the deck creates so much rigidity and structure in these boats. Especially when you have a wobble roller trailer. The pressure points of the wobble wheels is spread out and won’t cause the hull to conform and bend with foam. It really ties everything together structurally. It’s way more than floatation. Pour in foam is really the only way to go.
 

Luposian

Petty Officer 2nd Class
Joined
Aug 15, 2015
Messages
111
Cradles on the outside are the way to go. I simply used some dimensional lumber between the rollers and the hull to help spread the load some. The idea is to keep the hull from flexing. Once you add structure after the hull flexes, it becomes impossible to get the cap to fit. Your method of bracing from inside will work, but all those braces will be a pain in the arse to work around.

Catching up on the project from the first post, you really need to remove all the foam and rot if you haven’t done so. Also the new foam when solid and bonded to the stringers and under the deck creates so much rigidity and structure in these boats. Especially when you have a wobble roller trailer. The pressure points of the wobble wheels is spread out and won’t cause the hull to conform and bend with foam. It really ties everything together structurally. It’s way more than floatation. Pour in foam is really the only way to go.
Ok, let's go with the end of your first paragraph. "Your method of bracing from inside will work, but all those braces will be a pain in the arse to work around." That's all I need to know... I don't care about the hassle of working around the braces, I just need to know they'll work. Now, what about the location... are they about right vertically and laterally? Will three be good? How far apart should they be? Where does a boat's hull bow outward most? At the ends (bow and stern) or mainly in the middle? That would determine where to position the 2x2 braces.

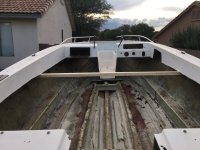
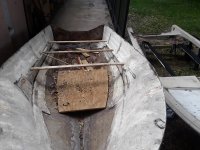
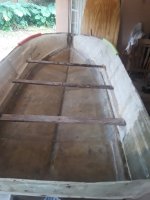
As I'm going to have to gut out everything on this boat... I've already torn out most of the floor (I'm pulling the cap, to get to the last bit under the bow) and the transom is torn out and the inside of the outer skin is sanded pretty much clean (as shown). Once everything is out, then I'll proceed to the next step and decide how to reconstruct the stringers, bulkheads and such.
 

Attachments

  • 279193338_10162192816968298_8324668137285513898_n.jpg
    279193338_10162192816968298_8324668137285513898_n.jpg
    71.8 KB · Views: 7
  • IMG_3468.JPG
    IMG_3468.JPG
    614.2 KB · Views: 7

buxmj

Petty Officer 1st Class
Joined
Jun 9, 2018
Messages
294
I used something similar to what you are thinking of doing, interior cross bracing. It does get in the way moving around but worked for me. I have to add that my project is smaller than yours at under 14'. Also my teenage daughter and I could put the cap back on easily so recapping it every so often helped me check for shape change but those interior braces kept it in place during my whole interior restoration.
 

Attachments

  • 20190503_163550.jpg
    20190503_163550.jpg
    1.6 MB · Views: 5
  • 20201109_143108.jpg
    20201109_143108.jpg
    931.9 KB · Views: 5

Baylinerchuck

Commander
Joined
Jul 29, 2016
Messages
2,726
Ok, let's go with the end of your first paragraph. "Your method of bracing from inside will work, but all those braces will be a pain in the arse to work around." That's all I need to know... I don't care about the hassle of working around the braces, I just need to know they'll work. Now, what about the location... are they about right vertically and laterally? Will three be good? How far apart should they be? Where does a boat's hull bow outward most? At the ends (bow and stern) or mainly in the middle? That would determine where to position the 2x2 braces.

As I'm going to have to gut out everything on this boat... I've already torn out most of the floor (I'm pulling the cap, to get to the last bit under the bow) and the transom is torn out and the inside of the outer skin is sanded pretty much clean (as shown). Once everything is out, then I'll proceed to the next step and decide how to reconstruct the stringers, bulkheads and such.
Yep, in the middle where you have the braces now should work well. I wouldn’t worry about the middle hole, I would go more up toward the bow in a couple places. 4 or 5 braces would be pretty good, plus the boat sitting on the trailer. I put 2x6 boards between the hull and the rollers for more support and to reduce pressure on the hull in those spots. Bunk trailers offer more support during a restoration. Adding lumber on the rollers pretty much makes it a bunk trailer.

You would get more distortion at the center of the boat without the cap, it will be pretty flimsy. Also be sure to fully support the cap when lifting it off. Especially around the helm. You don’t want it to crack.
 

Luposian

Petty Officer 2nd Class
Joined
Aug 15, 2015
Messages
111
Yep, in the middle where you have the braces now should work well. I wouldn’t worry about the middle hole, I would go more up toward the bow in a couple places. 4 or 5 braces would be pretty good, plus the boat sitting on the trailer. I put 2x6 boards between the hull and the rollers for more support and to reduce pressure on the hull in those spots. Bunk trailers offer more support during a restoration. Adding lumber on the rollers pretty much makes it a bunk trailer.

You would get more distortion at the center of the boat without the cap, it will be pretty flimsy. Also be sure to fully support the cap when lifting it off. Especially around the helm. You don’t want it to crack.
Ok, here's a revised copy of my image with four 2x2 brace points. Two brace points are basically as far forward and aft as possible, with two braces spaced evenly between the ends.

Is the vertical location for the holes good?
 

Attachments

  • 2x2 braces v2.jpg
    2x2 braces v2.jpg
    1.3 MB · Views: 5
Last edited:

Baylinerchuck

Commander
Joined
Jul 29, 2016
Messages
2,726
I would go as close to where the cap meets the hull as possible unless you already have holes in that area.
 

Luposian

Petty Officer 2nd Class
Joined
Aug 15, 2015
Messages
111
I would go as close to where the cap meets the hull as possible unless you already have holes in that area.
The 2x2's can't be screwed in any higher than the edge of the inside of the cap, which is about 5" lower than the rubrail by the throttle on the starboard side and a bit less at the transom end. But I'm assuming the braces should all be fastened at the same height, from fore to aft. Having braces higher and lower would mess up the hull's support stability, wouldn't it?
 

Baylinerchuck

Commander
Joined
Jul 29, 2016
Messages
2,726
The 2x2's can't be screwed in any higher than the edge of the inside of the cap, which is about 5" lower than the rubrail by the throttle on the starboard side and a bit less at the transom end. But I'm assuming the braces should all be fastened at the same height, from fore to aft. Having braces higher and lower would mess up the hull's support stability, wouldn't it?
Yep, that’s as high as they can go. The idea is to keep the edge the cap fastens to the same shape as the cap. However you can brace it to keep it from moving is the right way. Whether it’s 5 braces or 20 braces, if it doesn’t move, job well done.
 

Luposian

Petty Officer 2nd Class
Joined
Aug 15, 2015
Messages
111
I used something similar to what you are thinking of doing, interior cross bracing. It does get in the way moving around but worked for me. I have to add that my project is smaller than yours at under 14'. Also my teenage daughter and I could put the cap back on easily so recapping it every so often helped me check for shape change but those interior braces kept it in place during my whole interior restoration.
Did you screw in (secure) your braces from the outside, to keep the hull from both flexing out or in, as I'm planning on doing?
 

Luposian

Petty Officer 2nd Class
Joined
Aug 15, 2015
Messages
111
Here is an example of what would happen if I follow the interior gunwale (I assume that's what it's called) curvature from the inside and outside. The green and white dots follow straight across the hull (is that a chine or strake or...?; its tented out slightly from the side of the hull), whereas the red dots follow along the interior curvature of the gunwale. The braces would be closer to the cap/hull seam towards the transom, but support would be uneven (lower at the helm and higher near the transom). Does an uncapped hull bow outward, overall, near the lip (area closest to the cap/hull seam) or from down lower (like where the green/white dots are)? Is bracing supposed to be even across the hull (as the green/white dots represent) or does it matter?
 

Attachments

  • Interior bracing lines.jpg
    Interior bracing lines.jpg
    1.2 MB · Views: 8
  • 2x2 braces v3.jpg
    2x2 braces v3.jpg
    1.3 MB · Views: 8

Baylinerchuck

Commander
Joined
Jul 29, 2016
Messages
2,726
Doesn’t matter. Doesn’t have to be pretty, just has to be. Brace as close to where the cap meets the hull as you can. Don’t over think it. The goal is to keep the hull rigid when you take off the cap
 

Luposian

Petty Officer 2nd Class
Joined
Aug 15, 2015
Messages
111
Doesn’t matter. Doesn’t have to be pretty, just has to be. Brace as close to where the cap meets the hull as you can. Don’t over think it. The goal is to keep the hull rigid when you take off the cap
If I brace it along that ridge (what is that outdent called? Or is it just decorative, along the side, above the waterline?) with four 2x2's as indicated, that should be sufficient? I'm not trying to overthink it... I'm trying to make sure I don't screw it up by bracing too low. However, if all braces have to be at the same level, then that ridge is the only place where all braces can be at the same level. Should I place one brace as far forward and one brace as far aft as possible, with two equidistant between them?
 

froggy1150

Master Chief Petty Officer
Joined
Nov 3, 2017
Messages
844
After you brace however you choose and remove the cap do a rigidity test. Get in and out, pretend to do work, shake and wiggle. If the top deflects it probably will when you glass. If it does move and you dont catch it while resin is curing...... bad! So if it isnt solid put the cap back on and add more braces or cradle. An extra hundred In wood is nothing compared to throwing away thousands of dollars and time due to a twisted hull
 

todhunter

Canoeist
Joined
Sep 15, 2020
Messages
1,315
When I de-capped mine, it seemed like the hull bowed outward coming from near where the floor attaches (at the chines). I did not build a cradle or do internal bracing - just crossed my fingers and restored the hull on my bunk trailer. I did take width measurements every foot immediately after decapping and when I was glassing in stringers, bulkheads, and the floor, I would use 1-2 ratchet straps to bring the boat back into shape before starting the glassing...even over-tightening the ratchet straps to make the hull about 1/2" narrower than the original dimension to counteract any spring-back. The most splay I ever saw was a little over 1 inch, I think. After glassing in the floor and letting it cure, I removed the ratchet straps and the hull held it's shape and was within 1/8" of where it started at each width measurement.

All that to say, I would listen to the other members and not worry so much about placement of the bracing...just make sure you brace the hull somehow, and you'll likely be fine.
 
Top