1981 Citation Marquis restoration...

Luposian

Petty Officer 2nd Class
Joined
Aug 15, 2015
Messages
119
I just read through your project. I've been repairing boats for a bit over 11 years now. Here are my thoughts.

Bracing: What you did should be fine. If it was me though, I would bolt some blocks to the outside, through the rivet holes, amd use ratchet straps. You can adjust them easier if needed, I think it would be more secure.

Floor and Stringers: Hopefully you can still see the old floor line on the hull. Make your stringers a bit taller than that, set them in the same places, and trim them down later. It's so much easier than cutting too short and having to work around that. You'll need some boards screwed across the tops to keep them in place, set them in with thickened resin, and will be glassing along the sides to attach them to the hull. Do the entire stringers, floor, and might as well do the transome too.

Foam: Take it all out, it will at best be in the way. Use a reciprocating saw to cut into squares, then a flat bar to pry it up in big chuncks. Quick, easy, and clean. New foam should be poured in after the floor is done.

The Cap: Don't do all of that mixing and matching with bottles and extruded poly foam. Some two part or spray cans when everything else is done will be fine. In this case, maybe spray cans. The two part might be a bit messy for that job. If the wood on the rear needs replaced, don't go side to side. You need those open areas to glass to. You can add small plywood blocks to support deck hardware now too.

At the beginning of this, you said you didn't care about time or money, you wanted it right. It's definitely going to be a lot of time and money to get it there, but don't skimp out.
I'll add more detailed responses as the project goes.
Thank you for your detailed response. Now, I'll reply:

- The internal bracing I did (trying to hold the hull in it's "capped" shape) failed. I tried keeping the hull from popping out (along the sides), after removing the cap. Didn't hold. So, the hull "foompt!" out. Oh, well.... 'tis what it 'tis. Crying over spilt milk solves nothing. Deal with the bridges as you come to them. :-D

- I haven't touched the stringers/bulkheads yet. There is only a little section of the floor left in the bow (about 2') I need to cut out, to clean out the last of the rotted (it's super crunchy and it's as brown as pumpernickel bread!) foam in there. I haven't cut out or ground away any of the remaining fiberglass "lip" along the edges. I was originally planning on using it as guideline, so I know how thick my plywood pieces need to be, to just fit under it, snugly. A note on my iPhone states the flooring plywood is 1/2". If the resined fiberglass is what truly becomes the stringers, even if the core wood rots, which it has), then they still seem quite solid. They look sloppy as heck, but they're rock hard. I cut out and removed the transom as well. That wood was rotted, too. Not quite the "mulch" the floor was, but not far from it, either.

Everyone says grind everything out and down to the bare hull, but that's beyond my pay grade. While I could probably successfully do it, I'd have no clue how to get back from it. I've done what I feel "safe" doing. At worst, I'll have a professional grind the rest out and build it back up. At least I've given them less work to have to do.

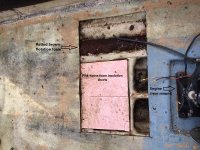
- As my last photo shows, I've removed all the foam. It was under the bow section of the cap The dry, brown crunchy stuff was just thin strips along the outside stringers. I'm assuming the stuff under the cap was from the factory, but the stuff under the floor was 3rd party mod (including the pink house insulation foam sheets where (I assume) the ski locker used to be)
 

Luposian

Petty Officer 2nd Class
Joined
Aug 15, 2015
Messages
119
Here are pictures of the boat shortly after I started gutting it.
-1st image was before I'd removed the engine.
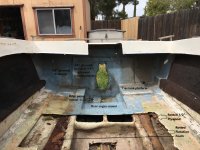
-2nd image was after everything was removed and I'd started cutting out the floor
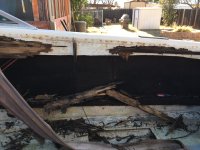
-3rd image was taken while trying to remove the side panels... yeah... not in such great shape... but FlexSeal can fix anything, right? :)
 

Attachments

  • IMG_2550.JPG
    IMG_2550.JPG
    1.6 MB · Views: 4
  • IMG_2683.JPG
    IMG_2683.JPG
    3.3 MB · Views: 4
  • IMG_2578.JPG
    IMG_2578.JPG
    1.1 MB · Views: 4

MikeSchinlaub

Seaman Apprentice
Joined
Jan 14, 2025
Messages
30
Ok, I'm going to try to address all of your steps here.

1. Bracing: should be pretty simple. Do the blocks of wood on the outside edge of the hull like I said. Take measurements from the cap for your width, it shouldn't change much while off. Use ratchet straps to pull the hull to match those measurements as close as you can, err on the side of just a hair under. If the floor is glassed in while the hull is relaxed, you'll have a very hard time getting that cap back on, if at all.

2. Transom: This is how we do them. Cut 2 pieces of 5/8 or 3/4 marine grade plywood (if someone else knows more about the wood, please correct me. I just use what we hace, I don't order it.) To match the shape of the original transom. Once both pieces fit, you will screw then together with a layer of chopped mat between. Mark any mounting screw holes before this to avoid having a screw in the way later. I don't remember if yours is an outboard or inboard, but just mark any openings, and don't put any screws in the way. We cover the back side of the transom with thickened resin, then lag bilt it to the hull. Use 2x4's on the outside to distribute the load. Once cured, you will then glass the transom to the hull.

3. Stringers: I think I described this pretty well before. Measure everything, make the new stringers just a bit taller than the finished height, and then they will be set pretty much luke the transom. Set in thickened resin and glassed to the hull. The wood core is what carries most of the load in your case, not the fiberglass.

4. Floor: Definitely leave that lip until you're ready to put the floor in. We use 5/8 for floor. The bottom side will need to be resined before screwing in. It will then be glassed to the hull.

Grinding: It's like half of the job. Lots of dust, lots of work. Safety gear is absolutely necessary. Tyvek suit, dust mask, and glasses are a minimum. I put on a hooded tyvek, latex gloves, and full face respirator with p100 filters.

Glassing: Gloves and a respirator with organic vapor cartridges are a must, but the fumes will also make your eyes burn. A fan blowing the fumes away can help, but will also set up the resin faster.

Having a pro finish: If you decide to go this route, take detailed measurements of the stringers, and leave the lip of glass from the floor. We got one once that the owner had taken all of the wood out himself (not my job luckily). It was NOT fun trying to figure everything out with nothing to measure from.

Foam: The pick stuff (extruded polyurethane) was the previous owner for sure. The stuff that looked like spray foam was from the factory. It's a two part liquid mix. Basically spray foam seperated into two liquid components. Like others have said, it is for buoyancy and structure, but once it absords water, it will stay wet pretty much forever. All of the old under the floor will need to be replaced. You have to take it out anyway for the stringers. The stuff under the cap can be left unless wet of you need to glass in the area.
 

MikeSchinlaub

Seaman Apprentice
Joined
Jan 14, 2025
Messages
30
I started writing before you had the pictures posted. I was looking at the phone just as I got the notification.

When/if you do the transom, have a shop do the cut out for your outboard. There is a bracket that has guides for the drill bit to keep the bolt holes straight. It also has pilot hole guides for the steering cut outs at the top.

The motor mounts also need to be very close to original. I don't install engines, but there is very little adjustment to align it with the outer unit. We stack 2x4's, bevel the bottom one, set them with thickened resin, and glass them in.
 
Top