1981 Bayliner Victoria 2750 - Restore or Bust

GWPSR

Senior Chief Petty Officer
Joined
Jul 25, 2012
Messages
758
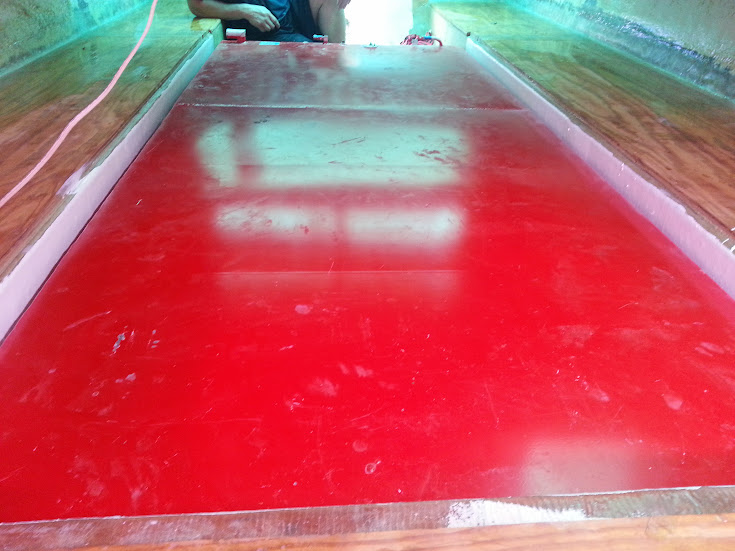
First coat of Bilgekote went down in the area where the fuel tank will live. Will need to recoat within 12-24 hours

20140601_182604.jpg


The neoprene padding has been cut into 2" wide strips to be glued down with 5200 once the paint cures.
 
Last edited:

GWPSR

Senior Chief Petty Officer
Joined
Jul 25, 2012
Messages
758
Second coat went down last night while the chicken teriaki slowly grilled. I'll let it cure til the weekend before gluing down the neoprene. It's plenty hot here so it ought to be as hard as it's going to be by then. The first coat was completely dry when I recoated. (Good thing, otherwise I'd have left knee and palm prints :) )
 

sportrider

Petty Officer 2nd Class
Joined
Jun 4, 2014
Messages
129
lol and to think I was nervous about replacing the deck on my boat. good job!
 

GWPSR

Senior Chief Petty Officer
Joined
Jul 25, 2012
Messages
758
The neoprene is all glued into place:

20140608_124248.jpg


Time to wrestle this massive fuel tank into position:

20140608_125145.jpg


Back where it belongs, finally:

20140608_130734.jpg


And we fabricated the sole section that covers the tank. It's 4' x 8' 6" of 22/32 plywood. 2x4 cleats are PL'ed and screwed to the underside. Each cleat is positioned directly over one of the baffles in the tank:

20140608_161149.jpg


Once the PL has cured, we'll lay a layer of epoxy and cloth on the bottom side and give it a couple of coats of Bilgekote. A strip of neoprene will be glued to the bottom of each cleat.
 

GWPSR

Senior Chief Petty Officer
Joined
Jul 25, 2012
Messages
758
Nice progress . . . That is one slender fuel tank.

What it lacks in height (3" tall at the edges, and about 7 or 8" in the middle), it makes up for with area (4' x 8' 6"). 125 gallons. I'll never be able to afford a complete fill-up in this thing. :) ($500 per tank)
 

GT1000000

Rear Admiral
Joined
Jul 13, 2011
Messages
4,916
Looking absolutely fantastic GWP...almost looks from the pic that there is no room for the lump in the back...sheesh that tank is looooong...
BTW, the best trick I know of to actually filling that tank up comes from a buddy of mine who owns a Cigarette style go fast boat with two 150 gallon tanks in it...
He starts filling them up at the end of the season and every month or so, until boating season comes around again, he goes to the filling station and adds a 100-200 bucks at a time...then every time he takes it out and comes back he tries to put as much in as possible to keep them close to topped off...
He complains though, that sometimes, if they make a Bimini run, he tends to burn through most of it running back and forth...then again, he is getting there and back, in about 45 minutes to an hour at about 70-80 MPH, each way...:facepalm:
:D
 

bigdirty

Senior Chief Petty Officer
Joined
Oct 4, 2013
Messages
652
Went for a short cruise in a friends boat a few days ago.. twin 454's and bravo3's in a formula 31pc... thats a 34 ft O/A cruiser, 11 ft beam.. and he cracked it wide open for about 3 mins... 45mph, 4500rpm... :lol: THAT burned some fuel...
 

Captain Ollie West

Petty Officer 2nd Class
Joined
May 1, 2014
Messages
156
What it lacks in height (3" tall at the edges, and about 7 or 8" in the middle), it makes up for with area (4' x 8' 6"). 125 gallons. I'll never be able to afford a complete fill-up in this thing. :) ($500 per tank)


Mine Victoria came with a little over half a tank. I feel pretty lucky. Pretty nice to start of with 60 to 70 gallons of fuel.
 

GWPSR

Senior Chief Petty Officer
Joined
Jul 25, 2012
Messages
758
Fabricated the last piece of the sole panel that will be installed over the tank last night. This thing is heavy now! 4' wide by 8.5' long, 3/4 plywood, with 20 linear feet of 2x4 cleats glued to the back.

AdRercuJvM71K2wZoIdqpCTdK0NJjGIUjMrISUbYLHM=w1084-h813-no


10465803_10152237513803925_150615491_o.jpg


10465645_10152237515618925_1890727651_o.jpg


Next step is one layer of 6 oz fabric on the back with epoxy before a few coats of Bilgekote.
 

GWPSR

Senior Chief Petty Officer
Joined
Jul 25, 2012
Messages
758
Tonight I laid down a layer of 6 oz fabric on the bottom of the sole.

10452482_10152239407388925_1643122596_o%255B1%255D.jpg


That took a combined 64 oz of resin and hardener.
 

GWPSR

Senior Chief Petty Officer
Joined
Jul 25, 2012
Messages
758
And after two coats of Bilgekote:

20140614_154013.jpg


Don't know if we'll get it hoisted up into the boat today or not. Need to make a trip to Harbor Freight to buy some boring household things and cash in some Father's Day coupons, then visit my father in the nursing home. Maybe mow the lawn if I get a chance. Oh, and take my family to a restaurant and pay for a meal in my honor :tongue:

Incidentally, this thing gets heavier and heavier! Not sure what it weighs now, but it's a bear to maneuver around.
 

GWPSR

Senior Chief Petty Officer
Joined
Jul 25, 2012
Messages
758
After visiting my father at the nursing home, and going to the Chinese buffet for early dinner, gwpjr and I got the sole panel into the boat, neoprene isolating strips under it, and screwed into the stringers.

The it was time to tab with 17 oz biax:

10431421_814846811860216_6527246825895641281_o.jpg


10457653_814846835193547_5641590447335611054_o.jpg
 

zool

Captain
Joined
Aug 19, 2012
Messages
3,432
Looking good GW, you may end up needing a diesel to push that PT boat your building ;)
 

GWPSR

Senior Chief Petty Officer
Joined
Jul 25, 2012
Messages
758
Got a few small things done today. I had laminated 5 layers of 3/4" plywood a few days ago, using Titebond III. Today I cut it to shape on the table saw:

20140621_123326.jpg


The angle is a little more than 90 degrees and matches the bow. This is the backer for the bow ring. Routed out a small area on the back for the plate and nuts:

20140621_123243.jpg


I also removed the anchor rope locker hatch and unskinned the inside and removed wet core. Ground it all down to solid glass:

20140621_181511.jpg


And fabricated a replacement core. Original was 3/8" ply. New one is 3/4" thick:

20140621_181545.jpg
 

GWPSR

Senior Chief Petty Officer
Joined
Jul 25, 2012
Messages
758
Glued the wood into the bow with PB last night:

10492319_10152260833683925_750606347_o.jpg


Today I filleted around it with more PB and laid several layers of 17 oz biax. I had a lot of scraps of 6oz saved, so I built up around it with 5 or 6 more layers.

20140622_184342.jpg


I also glued the plywood core to the hatch cover and laid 10oz cloth over it:

20140622_175423.jpg
 

jigngrub

Fleet Admiral
Joined
Mar 19, 2011
Messages
8,155
Looks like you're getting with the program now, after slack-arsing all winter... some real good progress!
 

greenbush future

Lieutenant Commander
Joined
Aug 28, 2009
Messages
1,814
Love your work, and that bow ring backer is as stout as German beer!! That boat better float this year, I think you win the award for hardest working resto man on this site, this year! Keep at it!!
 

GWPSR

Senior Chief Petty Officer
Joined
Jul 25, 2012
Messages
758
We are -->this<-- close to shopping for a long block or reman engine to stab in. I'd love to get it wet and see how it sits before I get too much further with the furniture.

There's a whole adventure coming with the trailer too. Structurally it's quite sound, but somebody cut all the brake lines off who knows how long ago, so I fear that the master cylinder in the surge brake is probably seized, and I'll have to pull off two tires and drums to see what evil lies inside.

Oh, and a minimum of two newer tires. These are the kind of rims that a "manufactured home" rides on, so maybe I can get some previously enjoyed ones from a mobile home dealer. Two of the 4 tires aren't too bad, but the other two are the wrong load range and have chunks missing or a lot of dry rot.
 
Top