1979 Starcraft 16’ SS Refresh

Watermann

Starmada Splash of the Year 2014
Joined
Jan 12, 2013
Messages
13,753

Moserkr

Chief Officer + Starmada Splash Of The Year 2021
Joined
Nov 23, 2020
Messages
834
Thanks @Watermann and @SHSU . Will be replacing that rub rail. Did not go well saving it and its the original ugly yellow...

Speaking of ugly yellow, been scraping off a tan/yellow and orange stripe paint under my black/green. Stripping paint sucks!! That or strip kleen sucks. May try that orange citrus stuff tomorrow to finish up. Wish I had it media blasted but im already down this rocky road so oh well. I blame the struggles on being in CA and not having access to really good paint remover lol. Thats my excuse. 3 coats of remover over 2 days.

I noticed that strip kleen does not do much to coat-it. My coat-it was stained or painted over before drying so theres permanent green/black on the hull edges. Oh well, the paint on the coat-it layer came off pretty easy. The majority of the transom is also covered in coat-it.... so i realized i will never fully remove the off colored layers and will have to settle on painting over. Not a big deal but if i knew all this going in, id probably have just painted over everything.
Going to look into an orbital sander as well since ive put enough elbow grease into it already. Nice to see some of the aluminum though. Figure ill be sanding the hull to at least get it smooth and have the vast majority of the paint removed. Still have the motor to do later too lol.

Also noticed my broken rivets were all:
Along the outer edge of the bottom
Across the bottom where the consoles sit
Knee brace
 

Attachments

  • 8CDD6F23-E9C0-433B-8971-FE4AC638E3BC.jpeg
    8CDD6F23-E9C0-433B-8971-FE4AC638E3BC.jpeg
    2.5 MB · Views: 13
  • 6102CB01-51EC-41D2-9893-A833FE97899F.jpeg
    6102CB01-51EC-41D2-9893-A833FE97899F.jpeg
    2.9 MB · Views: 14
  • F8BB4C4B-DAE4-4A4F-AC85-31D521B75D40.jpeg
    F8BB4C4B-DAE4-4A4F-AC85-31D521B75D40.jpeg
    2.5 MB · Views: 12
  • 6F660066-7742-4174-AE77-24883A349181.jpeg
    6F660066-7742-4174-AE77-24883A349181.jpeg
    2.5 MB · Views: 12
  • EAFB4339-8D50-4D2D-ADF8-AE9A74C1760F.jpeg
    EAFB4339-8D50-4D2D-ADF8-AE9A74C1760F.jpeg
    2.3 MB · Views: 11
  • BCE512B6-8CF2-4953-9EF0-EA3A9089CCB4.jpeg
    BCE512B6-8CF2-4953-9EF0-EA3A9089CCB4.jpeg
    5.3 MB · Views: 11
  • 9D60D6ED-AD06-42CA-84C4-78ED2118F630.jpeg
    9D60D6ED-AD06-42CA-84C4-78ED2118F630.jpeg
    3.5 MB · Views: 13
  • D4112F0D-326C-4D37-8B69-AFDDEB59DE74.jpeg
    D4112F0D-326C-4D37-8B69-AFDDEB59DE74.jpeg
    4.6 MB · Views: 13
  • 0C6B43F1-D8E4-476B-8101-21AED9585041.jpeg
    0C6B43F1-D8E4-476B-8101-21AED9585041.jpeg
    4.8 MB · Views: 12

classiccat

"Captain" + Starmada Splash Of The Year 2020
Joined
Dec 20, 2010
Messages
3,405
Stripping paint is a right of Starmada passage!

Citristrip is on this earth to only extend the pain of paint stripping.

I used both Zip Strip and Jasco with success...and I bet it will remove that old epoxy bandaid as well.

What really took it to the next level was making sure the paint was clean/dry 1st...then covering it with saran wrap to prevent the solvent from evaporating prematurely.
 

Moserkr

Chief Officer + Starmada Splash Of The Year 2021
Joined
Nov 23, 2020
Messages
834
@classiccat lol @citrisstrip hahaha. i am earning that stripe alright. Completely forgot about the saran wrap trick. Thanks. Round 3 coming up after i get the dusting of wet snow off the boat. Correction -ice snow lol. Still dont see that layer of coat-it coming off so my focus is going to be strictly on the sides. Kinda want to keep the coat-it anyway. Its obviously taken a beating under the boat and Im amazed how it has held up. Maybe in 50 years enough sand and water will have ground it down to warrant another rebuild.
 

Attachments

  • DC70BCFC-B2D5-4BD6-BFC6-B3E0D4F2F714.jpeg
    DC70BCFC-B2D5-4BD6-BFC6-B3E0D4F2F714.jpeg
    2 MB · Views: 1

Moserkr

Chief Officer + Starmada Splash Of The Year 2021
Joined
Nov 23, 2020
Messages
834
I can see metal!! Most the hull is stripped, the saran wrap trick really works. Wish I had done that the first day! Took 1/5 of the amount of kwik strip to get it done. Should be written on the bottle to do that lol. Tomorrow I just need to give it one more thin coat and some elbow grease, and I should be done! The pics show up to when I ran out of light, and theres another 2 hours of work in the dark not shown. Happy new year everyone!!
 

Attachments

  • 9D3C61B1-95B7-451A-83F0-21EB579555FD.jpeg
    9D3C61B1-95B7-451A-83F0-21EB579555FD.jpeg
    4.2 MB · Views: 11
  • A49CE378-032A-4ADA-9FE7-D095E5071E3D.jpeg
    A49CE378-032A-4ADA-9FE7-D095E5071E3D.jpeg
    3.3 MB · Views: 8
  • 3E81D999-6EAE-4DB2-A5F2-CB87ABE69122.jpeg
    3E81D999-6EAE-4DB2-A5F2-CB87ABE69122.jpeg
    3.4 MB · Views: 8
  • 7CC05391-8386-4639-A940-CFE17D18B6A1.jpeg
    7CC05391-8386-4639-A940-CFE17D18B6A1.jpeg
    3.9 MB · Views: 8
  • E8DB34F0-45C7-460B-8AF6-83FD7196CFF1.jpeg
    E8DB34F0-45C7-460B-8AF6-83FD7196CFF1.jpeg
    4.3 MB · Views: 9
  • 182758BF-FA92-4A55-8D15-1F36255611A2.jpeg
    182758BF-FA92-4A55-8D15-1F36255611A2.jpeg
    3.6 MB · Views: 9
  • 7FDBDCC8-811F-4BB4-8408-3141ED6BEF8F.jpeg
    7FDBDCC8-811F-4BB4-8408-3141ED6BEF8F.jpeg
    4 MB · Views: 12
  • CBED14FD-59DC-4D2A-B857-4E10C0250875.jpeg
    CBED14FD-59DC-4D2A-B857-4E10C0250875.jpeg
    1.6 MB · Views: 11

classiccat

"Captain" + Starmada Splash Of The Year 2020
Joined
Dec 20, 2010
Messages
3,405
I can imagine your satisfaction watching that paint literally melt away. Nice way to start 2021! (y)

I'm surprised that the coat-it is holding its ground. My 18SS was coated with an epoxy over bare aluminum and it bubbled up easier than paint (it still leaked like a sieve due to the corrosion holes & stress cracks 🤣 )
 

Moserkr

Chief Officer + Starmada Splash Of The Year 2021
Joined
Nov 23, 2020
Messages
834
Im honestly very surprised the coat-it held as well. It covers most of my transom and I tested it yesterday with a full coat of paint remover and saran wrap. Was not fazed in the least bit. Not even one bubble after over an hour of sitting directly on the coat-it. Im hoping there are no stress cracks or corrosion holes. From the inside I can not see either of those major issues so Im not worried. I figured out why the coat-it is so mis-colored - it was put on over layers of paint from POs. The boat has the original paint, then a camo paint, then the epoxy on the bottom/transom, and finally the layer of green/black. Some of the green/black is under the coat-it, and most was over it.

Going to put in some elbow grease on the hull to finish her up today, and coat the transom as well to get it clean. Also a pic of whats left of the transom. A few days of rain and its mush. Luckily i have that nice piece of AL thats a solid template.
 

Attachments

  • D2586E6D-A083-49C2-AC13-8C0249D2CDD1.jpeg
    D2586E6D-A083-49C2-AC13-8C0249D2CDD1.jpeg
    4.3 MB · Views: 10
  • C57F2075-44C8-4608-A2C9-1BAEA7F24AA5.jpeg
    C57F2075-44C8-4608-A2C9-1BAEA7F24AA5.jpeg
    4.2 MB · Views: 10

Moserkr

Chief Officer + Starmada Splash Of The Year 2021
Joined
Nov 23, 2020
Messages
834
Day 3 of paint removal.

Bottom is done!! Well as done as it will get with me haha. Sides are clean, bottom and transom is covered in coat-it, which if it didnt come off by now, is not worth removing. SW is also 99% stripped, so will finish that up tomorrow as well as flip the boat to do the gunwales on top. Biggest issue with the SW, besides missing rivets, is a 40 year old fish measuring tape sticker from f&g. Need a razor blade scraper for that. At least this boat has a history of fishing that will be upheld.

Just waiting some well earned carnitas now... 😋
 

Attachments

  • 7F8984C6-F82E-44C2-BCD2-DE49C0A81C72.jpeg
    7F8984C6-F82E-44C2-BCD2-DE49C0A81C72.jpeg
    4.9 MB · Views: 17
  • 06B9BBF2-A809-412E-8658-37A90999848D.jpeg
    06B9BBF2-A809-412E-8658-37A90999848D.jpeg
    3.3 MB · Views: 17
  • E4749079-1C1D-4F8A-9E80-FDD6880AE404.jpeg
    E4749079-1C1D-4F8A-9E80-FDD6880AE404.jpeg
    2.5 MB · Views: 17
  • EC29ACF5-1AC3-4EE8-BEFC-45910AE1BAD5.jpeg
    EC29ACF5-1AC3-4EE8-BEFC-45910AE1BAD5.jpeg
    4.2 MB · Views: 16
  • D3507089-B6C8-4095-B6F9-D502446CC448.jpeg
    D3507089-B6C8-4095-B6F9-D502446CC448.jpeg
    1.7 MB · Views: 16

Moserkr

Chief Officer + Starmada Splash Of The Year 2021
Joined
Nov 23, 2020
Messages
834
Cleaned up outside since rain is coming for the next few days and I can work on some stuff in the garage. Main thing being bunk boards for the trailer since that and rivets are high on my list to do soon. When I looked at my current bunk situation I was pretty disappointed. Its ghetto redneck and hardly functional. I thought “why spend all this time and money on the boat to then plop it down on a s$!#ty bed?” Ended up ordering some bunk bolsters and new carpet. Will go buy some new 2”x6”x10’ boards for her to rest on, and I think its for the best. No more stress from poor support which I imagine will help prevent rivets breaking. Last thing to do today is order rivets. Buck bar and rivet gun are here so hoping I got the right one. For as much work as its been, Im feeling like getting most of the paint stripped is a big step towards the finish line. Not sure refresh is the right word either anymore lol, feeling like this is pretty much a full rebuild...
 

Attachments

  • 3D7DFA94-02C1-40CD-A187-A83C7BCE6261.jpeg
    3D7DFA94-02C1-40CD-A187-A83C7BCE6261.jpeg
    2.3 MB · Views: 2

sidingguy

Petty Officer 2nd Class
Joined
Nov 3, 2017
Messages
136
Regarding your rubrail ,I found the easiest way to install it was remove the corner caps and spray the rail down good with WD40 and start the insert at the rear corner. Keep spraying and pushing until you get to the front of the boat.
 

Moserkr

Chief Officer + Starmada Splash Of The Year 2021
Joined
Nov 23, 2020
Messages
834
Thanks @sidingguy thats a great idea. Will definitely do that. Still need to get the rest of the rub rail off and order a new one. Will try the push and wd40 method to remove too since my nose cap is stuck on over it...

Coating new bunk boards in some spar. Really excited to rest her on 10’ of 2x6” instead of the corner of one 2x4”x5’. Should have the bunk bolsters and new carpet in a few days.
 

Attachments

  • CC4A4271-8263-4013-9085-C685D5A15401.jpeg
    CC4A4271-8263-4013-9085-C685D5A15401.jpeg
    746.1 KB · Views: 6

classiccat

"Captain" + Starmada Splash Of The Year 2020
Joined
Dec 20, 2010
Messages
3,405
Ha! it's funny how many builds start as a "refresh". Time for a tweak to the old thread title!

Nice progress getting down to clean aluminum; and don't worry...the nightmares of stripper fumes and chemical burns go away after a few months. 😁

bunks are definitely the way to go for our old aluminum tubs. (y)
 

Moserkr

Chief Officer + Starmada Splash Of The Year 2021
Joined
Nov 23, 2020
Messages
834
Thanks 
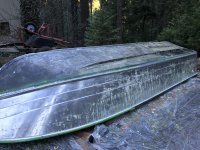
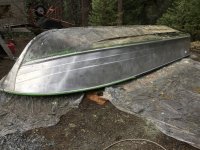
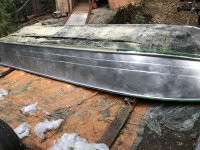
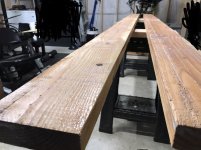
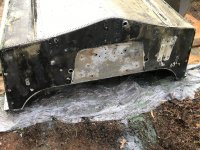
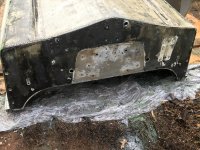
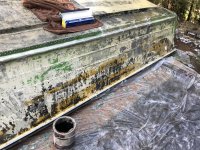
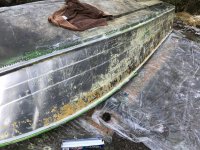
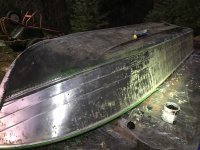
@classiccat It might be a bit more than a refresh but Im NOT envious of having to do the work some of you all have done - No bottom paint to strip due to the coat-it, no patches, no corrosion that Ive noticed yet. The stripper fumes are not like the cheap perfume Ive been used to in the past lol. Will not miss either at all. Im excited about the 10’ 2x6” bunks that will go in this week, and allow me to get the boat back on the trailer.

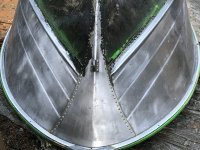
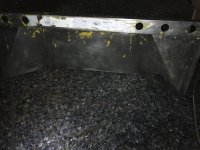
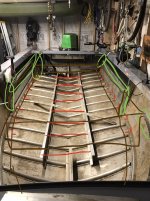
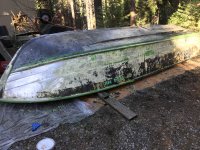
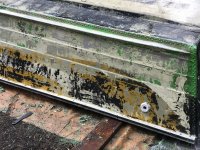
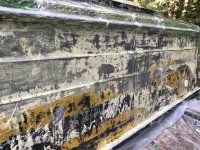
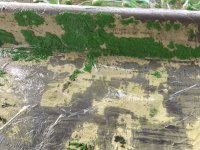
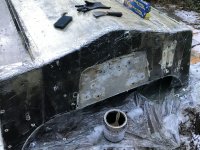
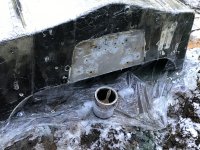
Right now Im just playing the waiting game for parts and planning what I will do with them. Ive been reading a lot of threads about bracing due to where all of my rivets have broken - along the outer chine?, I believe thats the right word. Seems to be more common among the bigger boats and was addressed by starcraft at some point as well.

My bracing plan so far is to not do it through the hull as many have done. I was thinking of using my gunwale panels and supports, floor, and bow deck wood, all tied together with angled AL and blind rivets. Also tie the original floor supports together with AL. By tying all these all together strongly, I believe it will eliminate a lot of the flexing in my little boat. Also reinforce the SW too. The gunwale wood would be the key though, as I can run it all the way from the transom brackets to the front casting deck supports, all tied into the floor, which will also be tied into the bow. In my mind this creates an open box within the boat which should be very stout. I have not babied this boat since I got her, and I believe a lot of rivets broke due to that and the fact that the PO hardly had any structure tied together inside the boat. Also tons of missing/broken rivets didnt help either.

Any thoughts on this “bracing” plan? Feel free to burst my bubble lol. Better now than have to rip up the floors to fix stuff later. Cheers!
 
Last edited:

Moserkr

Chief Officer + Starmada Splash Of The Year 2021
Joined
Nov 23, 2020
Messages
834
I forgot, besides bracing, I have a simple question on my bunk placements. Where should the boat sit on the 10’ 2x6” bunks? Along the furtherest outside point or closer to the center? Thanks for the advice guys.
 

classiccat

"Captain" + Starmada Splash Of The Year 2020
Joined
Dec 20, 2010
Messages
3,405
Bunks: I put mine right at the outer chine for support since my hull was showing advanced fatigue there.

Braces: It's a little hard to visualize your idea there but I'll share mine since my SS18's outer chine was roasted and used multiple reinforcement methods. The easiest to implement with no sub-H2O line rivets/drilling was the vertical pillars that get riveted to the hull sides and shelf. Also, my side panels are glassed making them more rigid. That little Z-brace is also a reinforcement since it connected to my vertical pillar system.

1609790447869.png

1609790392767.png
1609790505677.png
 

Moserkr

Chief Officer + Starmada Splash Of The Year 2021
Joined
Nov 23, 2020
Messages
834
Thanks @classiccat for the bunk recommendation and pics of your bracing. The idea I have for bracing is actually very similar to yours. Hope my pic helps to explain, along with the terminology I can copy from your response lol.

I really like how you did your bracing but I dont think I could get the additional pillars built for the budget Im trying to stay within. I thought about doing just the L brackets from the stringers to the side of the hull, but those also would require I have pieces cut and bent which I know is more expensive. So my thought was keep it to simple angle and flat AL thats relatively cheap and easy to find. So... my example pic, excuse its crudeness lol.

The red is aluminum. Pillars and gunwale shelf are circled in green. Floor, gunwale, front console and rear bench wood are “squared” with brown. I would brace the center so my 3/4” floor is well supported. Once the floor is in, use AL L-braces along the gunwales that run from the rear pillar to the front pillar. Also connect that front pillar/gunwale wood with AL to the front casting deck/console wood. The wood at the front of my consoles which supports the casting deck, wood along the gunwales, and wood across my bench seat, create the inner “box” when tied into the floor. The floor and shelf of the gunwales connect that “box” to the boat’s hull. The casting deck will also be tied in to the hull with supports from the upper deck to the floor. This ties the boat together from bow to stern and port to starboard. Please tell me that made sense with my pic I attached. You guys do not want to see me attempt to draw anything lol.
 

Attachments

  • 19ADE192-80D4-4436-A5A9-74AE750AEB38.jpeg
    19ADE192-80D4-4436-A5A9-74AE750AEB38.jpeg
    972.3 KB · Views: 25

sidingguy

Petty Officer 2nd Class
Joined
Nov 3, 2017
Messages
136
You guys both have great plans to stiffen your hulls up!After pulling the floor in my boat you can see what happens when floors and cabin bulkheads rot off and quit supporting hull and sidewalls.
 

Moserkr

Chief Officer + Starmada Splash Of The Year 2021
Joined
Nov 23, 2020
Messages
834
@sidingguy yes it seems to be a common thing, especially in the larger boats. I can see why more weight and power end up breaking rivets, and causing cracks in some boats as well, when there is no solid structure tying it together. Starcraft seemed to do the bare minimum and leave lots to improve upon. Id prefer to go with all AL bracing method like @classiccat instead of using wood to tie it together but thats beyond my budget. So Im thinking at least tying the wood together with AL should provide 10x more support that how it was originally manufactured. I like cheap insurance and want to feel safe when I take my family onto bigger water. Also dont want to have to redo more rivets in the future. Will see what the judges say about bracing the wood as opposed to AL to AL like most guys do.
 

classiccat

"Captain" + Starmada Splash Of The Year 2020
Joined
Dec 20, 2010
Messages
3,405
unrelated, i think it's funny that you chose a green that you just spent 2 weeks stripping from your boat. 🤣 i would've deleted it from the color palette forever!

I fabricated all of my brackets & braces using a 30" HF bending brake. Paid for itself several times over! It’s very intuitive to use.

Bulkheads you’re describing should help locally to each bulkhead. Are the L brackets just pieces of aluminum angle? If so, the problem with that is matching the angle of the outer chine.
 

Moserkr

Chief Officer + Starmada Splash Of The Year 2021
Joined
Nov 23, 2020
Messages
834
@classiccat hahaha the green and mustard yellow are still enshrined in parts of the coat-it. Not sure it will ever be gone.

That bending brake sure is interesting! Not a bad price either... i could fab whatever I want then from sheet and probably save money vs buying all the parts. Way to poke a hole in my plans hahaha. Thanks. Going to have to crunch some numbers and do some serious thinking now. What thickness of metal did you use? How much did a sheet cost and how did you cut it into sizes you needed? Ive referenced your thread so many times now i should know lol.

Ah! Another word I should know. The 3/4” floor would be attached to the BULKHEADS lol. The L brackets would just be simple, small angle AL that would attach the floor to the gunwale, rear bench, and front console wood pieces. The AL “L” brackets would not tie into the bulkheads directly, but indirectly by way of the floor. Hope that clarifies my plans.
 
Top