1979 Starcraft 16’ SS Refresh

Moserkr

Chief Officer + Starmada Splash Of The Year 2021
Joined
Nov 23, 2020
Messages
836
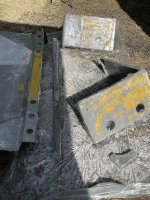
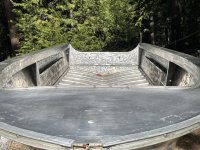
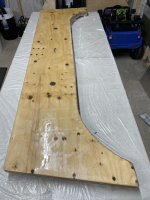
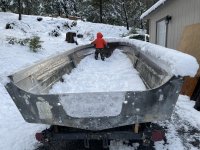
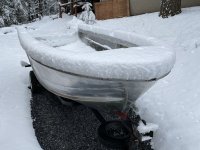
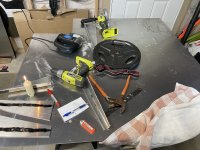
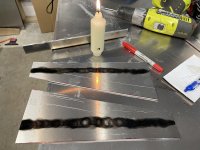
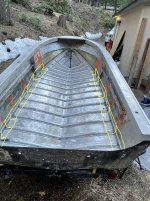
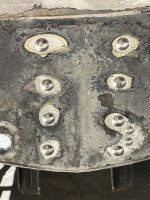
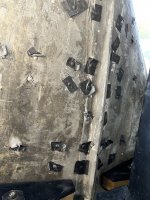
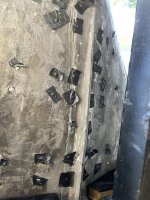
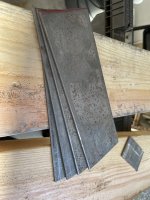
Thanks @SHSU I saved the original screws and bolts, but will probably replace with all new SS hardware. Found a bunch of old rusty pop rivets under the gunnel paint too that were missing heads. At least I have all the trim and caps, and despite my cracked nose piece, its all in good shape. I plan on using the AL putty to fix the nose piece, sand smooth, and paint. She is slowly coming along!!
 

Moserkr

Chief Officer + Starmada Splash Of The Year 2021
Joined
Nov 23, 2020
Messages
836
Paint stripping finally complete - all the trim, gunnel trim, consoles, SW, end caps and nose piece are clean!! A few difficult spots will just get sanded. Took longer than I thought but had a good method going.

Transom is ready for glass now too. Holes are all filled and she is looking smooth. Just need to lightly sand the faces and fill the odd ball areas on the sides. Boat is outside the garage and inside I will have a warm open space to work during the next week of rain. Coming up quick is drilling out the old rivets and pounding new ones in, as well as bracket fab time! Looking forward to getting to my next steps. Just a few more days work and Im there, but ive been slower focusing on quality work over quantity.
 

Attachments

  • AB9333D6-DFBE-491E-82BE-55CD9CDA17E9.jpeg
    AB9333D6-DFBE-491E-82BE-55CD9CDA17E9.jpeg
    2.4 MB · Views: 17
  • 637EEE49-A21C-4178-BBB7-EF24C7842467.jpeg
    637EEE49-A21C-4178-BBB7-EF24C7842467.jpeg
    3.3 MB · Views: 17

Moserkr

Chief Officer + Starmada Splash Of The Year 2021
Joined
Nov 23, 2020
Messages
836
Slowly moving along... just about done with epoxy and glass on the transom. Got one more side to glass on friday after the side I did today cures, but ive been trying to be thorough.

I was able to get some cardboard templates cut for my braces I need to build. While the transom finishes curing I will start on that.

Decided to leave the boat outside during the snow storm to keep the garage space open to work. Will be a few before Im able to drill out old rivets. In due time... First mate was kind enough to help clear some snow off the gunnels and pack down the rest so it melts faster. Given our mild winter Im not worried about it all melting quick. Will update again once I cut some metal.
 

Attachments

  • 4E05666C-A3BC-4D20-B533-F60CED7D7590.jpeg
    4E05666C-A3BC-4D20-B533-F60CED7D7590.jpeg
    2 MB · Views: 11
  • C8123626-A110-40B3-9666-DB8A4B6DF597.jpeg
    C8123626-A110-40B3-9666-DB8A4B6DF597.jpeg
    3.9 MB · Views: 11
  • 9B51D530-7706-4B51-9189-DDAEA0EF2887.jpeg
    9B51D530-7706-4B51-9189-DDAEA0EF2887.jpeg
    1.6 MB · Views: 8
  • 92B1F5DB-36B7-42DF-857B-BF7AB06271A1.jpeg
    92B1F5DB-36B7-42DF-857B-BF7AB06271A1.jpeg
    2.6 MB · Views: 10

SHSU

Lieutenant Junior+Starmada Splash Of The Year 2019
Joined
Mar 8, 2017
Messages
1,668
Great memories there sir!!! First mate learning how to keep a clean ship!

SHSU
 

Moserkr

Chief Officer + Starmada Splash Of The Year 2021
Joined
Nov 23, 2020
Messages
836
@SHSU Yessir!! He wants to be in the garage with me tomorrow too. We will be cutting metal again!

Had fun experimenting with what works and what doesnt when it comes to bending/cutting aluminum.

Cold bending .125 5052 did not work or budge in the cheap HF bending brake. Ended up annealing? the AL with a torch, cooling it in water, and then bending it which worked very well.

Tried an angle grinder diamond cutting wheel, and a jigsaw with a bosch metal blade. The jigsaw easily wins the cutting battle.

Got 4 small angles supports done today that will go under the gunnel shelf, 2 per side. Have 2 more to make for the ends on the gunnel shelf, then 2 more for the console/bow area.

Another little round of snow coming tomorrow night but the last bit already melted. Once the brackets/braces are mostly done, it will be time for drilling and riveting!!
 

Attachments

  • 0C804241-0F2C-44A2-B531-3C78E87D2B94.jpeg
    0C804241-0F2C-44A2-B531-3C78E87D2B94.jpeg
    4.6 MB · Views: 19
  • 51A7814E-673C-4621-BFDE-9F3322976BB5.jpeg
    51A7814E-673C-4621-BFDE-9F3322976BB5.jpeg
    3.8 MB · Views: 18
  • 1343037D-8001-4CBC-B3AE-23260CD405A8.jpeg
    1343037D-8001-4CBC-B3AE-23260CD405A8.jpeg
    1.4 MB · Views: 18
  • A7A69776-3D81-4477-B2F8-F6737DD6B10D.jpeg
    A7A69776-3D81-4477-B2F8-F6737DD6B10D.jpeg
    1.9 MB · Views: 18
  • 073F9E33-0D90-4121-AC40-20684AF4D21A.jpeg
    073F9E33-0D90-4121-AC40-20684AF4D21A.jpeg
    1.9 MB · Views: 18
  • 549E3AE3-659A-4239-A2CF-514D6CC7905C.jpeg
    549E3AE3-659A-4239-A2CF-514D6CC7905C.jpeg
    1.1 MB · Views: 18
  • 0C880084-99A6-48A0-8559-0738B93D2BD1.jpeg
    0C880084-99A6-48A0-8559-0738B93D2BD1.jpeg
    2 MB · Views: 19

Moserkr

Chief Officer + Starmada Splash Of The Year 2021
Joined
Nov 23, 2020
Messages
836
Thanks @benfish909 Got a few more pieces cut and bent today, after I got bigger clamps. Needed more pressure to hold the plates in the brake. Takes longer than I figured but some of the harder cuts are done. Will keep cutting and bending until I have the majority done, hopefully by weeks end. There are pieces towards the bow that Ill wait on doing until I get up there since a lot will depend on how the gas tank fits between the consoles.
 

Attachments

  • 68A6E702-B956-4F5F-B7B4-7E4E9D53BD90.jpeg
    68A6E702-B956-4F5F-B7B4-7E4E9D53BD90.jpeg
    2.4 MB · Views: 6

SHSU

Lieutenant Junior+Starmada Splash Of The Year 2019
Joined
Mar 8, 2017
Messages
1,668
Thanks @benfish909 Got a few more pieces cut and bent today, after I got bigger clamps. Needed more pressure to hold the plates in the brake. Takes longer than I figured but some of the harder cuts are done. Will keep cutting and bending until I have the majority done, hopefully by weeks end. There are pieces towards the bow that Ill wait on doing until I get up there since a lot will depend on how the gas tank fits between the consoles.

Looking good.

I forgot, what are the brackets you are manufacturing for?

SHSU
 

Moserkr

Chief Officer + Starmada Splash Of The Year 2021
Joined
Nov 23, 2020
Messages
836
Looking good.

I forgot, what are the brackets you are manufacturing for?

SHSU
Thanks @SHSU Brackets are crudely drawn below lol. Red are the ones I just finished which support and tie in the gunnel shelf. Also in red is a bracket for behind the bow seats/ in front of the console. Will continue to the gunnel shelf under the consoles too for more storage. Yellow will tie the floor ribs into the gunnel brackets. Hoping the wood floor/gunnel panels tie everything together after that.

Still have to brace the original center stringers, and build the fuel tank supports. Just need to keep spending a few hours a day chipping away at the list. Getting more snow tonight but it will melt by the time I need to get back in the boat.
 

Attachments

  • A61C8DF2-FC3A-4DC5-99CC-C6A8C827BB80.jpeg
    A61C8DF2-FC3A-4DC5-99CC-C6A8C827BB80.jpeg
    1.5 MB · Views: 20

Moserkr

Chief Officer + Starmada Splash Of The Year 2021
Joined
Nov 23, 2020
Messages
836
Back in the second office this week, feel like I got nothing accomplished lol. Finished all the gunnel braces and brackets, still have the floor/rib braces to do (yellow in pic above). Figured out it was way faster to anneal the AL if it was pre-heated. Pretty happy with the bending but wish i had gone with a thinner metal. For a 16’ boat, .125 is beyond overkill. Not a bad thing in the end.

Raining a ton today, but tomorrow and sunday the skies are supposed to be clear. Weekend is slated for boat work. Will clean up/clear out the garage to make room for the boat, pull her in, and prep for riveting. Hoping she is fully riveted (hull/gunnels at least, the solids) and ready for coat-it by next weekend. Im ready to get moving to foam, floors and paint after that!
 

Attachments

  • A4434666-7071-4594-9085-1FEAEF44B17C.jpeg
    A4434666-7071-4594-9085-1FEAEF44B17C.jpeg
    1.9 MB · Views: 10
  • 9B2761CE-A7F8-4CBA-A461-6BA51E86D2F2.jpeg
    9B2761CE-A7F8-4CBA-A461-6BA51E86D2F2.jpeg
    1.4 MB · Views: 10
  • 4082369C-75DC-4ED9-AD40-143AC3E5B7F5.jpeg
    4082369C-75DC-4ED9-AD40-143AC3E5B7F5.jpeg
    2.2 MB · Views: 10

SHSU

Lieutenant Junior+Starmada Splash Of The Year 2019
Joined
Mar 8, 2017
Messages
1,668
I went with .125 for all my aluminum I bought. Agree maybe overkill but worth the piece of mind.

SHSU
 

El Gaffer

Seaman Apprentice
Joined
Jul 23, 2019
Messages
44
I went with .125 for all my aluminum I bought. Agree maybe overkill but worth the piece of mind.

SHSU
@SHSU Yessir!! He wants to be in the garage with me tomorrow too. We will be cutting metal again!

Had fun experimenting with what works and what doesnt when it comes to bending/cutting aluminum.

Cold bending .125 5052 did not work or budge in the cheap HF bending brake. Ended up annealing? the AL with a torch, cooling it in water, and then bending it which worked very well.

Tried an angle grinder diamond cutting wheel, and a jigsaw with a bosch metal blade. The jigsaw easily wins the cutting battle.

Got 4 small angles supports done today that will go under the gunnel shelf, 2 per side. Have 2 more to make for the ends on the gunnel shelf, then 2 more for the console/bow area.

Another little round of snow coming tomorrow night but the last bit already melted. Once the brackets/braces are mostly done, it will be time for drilling and riveting!!
Those Bosch aluminum blades are a game changer. Clark tool down the street from me keeps them in stock.
 

Moserkr

Chief Officer + Starmada Splash Of The Year 2021
Joined
Nov 23, 2020
Messages
836
Making slow progress as the usual is I guess for now haha. Been busy between work and my family, so boat has only had a little attention lately, but thats about to change. This week Ive been drilling and prepping all of my bad rivets for replacement. Since I have the coat-it along the whole bottom of my hull, Ive had to drill the rivet, then sand the spot smooth to get down to AL. The replacement rivets are just set in place and covered with a piece of duct tape so I dont forget to do any of them. When we hammer them home, ill remove the tape/rivet, apply 5200, and a few whacks then they’re done. Im hoping this method improves efficiency when I have help. Started raining on me this afternoon so I will finish up drilling and prepping tomorrow afternoon.

Saturday is the big day!!! Father in law is coming over for beers and hammering rivets!! Ive been solo on this restore, minus help here on the forum, but in the garage its pretty much just me. Luckily I find solitude calming. I wouldnt have made it this far without everyone’s help though, so thank you all, I appreciate it a lot.

Assuming the riveting goes well, Ill leak test sunday, then coat-it as soon as the hull is dry since the temps are rising this week. Pics coming up wont be anything special but I will take a few. Thanks for stopping by!
 

Moserkr

Chief Officer + Starmada Splash Of The Year 2021
Joined
Nov 23, 2020
Messages
836
Solid Rivets are in!!!!! Started out today by finishing the rivet prep by drilling out any bad ones and putting a new one in, covered by a piece of duct tape. Then I prepped the knee brace and got it lined up, as well as attached the new brackets to it. The knee brace now has 1/4” rivets for added strength, and since so many had been double drilled before.

Father in law came over around noon, we grabbed a few wobbly pops, and by 4ish we were all done!! Went surprisingly fast. I would take each rivet out in a section with its piece of tape, apply 5200, then set it back in. We worked from the transom to the front in 3 sections - transom, midship, then the bow. Once a section had all the 5200 applied, we would work rib by rib to make sure none were missed. Also created a solid foundation to move forward from. Funny part is we hammered right over the duct tape with no issues, and it kept the 5200 from making a mess.

The bow needed the most work since the log impacted there - picture with all the tape pieces. First 3 ribs almost had all their rivets replaced. With a little hammering, everything went back in stronger than original. Really happy how the rivets turned out in the end! Big thanks to my FIL for helping me out, especially holding the buck bar in the hot sun. At least it was the nicest day of the year at a sunny 65*. Will see what i can get done tomorrow and looking forward to the next big step of coat-it!! Then floors and paint!!!
 

Attachments

  • DC86BA5D-0C93-4269-A4B2-E9C8EB6D9A63.jpeg
    DC86BA5D-0C93-4269-A4B2-E9C8EB6D9A63.jpeg
    3.8 MB · Views: 26
  • 6D476245-9184-4698-BDC2-BA4B350A61F6.jpeg
    6D476245-9184-4698-BDC2-BA4B350A61F6.jpeg
    1.5 MB · Views: 22
  • BCA1EDF5-6695-417E-A799-7B583DE2E393.jpeg
    BCA1EDF5-6695-417E-A799-7B583DE2E393.jpeg
    1.5 MB · Views: 22
  • 023236C3-0464-4969-9433-FA118AC6C738.jpeg
    023236C3-0464-4969-9433-FA118AC6C738.jpeg
    1.9 MB · Views: 23
  • 0D52D0E0-D6FE-4B8E-9E9D-2F3E68DF012D.jpeg
    0D52D0E0-D6FE-4B8E-9E9D-2F3E68DF012D.jpeg
    1.5 MB · Views: 25
  • 8B7B9CBB-29E4-4B8C-B535-D399EE77E62B.jpeg
    8B7B9CBB-29E4-4B8C-B535-D399EE77E62B.jpeg
    1.6 MB · Views: 25
  • 3F6BA310-CA31-416B-AFB7-715CF6735C84.jpeg
    3F6BA310-CA31-416B-AFB7-715CF6735C84.jpeg
    2 MB · Views: 24
  • 93A8BFA3-0138-414B-8377-288EEA374EE9.jpeg
    93A8BFA3-0138-414B-8377-288EEA374EE9.jpeg
    2.4 MB · Views: 25

classiccat

"Captain" + Starmada Splash Of The Year 2020
Joined
Dec 20, 2010
Messages
3,405
Excellent work! That's a huge job and it bet it feels good to be behind you!
 

Moserkr

Chief Officer + Starmada Splash Of The Year 2021
Joined
Nov 23, 2020
Messages
836
Thanks!! Definitely feels good to have that big step complete! Riveting may have only taken 4 hours, but prepping to do it took a lot longer. Hoping I dont have any leaks, or very few/small ones that coat-it can fix!!

Had a few extra rivet heads pop off when we were hammering, and lots of junk in the ribs rattled out lol. Considering 120+/2000 rivets were broken - ~5% - including some very important supports, its no wonder these boats can fall apart and crack if enough has been compromised.
 

SHSU

Lieutenant Junior+Starmada Splash Of The Year 2019
Joined
Mar 8, 2017
Messages
1,668
Man a single afternoon!!!!! It took us about 3 months to get through all of ours. I wish I had thought about the duct tape idea, that would have helped with all the mess we had.

SHSU
 

Moserkr

Chief Officer + Starmada Splash Of The Year 2021
Joined
Nov 23, 2020
Messages
836
@SHSU haha it seems fast but I only did 100+/2000? Add the time up I spent prepping too and it would take us at least 3 months to do them all 2000+ lol. Duct tape did come in handy though. After it was done, just peel it off and a quick wipe to be done. Rivet gun stayed nice n clean the whole time.

Started working on some steel for brackets for my bunks today. Bunks have been ready for a while. Figure ill put those on before leak testing cause my old ones are horrible. Need a sharper or stronger metal 1/2 drill bit to finish drilling holes, then bending into shape. After that some quick paint and bolt em on. Cant wait to get her onto a new bed!!!
 

Attachments

  • DF17F4F4-D1B7-4354-B323-645A22BFB99D.jpeg
    DF17F4F4-D1B7-4354-B323-645A22BFB99D.jpeg
    1.8 MB · Views: 3

Moserkr

Chief Officer + Starmada Splash Of The Year 2021
Joined
Nov 23, 2020
Messages
836
Hard stop to putting bunks on the trailer. Hate to say it but im selling my starcraft cause I picked up a new project - an old glass jetboat!!!
1A8AF457-AA75-4C18-9FE3-D2F01C26F14F.jpegD6D814CE-BB7A-4546-A7EE-B1502D807D54.jpeg

Just kidding you tinheads!!! Glasser will be trashed and I just scored that bada$$ trailer for $100!!! Will have to redo some bunks and give it a new coat of paint after a wash but its rust free, good tires, good axle, and beefy. So much nicer than the unregistered rust pile my boat sits on now. New trailer sits the boat low, and has nice side steps. Huge huge upgrade so I am stoked. Needs new lights - big whoop. Its home and mine!! Carry on, thanks for taking the time to read my nonsense haha.
 
Top