1978 SS 16 restoration

Siva283

Petty Officer 1st Class
Joined
Aug 28, 2022
Messages
226
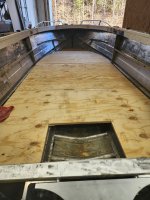
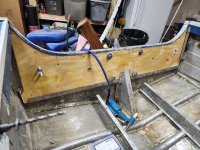
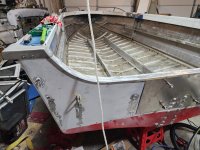
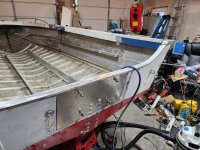
Got the gluv it done this weekend. Power washed the inside then Wiped it all down about 6 times with mineral spirits and 4 times with methanol.
No pics it wasn't showing up so looks the same.
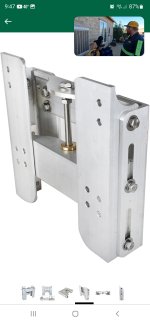
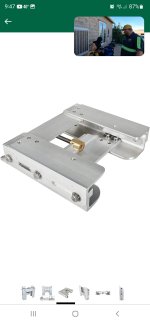
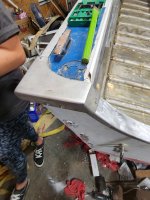
Next up reinstall the transom and finish drilling the plate I added
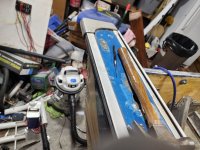
Got the aluminum tubes to go back in the splash well instead of those hideous plastic ones that were in there.
Found 2 rivits I missed and replaced them.
Next weekend I have a Xmas party for work and the next night dinner with the parents. Sunday will be a car day my brand new water pump **** the bed. Xmas and new years weekend though some big things should happen. Hopefully the transom will be in permanently the floor in and floatation foam and the sides on which I can wait to show the pictures of what I am doing with those. Might even get the splash well and consoles in and if I am really lucky the front seats.
 

Siva283

Petty Officer 1st Class
Joined
Aug 28, 2022
Messages
226
Got some unexpected work done. Got the transom in and mounted. Put the cap in the transom with a thin smearing of 5200 on the top edge where the wood and transom come together. Afterwards thought about it and I really should have used 4200.
Got the splash well drains in and flared and man they look awesome. I coating them in 5200 put the through and flared them. Doesn't look like much but that all took about 5 hours. Felt great to put those corner caps back on.
I am gonna put a bead if sealant at the caps on the top gunwale to keep water from getting under there.
I was gonna mount the splash well temporarily so I could slide a board for a floor and get some measurements but there are 2 struts that go there too that go to the floor so I need to but the floor in and do those struts.
Definitely a good day though. This is the first time a section of the boat could be called completed. Next weekend is Xmas weekend so I don't know how much will get done but some will socther should be more pics.
I have been starting to get worn down and burned out a little but this has renewed me spirit.
 

Attachments

  • 20221218_154830.jpg
    20221218_154830.jpg
    1.8 MB · Views: 19
  • 20221218_154833.jpg
    20221218_154833.jpg
    1.6 MB · Views: 18
  • 20221218_154841.jpg
    20221218_154841.jpg
    1.3 MB · Views: 16
  • 20221218_154845.jpg
    20221218_154845.jpg
    1.7 MB · Views: 18
  • 20221218_154847.jpg
    20221218_154847.jpg
    1.9 MB · Views: 17
  • 20221218_154850.jpg
    20221218_154850.jpg
    1.9 MB · Views: 19
  • 20221218_154853.jpg
    20221218_154853.jpg
    1.8 MB · Views: 18
  • 20221218_154855.jpg
    20221218_154855.jpg
    2.4 MB · Views: 19

renns

Petty Officer 1st Class
Joined
Dec 20, 2017
Messages
316
Nice work! I'm jealous of the two corner caps. Mine is missing the port side.
 

Siva283

Petty Officer 1st Class
Joined
Aug 28, 2022
Messages
226
Just scored a 22 gallon gas tank that fits perfectly under the passenger side console. I'm closing them in for storages. The driver's side will hold 2 battery's my 1000 watt genny and battery charger. So from side to side that's within 20 pounds of being balanced. That should help get the weight a little more balanced. I'll also store the 3 anchors. About 20 pounds total between them in the stsrbourd side so the left to right balance will be extremely close to balance probably within 5 pounds or so assuming a full tank. And it gets all that weight off the stern. Now it will be fishing tackle storage under the splash well. That's another major problem solved
 

Moserkr

Chief Officer + Starmada Splash Of The Year 2021
Joined
Nov 23, 2020
Messages
869
Great progress! Transom is a major milestone. Passenger side fuel tank will be interesting, would like to see some pics of that set up in place. Should balance decent especially with it balancing your own weight out. My boat likes to lean towards me when Im solo and Im not that big of a guy!
 

Siva283

Petty Officer 1st Class
Joined
Aug 28, 2022
Messages
226
Great progress! Transom is a major milestone. Passenger side fuel tank will be interesting, would like to see some pics of that set up in place. Should balance decent especially with it balancing your own weight out. My boat likes to lean towards me when Im solo and Im not that big of a guy!
Usually my girlfriend and her kids come out. I am actually using my 2 batteries and 1000 watt generator on the other side to balance it. So with no one in the boat I have move 250 pounds from the rear tojust forward of center. The left side when the tank is full will be about 40ish pounds heavier than the right. So the boat should be pretty balanced. Well till you add people then the right side is a little heavier. Its me and her 13 year old on the right and her and her 8 year old on the left. So we have a little more weight on the right with all of us in there. When I go out myself there will be a 200 pound bias to the right side. But overall the boat should be really balanced. Than tank full should weight in at about 140 pounds. On the right I will have 80 pounds of Batteries 20 pounds of Anchors and 15ish pounds of Generator.
However there will be pics and reports on the ride when she is done. Ill get pics of her sitting in the water. I expect she will sit pretty level.
 

Siva283

Petty Officer 1st Class
Joined
Aug 28, 2022
Messages
226
Alright y'all I am looking at manual adjustable Jack plates.
Anyone have any experience with them? Good bad? I like the idea of being able to adjust the motor. Especially since the boat is gonna sit and ride way different now so I won't have to pull it off and put it back on to get right. Loosen a couple bolts use the other to move the motor up and down and tighten. It would make adjustments way easier and get me some set back. Though I imagine that extra set back will stress the transom a little more but how much I have no clue
 

Siva283

Petty Officer 1st Class
Joined
Aug 28, 2022
Messages
226
did you beef up the transom on the rebuild?
Not really. Took and cut the transom out of 3\4 sanduste marine grade plywood and glued 2 peices together. Then coated in epoxy. Add a sheet is 24x24 .100 aluminum to the outside and 5200 it. I did add some 1\8 inch aluminum angle to the knee brace since it was cracked. All new rivets and bolts. All stainless. I also have the bar for the top bolts that goes from one to the other to spread the load.
I'm looking at a jack plate that only moves the motor out 4 inches. I would have liked 8 but I think that's to much
 

Siva283

Petty Officer 1st Class
Joined
Aug 28, 2022
Messages
226
Well thinking about it more. I guess it is beefed up ever so slightly. New D hoops. All new hardware. A few places I replaced the simple wood screws with bolts completely through the transom like down each side.
The boat is actually stiff now where it used to be flexy.
 

Siva283

Petty Officer 1st Class
Joined
Aug 28, 2022
Messages
226
Well went ahead and got the 4 inch set back one. Temporarily bolted it up last night and proceeded to hanf off of it bounce on it and do everything else I could and the transom didnt budge or flex a bit. I am sure the brace I have added between the top bolts helps some.
 

Siva283

Petty Officer 1st Class
Joined
Aug 28, 2022
Messages
226
post a pic. I'm new to the concept of jack plates but want to learn.
This is a Jack Plate. Mine should arrive later today but I'm not ready to put it in the boat. It mounts to the transom in place of the motor and the motor mounts to it. Loosen those bolts in the side and use the bolt in the top center to move the motor straight up and down.
In my case setting it as low as it will go is the same as having the motor raised up one hole on the motor which for me was still to low so I am ok with that. This particular one also gives me 4 inches of set back I wanted 8 inches but I was worried about the extra leverage on the transom. It would have probably been fine though.
So now when I put it in the water I can adjust the depth of the motor out in the water. I can raise it up to 4 inches. I also have all the adjustment available still in the motors transom mount so if I need more than 4 inches I can mount the motor higher on the bracket. But I think 4 inches of up travel should be plenty.

You can Google "jack plate for outboard motor" and it will give you many different explanations probably much much better than I just explained it

Edit: the lower side in this picture mounts to the boat the other side mounts to the motor
 

Attachments

  • Screenshot_20221230_094704_Amazon Shopping.jpg
    Screenshot_20221230_094704_Amazon Shopping.jpg
    502 KB · Views: 1
  • Screenshot_20221230_094711_Amazon Shopping.jpg
    Screenshot_20221230_094711_Amazon Shopping.jpg
    497.1 KB · Views: 1
  • Screenshot_20221230_094732_Amazon Shopping.jpg
    Screenshot_20221230_094732_Amazon Shopping.jpg
    457.7 KB · Views: 1
  • Screenshot_20221230_094726_Amazon Shopping.jpg
    Screenshot_20221230_094726_Amazon Shopping.jpg
    350.1 KB · Views: 1
  • Screenshot_20221230_094721_Amazon Shopping.jpg
    Screenshot_20221230_094721_Amazon Shopping.jpg
    528.1 KB · Views: 1
  • Screenshot_20221230_094716_Amazon Shopping.jpg
    Screenshot_20221230_094716_Amazon Shopping.jpg
    419 KB · Views: 1

Siva283

Petty Officer 1st Class
Joined
Aug 28, 2022
Messages
226
First fitting of the floor. Starting to mark the layout so I can get the conduit cut and holes in place and everything set up so I can seal it and put it in permanently. Then get the foam in. I am hoping to be putting foam in in about 2 weeks. More pics to come later today or tomorrow
 

Attachments

  • 20221230_144905.jpg
    20221230_144905.jpg
    1.9 MB · Views: 9

Siva283

Petty Officer 1st Class
Joined
Aug 28, 2022
Messages
226
so what is the advantage of a jack plate over a tilt/trim?
Jack plate moves the motor straight up and down. So you can move the motor higher without changing the angle of the prop. When you use trim yes your bringing the motor higher or lower in the water but your changing the prop angle so the high you trim the more the motor is pushing the back of the boat down.
With a jack plate you can raise it without the change in angle pushing the back of the boat down. So I get less drag and keep my forward thrust by not pushing the stern down.

Check this link it gives a run down.


Siva283

Petty Officer 1st Class
Joined
Aug 28, 2022
Messages
226
Well my measurements on my fuel tank didn't take into account the angles of the sides. So I am gonna have to make my consoles a little deeper which is fine. I was putting a birch veneer on them anyway. From the inside it will have alot of wood. I love the look and feel of it. But that's definitely a set back. I am shooting for having it done the end of February or mid March.
Tomorrow I'll finish the floor lay out and the interior sides. Then it will all get sealed Sunday. If things go to plan next weekend it will go in permanently along with the sides and get the flotation foam.
Then just need to build the new consoles put the front seats back in and the splash well. All new wiring.
Whatever else I am forgetting then it will get painted and the vinyl floor. After that mount the motor and she will be a ripper.
Seems like so little when you say it but I know it's alot
 

SHSU

Lieutenant Junior+Starmada Splash Of The Year 2019
Joined
Mar 8, 2017
Messages
1,710
Progress is always good.

Pictures also help us that have little imagination.... ;) lol

SHSU
 
Top