1978 SS 16 restoration

Siva283

Petty Officer 1st Class
Joined
Aug 28, 2022
Messages
226
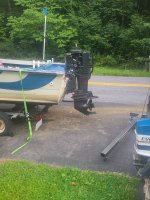
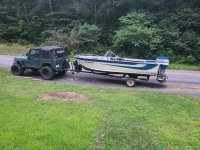
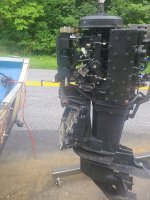
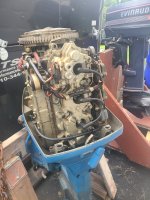
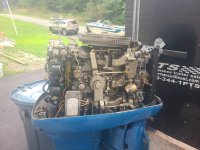
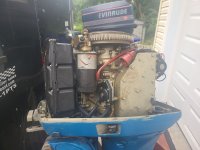
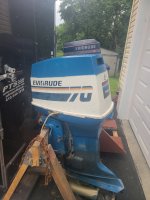
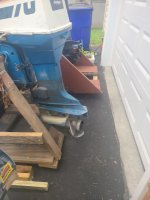
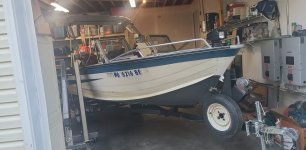
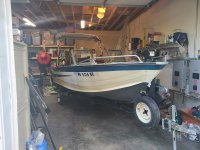
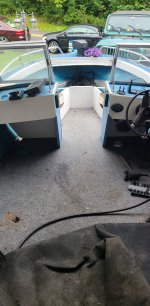
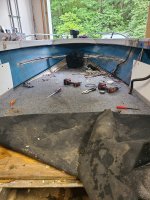
I am about start my first restoration. I have a 1978 StarCraft that I put a 75hp 93 merc on the original Evinrude 70hp was ran without oil.
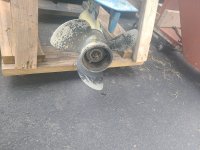
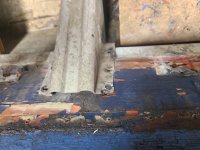
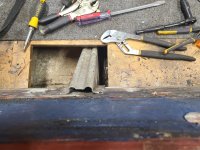
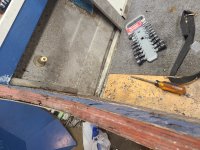
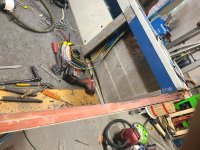
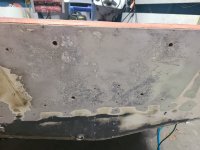
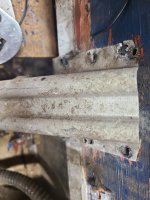
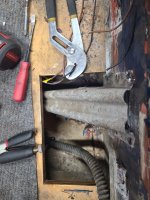
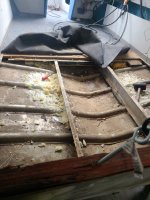
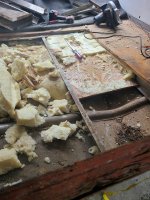
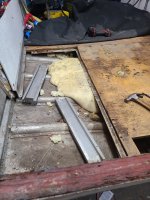
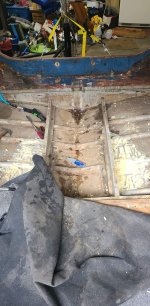
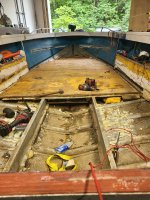
Lots of rivit heads popping off so my first step will be to gut it and replace most of all the rivits below the waterline. Then she's will get gluvit inside and gatorglide on the outside bottom. A new transom and once the floor is back in pour foam 2 part foam. I am open to pointers since I have never done this and will be learning as I go
 

Attachments

  • 20220819_182954.jpg
    20220819_182954.jpg
    2.3 MB · Views: 50
  • 20220726_201507.jpg
    20220726_201507.jpg
    5.2 MB · Views: 49

renns

Petty Officer 1st Class
Joined
Dec 20, 2017
Messages
316
Welcome! Sorry to hear about the 'Rude running without oil. I lost a Merc that way. A friend borrowed the boat, filled it up with fuel at the marina, but didn't add any oil. Ran it hard for the weekend with almost no lube, and it grenaded shortly thereafter.
Good luck with the project. There's lots of SS16 build threads here, so there's no shortage of info.
 

Siva283

Petty Officer 1st Class
Joined
Aug 28, 2022
Messages
226
Welcome! Sorry to hear about the 'Rude running without oil. I lost a Merc that way. A friend borrowed the boat, filled it up with fuel at the marina, but didn't add any oil. Ran it hard for the weekend with almost no lube, and it grenaded shortly thereafter.
Good luck with the project. There's lots of SS16 build threads here, so there's no shortage of info.
I'm a little nervous about it. This boat spent it's life in the Chesapeake bay. There's even some barnacle growth. The guy flat out lied about the boat. I have found probably 100 rivits that are missing and he smeared JB weld on them. When I take it out the bildge runs about every 10-15 minutes and every run a few more rivits pop. I have found one put in the transom all the way through but it's above the water line. I'm hoping replacing basically all the rivits below the water line possibly a few patches and 5200 to fix any serious pitting I find. Then between the gatorglide and the gluvit she finally stays dry. I'm working on cleaning out my garage to make room since fall is coming and it gets cold here I'll need the heated area.
I know it's gonna be work but hopefully not above my skill level. I'm also hoping to Tig up anot of the screw holes and stuff where tons of different things have been Mounted over the years.
What worry's me most of somewhere along the keep it's leaking and I have no idea where yet.
 

Siva283

Petty Officer 1st Class
Joined
Aug 28, 2022
Messages
226
Since everyone likes pics here some of mounting the Merc and removing the dead Evinrude. Well it will start and run on neutral if you keep it over 1500. Don't try to put it in gear or idle it though
 

Attachments

  • 20220819_182954.jpg
    20220819_182954.jpg
    2.3 MB · Views: 14
  • 20220819_180630.jpg
    20220819_180630.jpg
    2.1 MB · Views: 18
  • 20220819_180621.jpg
    20220819_180621.jpg
    2.9 MB · Views: 16
  • 20220815_180001.jpg
    20220815_180001.jpg
    2 MB · Views: 15
  • 20220815_180006.jpg
    20220815_180006.jpg
    2 MB · Views: 14
  • 20220815_180013.jpg
    20220815_180013.jpg
    1.8 MB · Views: 14
  • 20220815_180041.jpg
    20220815_180041.jpg
    1.3 MB · Views: 14
  • 20220815_180043.jpg
    20220815_180043.jpg
    1.5 MB · Views: 13
  • 20220815_180046.jpg
    20220815_180046.jpg
    1.5 MB · Views: 13
  • 20220815_180052.jpg
    20220815_180052.jpg
    2.6 MB · Views: 13

ifishmuskie

Seaman Apprentice
Joined
Apr 8, 2012
Messages
33
I wouldn’t tig any holes. Just put a rivet in. Some places I just use pop rivets.
First thing I’d do is a leak test. Then you’ll know if it’s worth while.
 

Siva283

Petty Officer 1st Class
Joined
Aug 28, 2022
Messages
226
I wouldn’t tig any holes. Just put a rivet in. Some places I just use pop rivets.
First thing I’d do is a leak test. Then you’ll know if it’s worth while.
Oh she leaks I have done the test but with the exception of one behind the keel which I don't know if it's a rivit or what all the others are rivits that the heads popped of and there 3 with heads that seep.
I think it'll be worth while as long as I don't find a ton of bad pitting when I gut it.
There looks like there have been a dozen different tops on it over the years there are snaps screwed down all over the gunnels. I'm planning to pull those off Tig weld them and sand them smooth before priming and paint.
I'm doing the tigging myself so that's no biggie the aluminum is thick enough and should be clean enough. I wouldn't try to Tig the hull it's way to contaminated from the salt for my Tig skills.

But all the leaks I have found are rivits except for one it could be but I won't know for sure till I but it out
 

Siva283

Petty Officer 1st Class
Joined
Aug 28, 2022
Messages
226
Hoping to start on this project in 2-3 weeks. Gotta make room in the garage and I think I am gonna take it out another time or 2 before tearing it apart.
 

Moserkr

Chief Officer + Starmada Splash Of The Year 2021
Joined
Nov 23, 2020
Messages
832
Welcome siva! Good looking boat and YJ! Pop-rivets and jb weld are definitely temporary fixes. Hopefully you find very little corrosion on her when its all torn apart. Get some solid rivets and start hammering, she will go back together nicely that way. A lot of structural support comes from it being held together properly so be sure to test a lot of rivets before putting floors back in. A PO hit a log with my 16SS and I replaced over 200 rivets from that incident, most of which followed a pattern from the damage.

Also Im not a fan of the pour foam but many people do it. Just seems messy and creates a hassle for future repairs. Cutting foam insulation sheets and just laying them in there is your other option.

Looking forward to seeing your future progress!
 

Siva283

Petty Officer 1st Class
Joined
Aug 28, 2022
Messages
226
Welcome siva! Good looking boat and YJ! Pop-rivets and jb weld are definitely temporary fixes. Hopefully you find very little corrosion on her when its all torn apart. Get some solid rivets and start hammering, she will go back together nicely that way. A lot of structural support comes from it being held together properly so be sure to test a lot of rivets before putting floors back in. A PO hit a log with my 16SS and I replaced over 200 rivets from that incident, most of which followed a pattern from the damage.

Also Im not a fan of the pour foam but many people do it. Just seems messy and creates a hassle for future repairs. Cutting foam insulation sheets and just laying them in there is your other option.

Looking forward to seeing your future progress!
Thanks I got 1,000 solid rivits to start with.the ones below the water line are bad. 200 or so the heads have popped off.
I am laying 0lastic down for the pour foam basically making custom blocks for each section so I canify them out if need be. I am also replacing all rivits below the water line and re bucking the rest. There probably 20 above the water line that I already know need replaced. Luckily itooks like only the rivits corroded. So far the aluminum skin looks good.
I just started taking the motor off the rigging is undone.
It'll be off tonight
This project should move fast. I'm motivated and don't have kids. I'm a widow so there's nothing to slow me down but work.
And some more pictures she's in the garage. There will be another update tonight or tomorrow. Possibly both
 

Attachments

  • received_837401024087872.jpeg
    received_837401024087872.jpeg
    140.5 KB · Views: 16
  • 20220909_180158.jpg
    20220909_180158.jpg
    3.4 MB · Views: 16

Siva283

Petty Officer 1st Class
Joined
Aug 28, 2022
Messages
226
Got the motor off and started tearing the back apart.
There was corrosion and putting behind the wood StarCraft had on the outside. I am going to epoxy a peice of sheet aluminum on the outside.
Thete are a ton of rivits the need replaced but so far just the rivit corroded the skin seems in great shape. Almost have the transom wood out. I wanna get the new one cut and epoxy coated and put it in then I'll finish gutting everything and getting the foam out.
After that it'll be replacing a lot of rivits then I'm gonna hang it from the rafters to do gatorglide on the bottom and gluvit on the inside.
Here's some pics of the progress so far
 

Attachments

  • 20220910_181854.jpg
    20220910_181854.jpg
    1.9 MB · Views: 22
  • 20220910_181850.jpg
    20220910_181850.jpg
    2.6 MB · Views: 23
  • 20220910_181849.jpg
    20220910_181849.jpg
    2.7 MB · Views: 22
  • 20220910_181846.jpg
    20220910_181846.jpg
    2.6 MB · Views: 23
  • 20220910_181841.jpg
    20220910_181841.jpg
    2 MB · Views: 22
  • 20220910_170142.jpg
    20220910_170142.jpg
    1.7 MB · Views: 22
  • 20220910_170153.jpg
    20220910_170153.jpg
    2.1 MB · Views: 22

renns

Petty Officer 1st Class
Joined
Dec 20, 2017
Messages
316
Seeing these pics brings flashbacks to last fall for my project! Looking good. Just one thought... Would 3M 5200 or the like be more suitable for your overlapping patch on the outside of the transom? I'd think it would provide the sealing and flexibility needed for that joint.
 

Siva283

Petty Officer 1st Class
Joined
Aug 28, 2022
Messages
226
Seeing these pics brings flashbacks to last fall for my project! Looking good. Just one thought... Would 3M 5200 or the like be more suitable for your overlapping patch on the outside of the transom? I'd think it would provide the sealing and flexibility needed for that joint.
I think I am going to use marine tex Todo exactly that. I'll be getting the rotted transom out today I wanna see what the inside looks like before I make a final decision.
I'm just glad so far the 30 or so rivits I have drilled out only the rivits are corroded.
I was thinking 5200 for it and I have some. But the Marine tex or gluvit is made specifically to bond to aluminum.
I am totally willing to change my mind though and learn from others experiences if anyone wants to chime in with their experience
 

Siva283

Petty Officer 1st Class
Joined
Aug 28, 2022
Messages
226
Still haven't gotten the transom out the boat is hanging by it while I work in side the boat. All the rivits are out of the z channel and all the caps and everything are off. I have no idea yet how I am gonna get it out
 

Attachments

  • received_1257122848388118.jpeg
    received_1257122848388118.jpeg
    263.7 KB · Views: 29
  • received_584042403401547.jpeg
    received_584042403401547.jpeg
    284.7 KB · Views: 28
  • 20220911_154352.jpg
    20220911_154352.jpg
    1.8 MB · Views: 26
  • 20220911_141547.jpg
    20220911_141547.jpg
    2.8 MB · Views: 26
  • 20220910_190142.jpg
    20220910_190142.jpg
    2.4 MB · Views: 26
  • 20220910_190140.jpg
    20220910_190140.jpg
    2.3 MB · Views: 27
  • 20220910_181854.jpg
    20220910_181854.jpg
    1.9 MB · Views: 26
  • 20220910_181850.jpg
    20220910_181850.jpg
    2.6 MB · Views: 28

Siva283

Petty Officer 1st Class
Joined
Aug 28, 2022
Messages
226
This is where it's at today. Getting those boards off the foam is damn near impossible. Getting the foam out of the boat sucks too.
Still haven't gotten the transom out. He siliconed it to the z channel and the z channel to the hull. I haven't been able to pop the z channel off either
 

Attachments

  • received_1257122848388118.jpeg
    received_1257122848388118.jpeg
    263.7 KB · Views: 13
  • 20220911_164814.jpg
    20220911_164814.jpg
    3 MB · Views: 13
  • 20220911_170202.jpg
    20220911_170202.jpg
    2.7 MB · Views: 13

Moserkr

Chief Officer + Starmada Splash Of The Year 2021
Joined
Nov 23, 2020
Messages
832
Screw some eye hooks into the top of the transom, strap the boat down, and try to pull it up from a point in the rafters. If its been sealed in, find something thin to slide between it and the metal to break it. I used a pry bar to move mine off the hull then screwed in hooks to lift it out.
 

Siva283

Petty Officer 1st Class
Joined
Aug 28, 2022
Messages
226
Screw some eye hooks into the top of the transom, strap the boat down, and try to pull it up from a point in the rafters. If its been sealed in, find something thin to slide between it and the metal to break it. I used a pry bar to move mine off the hull then screwed in hooks to lift it out.
I put eye bolts in and used my engine hoist I'll try strapping the boat to the trailer for extra weight. I didnt even think about that. I can add weight to the trailer if need be.
Thanks for the tip
 

MNhunter1

Ensign
Joined
May 12, 2014
Messages
979
I put eye bolts in and used my engine hoist I'll try strapping the boat to the trailer for extra weight. I didnt even think about that. I can add weight to the trailer if need be.
Thanks for the tip
Try standing inside the hull as well. Using your weight to rock it a bit sometimes helps break it free. Just make sure you have all the hardware and splashwell drains out :)
 

Siva283

Petty Officer 1st Class
Joined
Aug 28, 2022
Messages
226
Try standing inside the hull as well. Using your weight to rock it a bit sometimes helps break it free. Just make sure you have all the hardware and splashwell drains out :)
Oh I was I left it hanging by the transom while I was removing the floor. Looks like one side started to budge a tiny bit that I hadnt noticed. I am going to mess with it more tonight after work. I still need to get the out and I need to get one last floorboard up from the hell that is flotation pour foam. 3\4 ply soft from being damp but not rotten and it just doesnt want to release from the foam. Like the rear most board I am probably going to have to carefully cut it into smaller peices to get it out. I am redoing the floor anyway and coating it in epoxy like I am doing to the transom. Its getting a foam flooring that looks kinda like teak over it
 

Moserkr

Chief Officer + Starmada Splash Of The Year 2021
Joined
Nov 23, 2020
Messages
832
That exactly what I did to my floor - epoxy then the faux teak foam floor - hydroturf (or amazon knock-off brand). The jungle store brands I believe just get factory seconds that didnt pass hydroturf’s QC - probably one factory in china making it all. All my sheets had minor defects which were not a big deal. The barefoot comfort on the foam floor is well worth it. Lots of youtube videos I found later about guys buying the uncut sheets and cutting in their own design with a router or something. Thats another level of custom though.
 

Siva283

Petty Officer 1st Class
Joined
Aug 28, 2022
Messages
226
That exactly what I did to my floor - epoxy then the faux teak foam floor - hydroturf (or amazon knock-off brand). The jungle store brands I believe just get factory seconds that didnt pass hydroturf’s QC - probably one factory in china making it all. All my sheets had minor defects which were not a big deal. The barefoot comfort on the foam floor is well worth it. Lots of youtube videos I found later about guys buying the uncut sheets and cutting in their own design with a router or something. Thats another level of custom though.
I am using the Amazon version. From what I have seem the sheets arent cut parallel with the lines. But I am sure I can make it look good enough. I am doing the floor in it and the consoles and I am thinking about doing the top of the gunwales with it.
She is getting Red gatorglide on the bottom. The inside bottom is getting a good coating of gluvit that should keep her dry. I am switching the color scheme to a light grey and red to hopefully help hine the waterline stains from the chesapeake bay.
I am definitely not talented enough to design my own with a router. It probably looks absolutely amazing and if I had skills I would. After the boat gets done I think I am gonna paint the jeep in a matching color scheme.
I have seem videos where some people (tiny boat nation is one) claim the name brands have better adhesive then the amazon version but you could tell it was obviously a shill and that the name brand was sponsering the video. You could tell the person doing it was purposly doing it to make the amazon version seem like it doesnt stick. Yet the thousands of reviews on amazon that appear to be legit talk about no problems after 2 and 3 years.
 
Top