1976 Tom Boy Boat, 1976 40 HP Johnson Outboard and who knows what Trailer

Woodonglass

Supreme Mariner
Joined
Dec 29, 2009
Messages
25,924
Ha WOG, thanks very much for those kind words.

I may need your expertise's soon. I have a top seat cushion to make for the live well top.

I have all the vinyl(s) in all the seat matching colors and a pretty good idea of what I want to design for the matching live well seat top. But I may need you to explain what to buy and use to get what I want for that seat. I will post a design with dimensions and colors for you to see and help me buy the proper foams and batting to get it accomplished. That is if you want to. :decision::help:

I would be happy to help in any way I can. A man with your skills won't have any issues doing this. In Fact, I predict that not only will you be good at it...I believe you will enjoy the work!!:nod:
 

gm280

Supreme Mariner
Joined
Jun 26, 2011
Messages
14,602
I would be happy to help in any way I can. A man with your skills won't have any issues doing this. In Fact, I predict that not only will you be good at it...I believe you will enjoy the work!!:nod:

Well I will post my idea shortly for you to see what I'd like to do. But it may be pretty advanced for a newbie like myself. But I do like challenges...I think... :noidea:

Well I manged to get that front carpet installed today. I made my mind up that one way or the other, it was going in. And it did. That hurtle is over and I can proceed with rub rail and such. I didn't cut out the front hatch door opening because I wanted the contact glue to cure first. That stuff really stinks. But so did the polyester resin at first. Not so much anymore. I don't know if that is a good thing or not. :loco:

I attached some pictures. I rolled out the carpet....that kind of sounds interesting. And It seems I purchased enough to do two boats. But I didn't want to run out and buy more with a mismatched color later on. And I also drew some caulk lines with arrows noting direction. I remember back in my carpet installation days, so many decades ago, I was hoping I would forget about it, you had to make certain that any matching had to have the carpet running in the exact same direction or the seams would show. So that is why I drew those caulk lines.Then I cut the first pattern out for the front deck. Yea the deck pattern looks so small compared to the size of the carpet. But better buy more then needed, then less.

So now I can install the rub-rail and live well. That puts this in hyper drive towards finishing. Well I can pretend can't I? :encouragement:

Until next update, you all have a magnificent day!
 

Attachments

  • photo303518.jpg
    photo303518.jpg
    87.6 KB · Views: 0
  • photo303519.jpg
    photo303519.jpg
    84.7 KB · Views: 0
  • photo303520.jpg
    photo303520.jpg
    57 KB · Views: 0
  • photo303521.jpg
    photo303521.jpg
    60.9 KB · Views: 0
  • photo303522.jpg
    photo303522.jpg
    79.3 KB · Views: 0
  • photo303523.jpg
    photo303523.jpg
    78.6 KB · Views: 0
  • photo303524.jpg
    photo303524.jpg
    73.2 KB · Views: 0
  • photo303525.jpg
    photo303525.jpg
    70.4 KB · Views: 0

gm280

Supreme Mariner
Joined
Jun 26, 2011
Messages
14,602
Looks good GM, what contact adhesive did you use? I typically use 3M Super 90.

Well I used Weldwood contact cement. And I used a 2" brush and applied it to both the deck surface and the carpet. Allowed it to set for about 15-20 minutes and put it on the deck. Seems to have worked really well. And I can tell you a new sharp carpet knife blade installed on the carpet knife cuts like butter.

I can tell you, it did bring back ancient memories when I use to install carpet, well before I entered the Electronic and Computer Programming fields. And I know exactly why I didn't stay in the carpet installation career. :facepalm:

I am going to proceed to mounting the rub rail now and that front section uses screws to hold it on because of the fiberglass and wood behind that rub rail area. So my thoughts were to squeeze some 3M 5200 into the screw holes before installing the screws to help keep water out. Has anybody ever done that?

Then I can drill and install the large head pop rivets for the rest of the install. That should make the outside of the hull look finished. YEA :bounce:

And next is the live well. I have it pretty much finished, but it needs installed. And that means all the water and electrical connections will be setup as well.

And this is where WOG comes in to play. I have the top installed with the hinge, but I need to make the seat pad/cushion for it yet. So I need to measure it out and make a picture of what I would like to do. I want it to really match the seats in both color and design. So I bought all the vinyl material from Iboats (that is where I bought the seats from, by the way) so that the colors matched perfectly. And they do.

More to come soon. You all have a perfect day...
 

oldrem

Commander
Joined
Nov 7, 2013
Messages
2,002
If there's any chance of ever having to remove it, you may want to go 4200 instead of 5200. I use Marine Goop in those areas.
 

gm280

Supreme Mariner
Joined
Jun 26, 2011
Messages
14,602
I got yet another question for those in the know. :confused:

Since it seems most boats have an angled transom, and most smaller boats usually have their cranking battery located at the transom, how do you guys mount the battery box there? If you mount it flat to the floor, there is an angled gap behind it. I could build a spacer to fill in the angled gap, but I'd like to know how others do it first. :decision:

I have the three Tom Boy cast aluminum plates in primer now and hope to get them painted tomorrow. And the two back plates will finish off the rub rail install at the transom. The front cast aluminum Tom Boy plate bolts the front of the rub rails and then typical pop rivets goes down the sides. I am working on those rails and some electronic circuits as well. Part of all those little things that need done.

So let me know how you guys did your cranking battery box install. I am interested. :peace:

THANKS!
 

archbuilder

Vice Admiral
Joined
Sep 12, 2009
Messages
5,697
I used clear silicon on the screws for miss Morgans rubrail. I haven't had any issue with that. I like the fact that it doesn't show as bad and its easier to clean up than 4200 or 5200.

Both of my boats just have a triangle space between the battery box and transom. Fuel tanks are also that way. I gave up and made my own hold downs for the battery. I can't use a lid with them because of the hold down, but That really isn't an issue either since they are covered.
 

gm280

Supreme Mariner
Joined
Jun 26, 2011
Messages
14,602
I used clear silicon on the screws for miss Morgans rubrail. I haven't had any issue with that. I like the fact that it doesn't show as bad and its easier to clean up than 4200 or 5200.

Both of my boats just have a triangle space between the battery box and transom. Fuel tanks are also that way. I gave up and made my own hold downs for the battery. I can't use a lid with them because of the hold down, but That really isn't an issue either since they are covered.

Arch, do you have a picture of your battery setup at the transom? I'd be interested to see how you installed yours and your custom hold down clamping fixture as well? And yes, the fuel tank does have the same issues. So when I figure one out, I figured out both. Kind of like killing two birds with one stone....but even a 12 gauge didn't help me with that either. :facepalm: Only person on the dove field with an empty box of shotgun shells and not one bird. :eek: At least I was consistent though! :der:

Wishing you all s great day!
 

gm280

Supreme Mariner
Joined
Jun 26, 2011
Messages
14,602
I would be happy to help in any way I can. A man with your skills won't have any issues doing this. In Fact, I predict that not only will you be good at it...I believe you will enjoy the work!!:nod:

Okay WOG, here is a simple layout of what I am looking for. Of course the final design is still up in the air, and anybody that can offer something other than this, is very welcomed.

The top of the live well measures 27 3/4" by 15 3/4" . I know, odd sizes, but it is how it came out. And I have the exact vinyl material the seats are made out of to work with. There are three colors. Red, more of a dark red, light gray and dark gray. I also posted a few pictures of the actual seats and would like to compliment them in the live well cushion design. What I need to know is what batting and foam do I need to purchase to get something similar to the seats? I posted a side picture of the seats to give you an idea of their thicknesses. Hope that isn't too complicated to make something to match in both design and shape for comfort. I know I don't want any beading that would catch the under side of your legs though. Just something smooth but nice. And I do have lots of material of each color, so try and try again can be part of the effort. I had to buy a yard by 52" (I think) of each color, as a minimum. And I have made car seat covers that used wires and/or twine/rope to contour the design before. So if I have to incorporate such into the design, that's okay too.
 

Attachments

  • photo303618.jpg
    photo303618.jpg
    64.9 KB · Views: 0
  • photo303619.jpg
    photo303619.jpg
    58.1 KB · Views: 0
  • photo303620.jpg
    photo303620.jpg
    68.7 KB · Views: 0
  • photo303621.jpg
    photo303621.jpg
    62.4 KB · Views: 0
  • photo303622.jpg
    photo303622.jpg
    43.1 KB · Views: 0
  • photo303623.jpg
    photo303623.jpg
    61.8 KB · Views: 0

Woodonglass

Supreme Mariner
Joined
Dec 29, 2009
Messages
25,924
Will the Seat be a flat panel or do you want it to have the contours like the fishing seat? If a flat panel of foam then I can describe how to sew it. If you want contours then I can describe how to build the base and cut the foam to accomplish the contoured look. Let me know how you want it to look
As far as foam you want a 55 lb compression rated High Density foam. Here's what I've used in the past.

https://www.ebay.com/itm/FOAM-SHEETS...1FjA:rk:2:pf:0

You can use an electric carving knife to cut and shape it. If and when use batting, I use 1" polyester batting and I spray glue it to the foam as well as a thin plastic covering. The plastic helps avoid the vinyl chaffing the foam and easier to slip the covers on. I've even used plastic Walmart bags. Believe it or not they wear really well. I had to recover one of my seats due to mold over the winter storage and when I took the cover off after 5 years the Walmart bag was still perfect.

Not sure what your knowledge level is on the various stitch types, length of stitches, thread weight etc. but let me know and I'll provide as much detail as you want.
 

sphelps

Supreme Mariner
Joined
Nov 16, 2011
Messages
11,451
Oh boy ! This is gunna be fun to watch !
‘So basically a rectangle cushion to match the seats .. dark gray around the outside with the light gray center section .
‘The hard part is figuring how to incorporate the red ... Maybe like an 8” stripe down the center or maybe just a thin separation band between the 2 shades of gray ...

edit : just saw the sketch you made with the rest of your pics ... Very nice design GM .. I like it !
 
Last edited:

gm280

Supreme Mariner
Joined
Jun 26, 2011
Messages
14,602
Will the Seat be a flat panel or do you want it to have the contours like the fishing seat? If a flat panel of foam then I can describe how to sew it. If you want contours then I can describe how to build the base and cut the foam to accomplish the contoured look. Let me know how you want it to look
As far as foam you want a 55 lb compression rated High Density foam. Here's what I've used in the past.

https://www.ebay.com/itm/FOAM-SHEETS...1FjA:rk:2:pf:0

You can use an electric carving knife to cut and shape it. If and when use batting, I use 1" polyester batting and I spray glue it to the foam as well as a thin plastic covering. The plastic helps avoid the vinyl chaffing the foam and easier to slip the covers on. I've even used plastic Walmart bags. Believe it or not they wear really well. I had to recover one of my seats due to mold over the winter storage and when I took the cover off after 5 years the Walmart bag was still perfect.

Not sure what your knowledge level is on the various stitch types, length of stitches, thread weight etc. but let me know and I'll provide as much detail as you want.

Okay, sounds like you know what I am wanting to do. Yes, I do want a contoured cushion to match the contour of the seats, if possible. And I want it about as thick as the seats also. As far as the stitching goes, I even want to match the seat with that too. Yea a bit advanced I agree. But I want it to look like they all were purchased and not home made. I shoot for that imagine in everything I do. Part of my OCD I guess, if I even had that condition. I just like things to look great when I build them.

I have made some other vinyl cushions before, but nothing approaching this layout. So the sewing isn't as much an issue, at least I keep telling myself that. I have watched a lot of sewing designs on YouTube for all types of cushion designs, and think I can duplicate them. I have also used an electric knife to contour foam before. And I don't think that will be an issue either. I just didn't know the correct foam type or top batting to get it to look smooth and contoured. We will see.

WOG, I was thinking the foam should be at least 3" type? But was thinking about an inch on top or so... I don't know what else goes on top of the foam, so I don't know if that will match the thickness of the seats... What do you think?

sphelps, The actual color layout is still up in the air. I want it to match, but haven't set on any one design for that yet.
 

Woodonglass

Supreme Mariner
Joined
Dec 29, 2009
Messages
25,924
I'd use 3" foam and 1/2 - 1" batting. Here's a drawing of how I'd do it..
The interior and exterior boxing for the Outer section should be 4" to allow for stapling both on the inside and outside of the main base. Same for the Inner piece to allow for wrapping the vinyl around the base and stapling. Hope this makes sense. If not PM me your phone# and we can talk about it.


. Click image for larger version  Name:	GMs Seat.jpg Views:	1 Size:	117.5 KB ID:	10673404
 

gm280

Supreme Mariner
Joined
Jun 26, 2011
Messages
14,602
I'd use 3" foam and 1/2 - 1" batting. Here's a drawing of how I'd do it..
The interior and exterior boxing for the Outer section should be 4" to allow for stapling both on the inside and outside of the main base. Same for the Inner piece to allow for wrapping the vinyl around the base and stapling. Hope this makes sense. If not PM me your phone# and we can talk about it.


.

Okay WOG, if I am understanding you correctly, you are talking about making four separate cushions and attach them to the top plate to give me that curvatures I am looking for. Sounds like a pretty good plan to me, and a lot easier to accomplish then sewing up one vinyl part for everything. I can do that. Only one that will offer some issues will be the very middle section with the sharper corners. Got any ideas how to do them? And how do you use the batting on the top? Like your ideas pretty well...
 

Woodonglass

Supreme Mariner
Joined
Dec 29, 2009
Messages
25,924
Okay WOG, if I am understanding you correctly, you are talking about making four separate cushions and attach them to the top plate to give me that curvatures I am looking for. Sounds like a pretty good plan to me, and a lot easier to accomplish then sewing up one vinyl part for everything. I can do that. Only one that will offer some issues will be the very middle section with the sharper corners. Got any ideas how to do them? And how do you use the batting on the top? Like your ideas pretty well...

Yeah, that's pretty much what I'm suggesting. The Interior piece IS the most challenging due to the sharp corners. It's doable although I'm not sure how it would function when sitting on it.
 

gm280

Supreme Mariner
Joined
Jun 26, 2011
Messages
14,602
Okay, a little more update.

I finally got the Tom Boy aluminum parts painted. And while they look pretty nice, seems the black lettering is not drying like it should have. My fault though, because I used PPG Base Coat paint, but I also used some paint I had in a thin little jar to paint the black lettering. I though it would dry and then I could clear coat and seal everything. Well the base coat paint dried, and I clear coated them, but the black lettering is sticky. Not sure if I will have to redo them yet. I actually started covering the lettering with a black sharpie, but it wasn't giving the coverage I was wanting. Seems sharpies remove color as well as applies it at the same time. We will see and I'll post pictures.

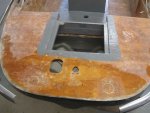
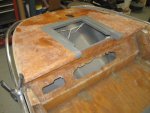
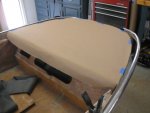
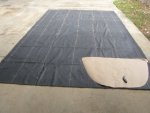
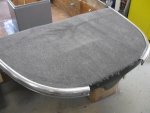
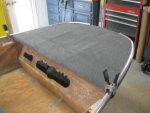
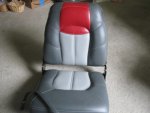
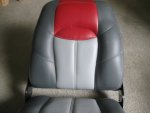
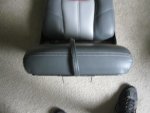
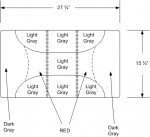
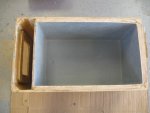
Next item is the live well seat, of course. I haven't settle on the final design. But knowing more now then when I started, I may redesign the layout to help with the covering. Again, it is still up in the air, but after looking at the seats, I have another idea I will post later on for you guys to make comments and improvement suggestions.

That brings me to another question. Seem there are a lot of folks that always want to see how others build live wells. And if you search on these forums, there isn't one thread to show that construction effort from start to finish. So I was wondering If I should post such an article, separate from this thread, that shows how I did mine. Of course it isn't the gospel on live well building, and I am certain others could do a lot better job, but at least it would allow others to see at least one such project and allow improvement suggests along the way as well. What to you all think? Good, Bad, or leave it alone?

Here is wishing everyone a great day...
 
Top