archbuilder
Vice Admiral
- Joined
- Sep 12, 2009
- Messages
- 5,697
I second that.


First on the list ...Take care of the Admiral !
The rest ,just get to it when ya can ...")
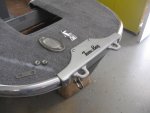
ray2:And I think I will regret it in the morning. Why you may ask, because I installed the rub rails. And every 4" or 5" it took a large headed pop rivet. And since there were 3/16" diameter size, a lot of squeezing went on. Hand cramps could set in... :facepalm: :cold:
That's why I let Watermann convince me to get the air riveter. Arthritis cramps my hands up bad enough without putting in hundreds of rivets.
Looking good. Miss carpal tunnel let me know it wasn't happy with all of Fuggly's rivets......next time I will be buying an air rivet gun!
Here is a little update info for anybody that is using a typical resistive fuel sender setup for your fuel tank to fuel gauge. Roughly 140 ~ 150 ohms is about a quarter of a tank fuel level. And that is independent of the size of the tank with either a swing arm or reed sender unit. I wanted to know so I can finish up the low fuel indicator light circuit. So hope that helps others.