1976 Tom Boy Boat, 1976 40 HP Johnson Outboard and who knows what Trailer

gm280

Supreme Mariner
Joined
Jun 26, 2011
Messages
14,593
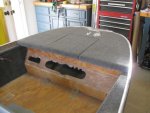
I did get some wiring done today. I also cleaned the front deck lid off for another try at the carpet install. Surely I can't get it wrong twice....can I? :rolleyes:

I used a typical flap disk and it cleaned up pretty well. Now I will try again and hope this time to get in the right direction.

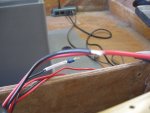
I attached pictures about how I label the wires. I was labeling the ground wires for the different circuits. The positive wires will also get labeled but they will attach to the main control panel switches and I can't do that until the carpet is installed.

So here is my method of labeling wires. You can easily identify which wire goes to where this way.

I print out the labels using any word type program, and then cut them to the size I need for t he wire. Just remember that the smaller the gauge, the smaller the font has to be or it will wrap around over itself. I am using marine grade tinned 14 and 16 gauge wire. So a typical font seems to work just right.

I then cut the clear heat shrink tube and slide that on the wire first. You have to do that because otherwise the clear heat shrink tube won't go over the terminal. I am using a 3:1 clear 1/4" (before shrunk) shrink tube and it works perfect for these wires. Then I strip the wire to the size needed and crimp the terminal on next. Then I solder the terminal as well.

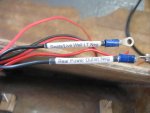
I use some scotch tape (mat finish type works perfect) and apply the label to the wire wrapping it so the words are wrapped last. I also use some more scotch tape to finish the wrap. I use only about a 1/4" long piece of tape both times so you are not wrapping scotch tape over the words. It is only there to hold it until the clear is shrunk down over the label.

Then I slide the clear heat shrink tube over the wrapped label and shrink. It is done and will be there forever. And you can easily read that label too. Other people have other ways to do this. This is just how I like doing it.There is always more then one way to skin a cat... :confused:
 

Attachments

  • photo307573.jpg
    photo307573.jpg
    69.2 KB · Views: 0
  • photo307574.jpg
    photo307574.jpg
    113.2 KB · Views: 0
  • photo307575.jpg
    photo307575.jpg
    60.8 KB · Views: 0
  • photo307576.jpg
    photo307576.jpg
    109.8 KB · Views: 0

kcassells

Fleet Admiral
Joined
Oct 16, 2012
Messages
8,600
Nice, back to some 15 degrees and flurries. Little nipply, supposed to get better as the week goes on.
 

archbuilder

Vice Admiral
Joined
Sep 12, 2009
Messages
5,697
I did mime that way GM and it worked great. I used a label maker, which makes sticking the labels on a snap. It was also nice to be able to have the label maker in the boat. They also make weather resistant labels, but I have not idea how they would hold up without the heat shrink.
 

gm280

Supreme Mariner
Joined
Jun 26, 2011
Messages
14,593
I did mime that way GM and it worked great. I used a label maker, which makes sticking the labels on a snap. It was also nice to be able to have the label maker in the boat. They also make weather resistant labels, but I have not idea how they would hold up without the heat shrink.

Ha arch, post a picture of your label marker. Sound interesting and maybe I can adopt such an idea as well.

I have labeled wires all my life and that is how I do it. But your idea sound like an interesting idea since you don't have to use any scotch tape.

Always looking for a better idea. And everybody has their own way and can be a good idea or make you think of a different idea to use...
 

Ciera2450

Lieutenant Junior Grade
Joined
Apr 8, 2011
Messages
1,049
I did my dash wiring with a label maker minus the shrink, but the shrink wrap will ensure it’s there forever. Great work GM!
 

gm280

Supreme Mariner
Joined
Jun 26, 2011
Messages
14,593
Wow some good ideas. I looked up the Brother P-touch label makers and seems there are a lot of them with different abilities. So as usual, the more you spend, the more you get and can do. I guess the labels have a peel away backing? :noidea:

I do see how I could use such a label maker in the shop for so many other things as well. I have tons of parts drawers with lots and lots of hardware and electronic components. I could probably use up a few miles of labels just with those things.

I little boat up date. I just finished carpeting one side of the boat. And I can tell you, I am tired!!!!!!!

I had to apply the Dap Weldwood contact adhesive on both the carpet and the boat, as is usually done. And then try to install the carpet without it touching itself or the side of the boat until I got it in the correct place. And since the carpet was about 14 feet long, that was a huge ordeal. And I can tell you, if your carpet knife blade gets even a little worn, you better change it if you don't want frayed carpet with every cut.

I will probably do the other side tomorrow and post the pictures. We are having pretty warm weather in the 60's and 70's and it allows me to get this carpeting done now. Then the finishing up wiring and install the engine. YEA! :rockon:
 

Ciera2450

Lieutenant Junior Grade
Joined
Apr 8, 2011
Messages
1,049
Can’t wait for the warm weather! Yes, the label makers have self peel backing to wrap around stuff. Your shrink wrap combined with that will last forever. I’ll shoot ya a PM and see if we can meet up since so close. (May need some help!)
 

gm280

Supreme Mariner
Joined
Jun 26, 2011
Messages
14,593
Well as promised, I have a few carpet pictures. And once again, the one side carpeting has exhausted me. I guess nearly standing on my head to install the carpet from the outside of the boat does that to me. If takes a while to roll and brush on the glue on the boat, and then again on the carpet.

But then comes the interesting part to get it installed the long lengths without if touching itself or the boat until I smooth out the carpet along the way. Now I know why I stopped installing carpet decades ago and went into electronics and computer programming.

With the exception of the actual floor carpet yet to do and the strips along the rub rail section, seems everything is finished, carpet wise. And I can start installing the courtesy lights and all the panels for keeps.

The little odd looking bumps along the sides is wires for the courtesy lights. I had to cut a little slit to allow the wires come through.

So I have now installed carpet with three different glues. We will see how they work out in the long run. Personally, I think all of them will work without any issues,but we will see.

In the pictures, nothing is bolted in yet. So the storage box lids are merely sitting they so I could get an idea how it is going to look. And you can see that front deck lid has been re-carpeted. And I 100% absolutely positively made sure the sides and everything else was running the exact same direction...........I think.:eek:

I sure hope so because it seems I do have enough carpet to finish and won't have to order anymore. :applause:

.Rub rail insert should show up soon as well. I ordered from Wefco Rubber in California. Not cheap, but they say it will work like original. Hope so!

So much for today. I hope to do the floor carpet tomorrow. I am still thinking how to get it installed with both the floor and carpet glued as I lay it in. That is going to be really interesting for sure. :nevreness:
 

gm280

Supreme Mariner
Joined
Jun 26, 2011
Messages
14,593
[No message]
 

Attachments

  • photo307683.jpg
    photo307683.jpg
    87.8 KB · Views: 0
  • photo307685.jpg
    photo307685.jpg
    91.3 KB · Views: 0
  • photo307686.jpg
    photo307686.jpg
    83.9 KB · Views: 0
  • photo307687.jpg
    photo307687.jpg
    81 KB · Views: 0
  • photo307689.jpg
    photo307689.jpg
    86 KB · Views: 0

mickyryan

Rear Admiral
Joined
Apr 18, 2016
Messages
4,210
carpet looks great, really makes a difference on the boat, one thing i noticed with carpet is it does quiet down a boat, I fired mine up yesterday after carpeting to see difference, it was very quiet, reduces that bathroom echo effect i guess when you have a enclosed cabin .
 

gm280

Supreme Mariner
Joined
Jun 26, 2011
Messages
14,593
Thanks all for the encouraging words.

Today I hope to do the floor. And that is going to be interesting for sure. Since I already have the carpet cut close to actual size, with the three areas cut out, getting glue on the carpet and floor and then putting the carpet in will be a circus. I can't simply roll up an area to glue and install, because the the carpet can't stretch to fit the other sections over the seats and live well to be able to do that. So it has to all go in at one time.

I have been thinking how that is going to work. Can't say I have an good ideas presently, so I will go for it all at once and work the problems as best I can. A situation like this would have been better to have the carpet installed and then cut the areas out for the two seats and live well. But that isn't going to happen now.

I can;t even wait for the pictures this time... :eek:
 
Top