1976 Tom Boy Boat, 1976 40 HP Johnson Outboard and who knows what Trailer

kcassells

Fleet Admiral
Joined
Oct 16, 2012
Messages
8,600
Who does Mick?
Getting in and out the battery box seems like a hassle. I would go under the gunnels vs. transom.
 

sphelps

Supreme Mariner
Joined
Nov 16, 2011
Messages
11,435
GM, I have only installed one of those switches and that was on the Lake Butler girls Ouchita . It had an inside gunwhale panel cover that went down up under the splashwell .. That was the best option on that boat ...
As good as you think things through I’m sure you’ll come up with a good spot ...
 

gm280

Supreme Mariner
Joined
Jun 26, 2011
Messages
14,593
Thanks for the feedback folks... I always appreciate everyone's ideas and suggestions. Whether they give you a direct solution, or simply trigger an idea, they are helpful.

Did you ever do something so totally stupid that the only thing you can do is laugh? Well I did something that completely stupid and I am going to post it here because you all deserve a laugh as well.

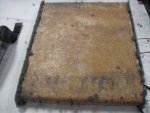
If you followed this thread for very long, you probably remember me stating numerous times about installing carpet, and I know I mentioned this a few times in other threads as well. Any time you install carpet you absolutely have to make sure the grain of the carpet runs all in the same direction. If you remember, I actually used chalk and made arrowed lines on the back side of the carpet in a not the long ago post. And that is because if you don't install the carpet in the same direction, the color will change...

Well yesterday, I was doing some little things once I found out I needed smaller clear heat shrink tube for the wire labels. So I decided to carpet the front deck storage lid. I cut the carpet from the roll and made certain the arrows were going the correct direction. I then used the Permatex spray glue and covered the carpet and lid in preparation to carpet it.

Once I sprayed both parts, the arrows were no long viable. So I went to the roll of carpet to get the direction of the arrows again. Don't want to screw up now. Well It went on very nicely, and the glue and stainless steel staples did a nice job getting it all covered.

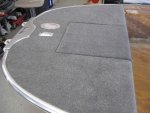
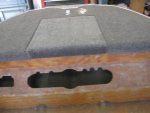
I was pretty proud of the job. Then I put it in place on the deck. OMG, It didn't even come close to matching. I put the carpet on 180 degrees out with the rest of the deck carpeting. The only thing I could do at that time was laugh...

As many times as I have warned others about such things, I am 10000000% guilty of screwing up myself. Take a look at the pictures and view a perfect example of why you need to make sure the carpet runs the same direction. Sure hope I can get it all back off the lid and have enough to recover it again.

I'll try to get in right the next time....What else can I say. :pound::pound::pound::pound::pound:
 

Attachments

  • photo307413.jpg
    photo307413.jpg
    103.1 KB · Views: 1
  • photo307414.jpg
    photo307414.jpg
    99.1 KB · Views: 1
  • photo307415.jpg
    photo307415.jpg
    64.6 KB · Views: 1

zool

Captain
Joined
Aug 19, 2012
Messages
3,432
Wow, it does make a difference! Never knew that about carpet....that tidbit should ave me from screwing up the checkmate carpet. Thanks.
 

oldrem

Commander
Joined
Nov 7, 2013
Messages
2,002
When we stop learning - and making the occasional goof up - it's time to get planted :rolleyes:
 

mickyryan

Rear Admiral
Joined
Apr 18, 2016
Messages
4,210
i learned that the hard way as well, its like tile i always tell folks to make sure to place it the same way every time even if tile is non directional it still seems to be the case lol
 

gm280

Supreme Mariner
Joined
Jun 26, 2011
Messages
14,593
Well I worked on some wiring in the boat yesterday. I got a lot done in that respect. Nice seeing the storage and other circuits get wired.

I used magnetic reed type switches for all the storage, seat, rod boxes and live well compartments. That way when you open any of them up, the lights come on. I still have control of those circuits via switches on the main control panel so in daylight, I don't need them to come on.

And seeing them work like planned gave me more inspiration. I mean at least I run the wires correctly it seems.

I looked at how hard it is going to be to remove the "oops" carpet mistake on the front deck lid. Wow, that glue got it on there extremely tight. I think I will need a multi-tool to cut the carpet off. And then some type sanding wheels to get the glue off so I can try it again. :facepalm: :eek:

That brings me to the latest adventure at the gm280 house. When I finished up in the shop and closed the door, I went back in to the house only to find out the AC/Heat-pump was not working. Yes we are experiencing some of the coldest mornings we've had this year. About right! So we called the Heating/AC guys and told them to wait until today to come out today to avoid a triple emergency cost. So we dealt with the cold and covered up a little tighter.

Actually we had 29 degrees this morning outside but inside was a mere 62 degrees. Not that bad...

If I only has a schematic diagram of the circuits inside the thermostat I maybe could figure out what is wrong. Since both the inside fan system and the outside compressor and fan systems both are not coming on, I am suspecting a thermostat or low voltage power supply problem feed it. But since I don't have the proper parts, I have to let them discover and replace them. And yes I already checked and reset all the circuit breakers for those that thought that could be it. :eek:

Well maybe I'll work out of the shop today just to keep warmer... :laugh:
 

gm280

Supreme Mariner
Joined
Jun 26, 2011
Messages
14,593
Well we have heat again. And the culprit was a connection between the aluminum incoming power line wires coming from the breaker box connected to the copper wire that feeds the blower system inside. That also powers the low voltage transformer that goes to the thermostat. Seems when the house was built, that was allowed. Now NO WAY. :nono:

The connection being a bolted setup, was so corroded that the heat it generated opened the connection and therefore no voltage to the thermostat and obviously no relay signals to either inside or outside systems to turn on.

I honestly didn't even know I have aluminum wire for the AC/heater system. Everything else is copper. But because code allowed it when the house was built, they used aluminum to save a few dollars. The run is only ~10 feet if that. Profit over safety... So I will replace it with the proper copper wire according to today's code.

===========================================================

:focus:

I thought I would post this as well because it could help someone that made an "oops" carpet mistake like I did.

I was wondering how to get the carpet off the front deck lib that some idiot installed backwards. :gossip: Between the glue and stables, I knew it was going to be trouble. However, I thought about using a multi-tool with a flat blade to try it and see how that worked. The blade has no teeth, just straight and flat. And amazingly it worked like magic. It reminded me of shearing a sheep.

Now I really never sheared a sheep before, or even slept at a Holiday Inn last night either. But from what I've seen on TV, it looked exactly like shearing a sheep. I removed the stables with an awl and wire cutter and then used the multi-tool. Amazing to see the carpet roll off so easily. I initially tried to just pull it of and that wasn't going to happen. It wouldn't budge. But with the multi-tool, it was a dream.

Thought you all might wanted to know that for future issues.

More updates to come...
 

mickyryan

Rear Admiral
Joined
Apr 18, 2016
Messages
4,210
at least you got it, man i must have checked coverings for my cabin 5 times other night after you posting that reminder, as i was building them eheh , sadly i must admit i covered the foam on the wrong side of my backing and rolled with it , Ugh. worst part was in was my last one so luckily i had enough material to recut remove and replace
 

gm280

Supreme Mariner
Joined
Jun 26, 2011
Messages
14,593
lol yes @sphelp, I think I could shear a sheep. But how do you remove the stables from them... :loco:

Ciera2450 Did the multi tool get most of the glue as well? Answer; pretty much so. I'll post a picture or three later today. It did clean the flat surfaces near perfect. The corners and edges were a little different but now bad.
mickyryan, didn't mean to start something with others covering things. I just knew (and still screwed up) that if you don't follow the grain, it will stand out. My very very old carpeting days proved that to me. I guess that lesson is proven again. :facepalm:
 

Mad Props

Lieutenant Commander
Joined
Jul 8, 2016
Messages
1,766
Glad I read about your carpet whoes lol.. I had no idea, I would have never paid attention to that in a million years!
 

gm280

Supreme Mariner
Joined
Jun 26, 2011
Messages
14,593
Glad I read about your carpet whoes lol.. I had no idea, I would have never paid attention to that in a million years!

Well at least this did some good helping others realize there is indeed a grain to every carpet, not just this type. I guess I was just destine to be that example after all.

It is all good now and even I learned, again, from this. The funny part is I knew all a bout it and made certain everything was correct....until it wasn't. :facepalm:
 

mickyryan

Rear Admiral
Joined
Apr 18, 2016
Messages
4,210
you know sometimes its hard to see the pattern , glad the removal wasn't horrible the pain is in taking the 1 step back to move forward lol
 

gm280

Supreme Mariner
Joined
Jun 26, 2011
Messages
14,593
Update, Here are the pictures of the carpet removal. You can see it basically removed everything on the flat areas. Not so much on the curved sections. The ends are there because I used a carpet knife to cut those areas before I even started removing the carpet. I figured it would be easier that way. Now I can remove the remaining staples and do a little clean up and re-carpet again. Maybe this time I will get it correct. I mean there is a 50/50 change...right?

mickyryan, if you look at the back of the carpet, you will see how the carpet was manufactured. And some times the edges fray and you can pull off strings really easy. That also shows the direction it was woven together. All you have to do is pick which direction you want to install all the carpet and stay with that idea.

I used chalk to mark the back to help with that. As you now can see, it really does make a difference. Pretty sure other methods would work equally well. Like a paint pen or something similar. Problem was, when I sprayed the back of the carpet with the Permatex glue spray, I couldn't see the chalk lines anymore. Hence the problem. And since the deck lid has a rolled back section but the carpet really needed to be directed forward against that rolled back, I got it totally mixed up.:doh:

Hope this explains it so others can avoid my stupid mistake. Not a work stoppage, but it cuts the carpet even closer. We will see. And who said you can't teach an old dog new tricks...okay, maybe that is true... :crazy:
 

Attachments

  • photo306689.jpg
    photo306689.jpg
    94.4 KB · Views: 0
  • photo307508.jpg
    photo307508.jpg
    86.6 KB · Views: 0
  • photo307509.jpg
    photo307509.jpg
    85 KB · Views: 0
  • photo307510.jpg
    photo307510.jpg
    95.3 KB · Views: 0

gm280

Supreme Mariner
Joined
Jun 26, 2011
Messages
14,593
Well I am still waiting for the clear shrink tube to show up to get back to the boat wiring. I ordered it five days ago from a Florida distributor thinking being so close (middle Georgia), I would get it in a day or so. Well seem the tracking number shows it in Saint Paul, MN. Why you may ask? Well I asked too. Seem it got mistakenly sent to MN by accident. And so much for getting it quickly. Oh well, maybe in a few more days.

I need it to label all the wires so anybody can see where each wire goes to in the boat from the buss bars and switches. Doing that with a wiring schematic should make any future work a breeze.

And my order for the rub rail insert is to be shipped Feb 1, 2019. Yeah.... So that is taken care of as well.
 

kcassells

Fleet Admiral
Joined
Oct 16, 2012
Messages
8,600
yup....something I would do. Click order ,,,,where is it? Oh well. How's the temp?
 

gm280

Supreme Mariner
Joined
Jun 26, 2011
Messages
14,593
yup....something I would do. Click order ,,,,where is it? Oh well. How's the temp?

Well surprisingly the shrink tube finally should up. I don't need the rub rail insert to continue work, so wiring and finish carpeting is the things to do pending weather.

Temps? Today mid 50's from freezing morning temps. But they are talking about mid 70's by the weekend and first of next week. So most any work on the boat will be wide open.

I'll post how I label the wires just in case anybody was wondering. A few boaters on these forums seem to do the same technique as well. It really helps down the road.
 
Top