1976 Tom Boy Boat, 1976 40 HP Johnson Outboard and who knows what Trailer

sphelps

Supreme Mariner
Joined
Nov 16, 2011
Messages
11,435
Well if it’s really thin woven it may be ok . Not really structural . I think mainly the thicker woven really needs the csm .
Back in 2011 when I signed up and strarted mt first project . I was scolded by our current “old okie” fella on the need for the csm and it’s stuck in my brain ever since ..:)
 

gm280

Supreme Mariner
Joined
Jun 26, 2011
Messages
14,593
I may just order the CSM and do it right, like I know to do. I also think I'll make a little test application with the straight woven just to see how it works on something I have laying around. I mean at this stage, why try something I don't know works... :noidea:
 

Mad Props

Lieutenant Commander
Joined
Jul 8, 2016
Messages
1,766
I'm only speculating here, but my understanding/thought was woven fabrics only have strength in 2 directions (warp and fill). In order to transfer the load from layer to layer of fiberglass, you need to have a layer of CSM between each cloth since it has a random fiber orientation and will efficiently transfer that load from layer to layer. In addition, CSM tends to hold a lot of resin, so you are more likely to have sufficient resin to resin bonding from layer to layer. If you do a wet layup, this is probably less important.

The reason CSM isn't required for EEEEEEEEEPOXY is because the epoxy has a superior compressive AND tensile strength and can transfer the load from layer to layer on its own.
 

mickyryan

Rear Admiral
Joined
Apr 18, 2016
Messages
4,210
Thanks kcassells.

I am presently crimping the connectors and then soldering them. I know that will get some people stirred up. But it is the way I like doing such things and I've never ever had any issues making connections that way.

More to come and maybe even pictures of an installed live well now.

i love soldering and do it a ton , i dont care what folks say if soldering was so bad then every piece of hardware that has soldered connections inside would just fall apart lol
 

mickyryan

Rear Admiral
Joined
Apr 18, 2016
Messages
4,210
oh and as far as the csm then woven then csm? its mainly because the woven wont lay as flat and voids could occur where as a layer of csm will fill any imperfections however small and allow you a nice thick bed onto lay ya woven,"as i was told
",
and just so you know the difference in epoxy and poly resin is 20% adhesion in a perfect lab experiment,
personally i prefer to stick to like materials , if i was building from scratch then id go all epoxy fixing a poly boat i use poly :) opinions will vary and yes epoxy is strong but for the application in witch we are using it for poly is fine:)
 

sphelps

Supreme Mariner
Joined
Nov 16, 2011
Messages
11,435
Yeah but ya know if it’s the thin woven and just being used to seal the top of the lid . I would think it would be ok without csm .. Not like your tabbing in a transom or something structural ...
 

gm280

Supreme Mariner
Joined
Jun 26, 2011
Messages
14,593
I would like to thanks sphelps, archbuilder, oldrem, mad Props, and mickyryan for chiming in with info about the CSM and 1708 issue. I already solved that dilemma by ordering 5 more yards CSM, so that will take care of that. Yeah I know it won't take even a fraction of that CSM order, but I will have some laying around for other interests as well then.

I tried very unsuccessfully to try and post that ordering info, but I was unable to access any reply efforts. This is the first time I logged on and didn't get the "whatever" scrambled screen of garbage and was able to get to this thread. So not even sure this will post.

I did a lot of painting the last few days with a little bit more to go yet (second coats on some things). And I went to Tractor Supply to get some more of their "Magic Catalyst hardener". Wow has that price gone up! With tax that little can (8 oz) was near $18 for it this time around. Which brings me to this question. Has anybody used any other type Catalyst for their Rust-Oleum paints? I ask because I tried to research their MSDS sheet to see what was the reason for the cost, but didn't get anything interesting and was wondering if other manufacturers had something that could be used as well. There are a lot of Catalyst hardeners out there.

I did get the second coat on the live well and working on the second coats in the seat compartments. I went with a very light gray paint inside the seat compartments to help see what was in there. And even at night I installed LED strips to help as well. Every storage area has those same LED strips to that reason.

Well as I get more done I'll post pictures. The live well lid is about the only thing that needs water-proofed and covered at this time.
 

Woodonglass

Supreme Mariner
Joined
Dec 29, 2009
Messages
25,924
Ok, here's why CSM is required with ALL polyester layups. Poly resin is extremely Brittle when used alone. It has no binder to keep it somewhat flexible. Epoxy DOES have a chemical binder so when fully cured it remains somewhat flexible. Polyester contains Styrene and this will somewhat "Melt" the CSM fibers and these fibers "Bind" the resin molecules together and keeps it from cracking during flex. The Cloth/Fabric is needed for Poly or Epoxy layups to add bulk and Strength to the layup. Woven is thicker and will not conform to corners easily but is GREAT for Flat applications. However it's difficult to avoid pattern bleed thru. The "08" fabric was created to give the best of both. High strength and conformability. If you need a thick layup i.e. 1/4 inch then the use of Woven is preferred. In poly layups, It's been proven that multiple Thin layers of resin and fabric is the strongest method especially where flex may occur. Example two lams of 8.5 oz biax with CSM would be stronger then one lam of 1708

Hope this helps
 

gm280

Supreme Mariner
Joined
Jun 26, 2011
Messages
14,593
mickyryan, Thanks for the info on the catalyst. Seems every type I see is now costing a lot for a little. But I already bought enough for a while. Must be some type of gold based chemical to cost that much for 8 oz. :rolleyes:

@Woodonglas, Thanks for the update of the fiberglass and resins. Instead of trying something new at this last stage of my project, I just bought 5 more yards of CSM from US Composites...like I've been doing. So the lid will get waterproofed the same way as everything else. THat should be the end to anymore glassing efforts as well. Yeaaaaaaa....... :clap2:

Did I ever tell you all how much I hate grinding fiberglass... That dust gets all over everything and then the vacuum gets a work out. :blue:

I gave the storage compartments/seat bases another coat of paint today. So with only a little touch up efforts remaining, that painting is also finished. :D

I sent off a sample of my rub rail insert to Wefco Rubber Co Inc and am waiting for their reply. So that should take care of that issue as well. :cool:

All for now... :joyous:
 

gm280

Supreme Mariner
Joined
Jun 26, 2011
Messages
14,593
Okay I got some more done and even the CSM has arrived. Weather is good, CSM has come in (US Composite doesn't mess around) and I managed to get the carpet pattern made.

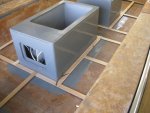
I was waiting for the CSM fiberglass to show up and amazingly it did today. Fast shipping in my opinion. So now I can finish the live well lid the correct way. :D

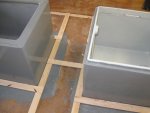
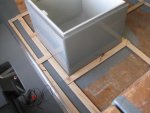
I did get the second coat of paint on the inside of the seat boxes as well. There is only a little touch up to do with them.

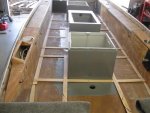
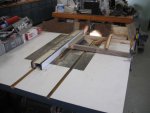
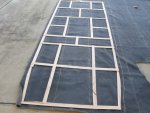
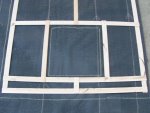
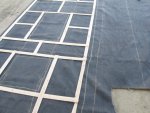
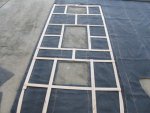
Today right before the CSM arrived, I manage to cut and make the floor carpet pattern. I took one 2 x 4 and cut it about 3/32" thick strips and laid the strips out to allow me to make a decent pattern to rough cut the floor carpet. I set us a simple jig to get each strip cut exactly the same thickness.

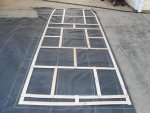
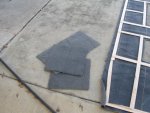
I know a few will think that this was totally useless, but it works and makes the rough cut a freeze. Hot glue makes the connection with the wood strips instantly and they don't move. Now I just slide the pattern out of the boat and lay it on the carpet and mark with some chalk (on the back side of the carpet with the pattern flipped over as well) and cut a little over size. Nice....:)

Of course cutting that many strips made a mess of table saw dust that took me about an hour to get vacuumed up. But it is now done and I will use it to cut the carpet to close size. You always allow an inch or so long on all the edges to get the perfect finish. And once you are done with the strip pattern, you have lots of stir sticks as well. :lol:

I still need to make the cushion yet. Been putting tha toff until I have to make it...and that is coming soon... :eek:

Until next update, you all have a wonderful day.
 

Attachments

  • photo306666.jpg
    photo306666.jpg
    87.7 KB · Views: 0
  • photo306667.jpg
    photo306667.jpg
    62.3 KB · Views: 0
  • photo306668.jpg
    photo306668.jpg
    83.6 KB · Views: 0
  • photo306669.jpg
    photo306669.jpg
    74.1 KB · Views: 0
  • photo306670.jpg
    photo306670.jpg
    67.6 KB · Views: 0

gm280

Supreme Mariner
Joined
Jun 26, 2011
Messages
14,593
Update...again.

Well today was pretty nice again. So I took that pattern and cut out the carpet parts for the insides of the boat and the floor. As you can see, it makes cutting the carpet a breeze and all you have to do is allow a little extra for the cuts. Calk and a carpet knife makes quick work of it. And the parts I cut out can be used for other parts like lids and such. Of course I have to make sure I don't include any leaves when gluing it in. Seems they love to get all over the carpet outside this time of the year. Funny how I originally though I bought way more carpet then I would need only to find out it is going to be close to being enough.

I have plenty of carpet, but if you want the grain to flow the same direction so it actually looks right, then I have just enough. So now I just have to wait until a warm day to apply the glue and fit it in place.

The Weldwood Contact glue I am using says it has to be 65 degrees or above for 24 hours before and at least that after it is used. So that is going to be a special situation this time of the year. I guess I can break out the heaters to warm things up, but since it is a K1 Kerosene heater, I can't have it running once I open up the glue. But it will all work out.

I also installed a lip around the live well lid to allow the upholstery to be installed and still fit flush with the live well. I then need to use the polyester and CSM to water proof it before installing the cushion. Yeah, the cushion that I have yet to make... :facepalm:

But it is getting close to being ready for the engine installation. :high5:
 

Attachments

  • photo306686.jpg
    photo306686.jpg
    90.4 KB · Views: 0
  • photo306687.jpg
    photo306687.jpg
    77.7 KB · Views: 0
  • photo306688.jpg
    photo306688.jpg
    89.6 KB · Views: 0
  • photo306689.jpg
    photo306689.jpg
    94.4 KB · Views: 0
  • photo306690.jpg
    photo306690.jpg
    78.8 KB · Views: 0
  • photo306691.jpg
    photo306691.jpg
    96.4 KB · Views: 0

gm280

Supreme Mariner
Joined
Jun 26, 2011
Messages
14,593
I'm enjoying the updates!

Great. I hope you continue enjoying them. I still have a lot more to finish yet.

Today I opened up the new shipment of CSM that came in quickly from US Composite. Then I rough cut some to fit the live well lid and the steering control adapter to water proof them. I mixed up the Polyester/MEKP and went to work. Again I mixed just enough. WHo would have guessed. :noidea:

Once they cure, then I do the other sides and they are ready to install. With the shop closed up to help keep in the warmth, it didn't take long to get overwhelmed with the poly smell. Usually I do that with the doors open and even most of the time a VOC mask. But I forgone those things because it wasn't much area to waterproof. But the smell was too much to do much of anything else, so it was a short day in the shop.

I guess I really should approach the live well seat cushion now. :facepalm:

I guess I just need to get in there and tackle that and see what I can do. I have enough vinyls of all the colors to make a few mistakes. But unless I try, how will I learn... :decision:
 

mickyryan

Rear Admiral
Joined
Apr 18, 2016
Messages
4,210
i have been researching carpet adhesives, careful some on the web say some like the weldwood don't do well with heat and moisture, make sure whatever you are using dries waterproof and is for extreme heat :)
 

gm280

Supreme Mariner
Joined
Jun 26, 2011
Messages
14,593
i have been researching carpet adhesives, careful some on the web say some like the weldwood don't do well with heat and moisture, make sure whatever you are using dries waterproof and is for extreme heat :)

It must work pretty well because I used the same type glue on the trailer bunks and they show no signs of any problems. And sadly that trailer has been sitting out in the elements since I finished that part of this rebuild. So I have total faith in the glue. But thanks for the heads up. Good to know what to watch for.
 

archbuilder

Vice Admiral
Joined
Sep 12, 2009
Messages
5,697
I didn't look that one up but I am assuming it is a contact adhesive. I installed some Formica with some one time and got a call that it had came loose. Sure enough the entire top sheet had just peeled up and came off! It was a counter top that hot linens were stacked on after coming off a steam press. I was shocked......but after reading the label I understood why! It noted that heat would cause the glue to come loose for the first 48 hours.....guess I should have read the instructions! Put it back on, let it set for a few day, then never had a problem again. I think that was actually a formica brand glue, but I am guessing it is simliar.
 

mickyryan

Rear Admiral
Joined
Apr 18, 2016
Messages
4,210
I have used weldwood on tons of stuff but i never had used it on headliner and such and after reading about the heat issue i went for one that said able to withstand hi heat conditions.
 

gm280

Supreme Mariner
Joined
Jun 26, 2011
Messages
14,593
I have used weldwood on tons of stuff but i never had used it on headliner and such and after reading about the heat issue i went for one that said able to withstand hi heat conditions.

Interesting mickyryan, Exactly what type glue did you use that states it can withstand high heat situations. I am curious now...
 
Top