1976 Tom Boy Boat, 1976 40 HP Johnson Outboard and who knows what Trailer

gm280

Supreme Mariner
Joined
Jun 26, 2011
Messages
14,605
I'm pretty sure you're gunna be happy with the strength of the covers. You Might want to consider laying the 1708 "Upside down so the CSM will hide the texturing of the 1708. It works great that way.;)

That is an excellent idea there WOG, I will do that for sure. Thanks. :thumb:

The only reason I am going the thin plywood route is because everyone of these covers are certain unique sizes. If they were all the same, I would build a mold and go for it. But being different sizes, I figured I would merely just go the thin plywood route with 1708 and CSM. The end results will be pretty much the same...I guess. :noidea:

I am going to router them with 1/4" round overs for the three sides not directly seen, and 1/2" round over like every thing else is for the directly exposed side. So continuity for sure in how everything looks when done.

Now if I can just get the correct Stick Steering cable length. :facepalm: :eek:
 

gm280

Supreme Mariner
Joined
Jun 26, 2011
Messages
14,605
A little update, I am still waiting for the third steering cable to arrive. Hopefully this 12' one will the answer. I also rounded over the rod and storage box covers and am working the live well issue. I went a little different direction with the live well. I'll post pictures after seeing how this works out...if it does. :eek:

I guess I can run some wires while waiting for the Stick Steering assembly to show up. :noidea:
 

gm280

Supreme Mariner
Joined
Jun 26, 2011
Messages
14,605
Well yesterday I received the 12' Ezy Glide Stick Steering cable assembly and hooray it is perfect. It took three tries, but I now have the correct size and it seems to be very nice indeed. The only problem I am having with it is the place I selected to install it, doesn't have quite enough clearance behind to allow it to fit. So I had to build a little assembly for it. But not a huge problem because It allows me the option to remove it in the future if need be. So all in all, not a problem at all.

I also have the home made live well near about finished now as well. I did snap pictures along the way but haven't posted them just yet. It seem to worked out well also. So with these final issues, I can button up the top parts now and round them over with the router and move on.

Okay it seem I have missed this Crappie Spawning Season again, as usual, and am hearing about others dragging them in in record sizes. :facepalm: That was my goal and since that is already here, I don't see this boat being finished to get in on the fun. So hopefully this fall coming up later this year. :noidea:

Anybody that seriously thinks they will rebuild their rotted boat in a month or two or even three, is fooling themselves. Yes I did think that over three years ago myself. :eek:
 

Woodonglass

Supreme Mariner
Joined
Dec 29, 2009
Messages
25,928
Sound to me like you're boat build is on "Taylor" time!!!! When I'm working in my shop and my wife calls for me to come in the house and I tell her I'll be in in 5 minutes and then I show up in 30 minutes she always tells me that I must have been on "Taylor Time"!!!! So now when I give her a timeline she asks...Is that actual time or...."Taylor Time!!!!????":eek::D Soooo...If you're on Taylor time...You're right on Schedule!!!:rockon:
 

nurseman

Lieutenant Junior Grade
Joined
Jun 2, 2013
Messages
1,045
There is still time for the crappie's!!! They don't usually spawn up here till late May into June! You've got PLENTY of time...
 

gm280

Supreme Mariner
Joined
Jun 26, 2011
Messages
14,605
Sound to me like you're boat build is on "Taylor" time!!!! When I'm working in my shop and my wife calls for me to come in the house and I tell her I'll be in in 5 minutes and then I show up in 30 minutes she always tells me that I must have been on "Taylor Time"!!!! So now when I give her a timeline she asks...Is that actual time or...."Taylor Time!!!!????":eek::D Soooo...If you're on Taylor time...You're right on Schedule!!!:rockon:

Is that Mike Taylor time? :noidea:

I think I am slower then that too... :facepalm:

nurseman, seems we have crappie spawns early this year but unless I can finish the boat and then locate them after the spring spawn, I have to wait until next spawn. :eek:

Of course I do like to bass fish. But honestly is has now been so long since I fished for anything, I may have to get fish lessons and training. :eek:hwell:

Well I did finally get the latest Ezy-Glide 840 series Stick Steering cable in (12' version this time) and is does fit....sorta. Seem the area I am installing it was just short of depth by about 3/8" to install it. So I had to make a little adapter plate and install it. I attached some pictures to give a better idea of that. But length wise, it is perfect. And now I can finish running some wiring and PB the top plates in. So Again progress is moving along now.
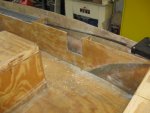
IMG_0139.JPG
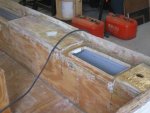
The square cut out section is where it will go. As you can see the area behind it is the curvature of the hull and therefore would not allow me to install the unit behind that plywood section. So I had to cut it out and make an adapter. On the right-hand side you can see the unit laying there. The cable coming out of the unit is the side of it.
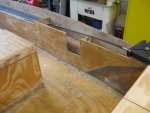
IMG_0140.JPG
Just another shot of it.
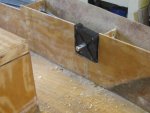
IMG_0141.JPG
And there is the unit sitting in there temporarily. As you can see it was just shy of fitting without any adapter. But the hull shape didn't allow it. :violin:
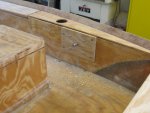
IMG_0142.JPG
So this adapter plate allows it to fit and also allows me to access it if I ever need to. I installed "T" nuts behind the unit for the adapter to install and the regular mounting screes will attach the steering unit to that adapter. So all is well. I will poly the "T" nuts in place as well so the can't back out and waterproof it too. And the adapter plate will be rounded over and of course carpeted as well. There is always more ways to skin a cat. If skinning cats is what you're in to. :loco:

I am also building my own live well instead of using the busted up one I ruined. I am actually using the housing section for the cooler to make it. I installed 1/2 foam from Lowes and then 1/8" luan plywood and now fiberglass CSM and resin. So it will still keep things reasonably cool and still work as a live well. And it really looks pretty nice too. I'll post those pictures soon.

Until next time, you all have a great day... :thumb:
 

gm280

Supreme Mariner
Joined
Jun 26, 2011
Messages
14,605
Okay not a progress report because for the last few days I haven't done anything to the boat. But not that I don't want to, but other things took place.

We presently have a growing season upon us already and having mowed the yard once already I needed to edge everything as well. I rebuilt the Tecumseh engine last year on my old old edger to try and make this 30 year old edger keep going. And it did work but only for a short time. Seems I may have an ignition coil going out. After about ten minutes or so the engine stops and while there is very good compression, it won't start again until it cools off a little.

So I see a very nice Ariens 169cc (6HP) edger on EBay for sell. BUT, the seller won't ship it. You have to pick it up. Well it just happens to be in Georgia. So I looked up the distance and it is 132 miles away. First I told the seller I didn't want it and then decided to go for it. There in starts the story. I live in middle Georgia and the edger was in upper Georgia. And the typical route is to take is I-75 through Atlanta. Okay, I can do that. It looks like about 4 to 5 hours round trip. NO, it was way more.

I didn't know they are working on I-75 towards the Atlanta area for miles, and we sat for almost an hour both ways through that section. So a 4 or 5 hour trip now took 6 to 8 hours. So boat building wasn't going to happen that day for certain. But I did get the edger and really a pretty goo deal as well. I probably saved two to three hundred dollars. Not too bad, but not what I was expecting either with the traffic times. I guess they never ever stop working on I75...ever. :facepalm:

Boat updates coming soon. :thumb:
 

sphelps

Supreme Mariner
Joined
Nov 16, 2011
Messages
11,468
I could never be a truck driver .... 30 Or 40 mins on the road and I;m ready to stop ... :lol:
 

gm280

Supreme Mariner
Joined
Jun 26, 2011
Messages
14,605
I could never be a truck driver .... 30 Or 40 mins on the road and I;m ready to stop ... :lol:

Yea Sam, I do hear yea. When I was still working some decades before I retired, I had to drive and install some very larger communication equipment all over the nation. So I drove to California, Arizona, Mississippi, Illinois, New Jersey, and a lot of closer places. And While I didn't mind it at the time, I don't think I would like it so much now. Nice when the traffic is flowing. Not so much when it turns into a long parking lot. And amazing how the traffic just starts flowing again without any reasoning to why it was stopped for so long in the first place. :noidea:
 

Woodonglass

Supreme Mariner
Joined
Dec 29, 2009
Messages
25,928
Me and the Admiral got caught on I-40 near Little Rock 2 years ago in a Major accident road shutdown. Took us 5 hours to finally get to the off ramp so we could take back roads 25 miles to get back on the Interstate. She was NOT pleased. I kept trying to tell her there was NOTHING I could do but she kept insisting that I call the HIghway Patrol. SOOOOO I did. Or should I say I tried. Of course their lines were swamped with calls. So I called a friend of mine in Arkansas and He told me what was all over the news about the major wreck and we were in the middle of it!!! Don't want to go thru anything like that again especially with the admiral on board. We had already been in the car for 4 hours so she was UPSET!!! Bathroom breaks were VERY INTERESTING!!!!
 

gm280

Supreme Mariner
Joined
Jun 26, 2011
Messages
14,605
Okay folks, it has been some time since I last posted on here. So I will try to bring everybody up to date on this project.

While I have done some work on the boat, it isn't that easy to see. But I do have pictures anyways. I have basically finished all the magnetic proximity switch installs and the basic wiring to all of them and the LED lights in all the storage and rod boxes. And amazingly what I thought would be an easy wiring effort actually took way over a couple weeks and I had to order more marine grade wire then I originally bought. When you run individual separate circuits, you use up wire very quickly. But it is all finished now. I also installed the top plates over some of the rod box areas and used a router bit to round over the edges to give it a more finished look. All the rod box covers are finished and even the front raised platform installed for final as well.

So with all the preliminary wiring done, it is time to flip the boat for the sanding and primer and color/clear coat efforts. That is where I presently stopped. Today I bought a 2 ton come-along to assist in lifting the front section of the boat while I will use the engine hoist on the rear. I already removed the side supports on the boat cradle to allow me to flip the hull and set it on the moveable cradle for the painting effort. Of course with the summer heat, that isn't going to happen quickly for certain. But I can at least do a little daily now and every little bit helps. Here are a few pictures. Don't expect much because the preliminary wiring is inside the compartments.
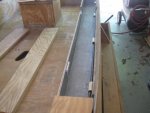
Rod Box (36).JPG
I finally got the correct length stick steering assembly, after three tries, and you can see my home made holder I made out of PVC pipe sections to hold that cable. I used some 3/4" (I think) PVC cut lengthwise and then polyestered (PB) them in place. I can open the top of them to allow removal of the cable if need be. I also used these holders to run some of the wiring to the rear compartments. You can see the gray colored polyester in the rod box and the rod box covers laying on the floor. You can also see the LED strips I installed but not wires at this time.
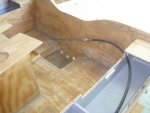
Rod Box (38).JPG
Here is the rear storage area on the port side. As you can see the steer cable is installed and so is the LED strip.
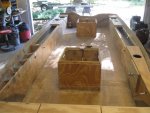
Rod Box (41).JPG
If you look closely, you can see a few wires sticking out from the rod box sides on both sides. Those wires are for the courtesy lights once everything else is installed. And it is hard to see but the tops are installed and rounded over on the sides except the actual covers. The port and starboard front sections are still uninstalled. That is because I have a lot of additional wiring to install and then wire up the control panels. I decided to wait until that was finished before installing them for final.
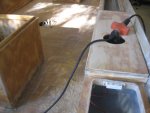
Rod Box (45).JPG
This is a little close shot of the rear top plates installed and rounded over. You can also see my attempt at making the lips to help keep water out of the storage areas. Certainly not Red Herring's quality, but I will get better....I hope. And you also see the magnetic switch installed. All those switches will allow LED lights to come on IF the storage light switch is turned on from the master control panel AND the cover is opened. That way I can control such lights. And knowing how such things are hard to see when dark, I had to install LEDs in every closable storage and rod box. Also in the live well too. I have to have some way to see the little tiny minnow size fish I catch. I will use a rubber lip cover over the edge of those lips and it will look a ton better.
Rod Box (54).JPG
And this basically bring every thing up to date now. Still hard to see, but those top plates are rounded over using a 1/2" round over bit. Nice and smooth.

So even though I was absent from iboats for a while, I did continue on the boat. Once I do get it flipped, more progress can take place...but slowly with the summer heat!

OH, one thing I didn't say. My neighbor, across the street from me, ask me if I could use these old metal 6 gallon OMC and Johnson metal gas tanks. You can see them in the background. I told him I will be glad to buy them, but he stated that IF I didn't take them they were going to the landfill. Both are in amazing condition with no dings, dents, or scratches and so little rust that a little sanding and some new primer, paint and graphics and these tanks will look new again. Some times things just fall into your lap.

Any ideas or suggestions for something you guys see, let me know. And everybody most certainly have a wonderful day - gm280.
 

sphelps

Supreme Mariner
Joined
Nov 16, 2011
Messages
11,468
Gm ! Glad your back ! I was going through Gm fabrication withdrawal symptoms ! :cold:
We were getting concerned ... But I see you are doing well ... Seeing your boat really starting to take shape is really making me want to get done with the Admirals kitchen and get back on the Manatee ..
Nice score on the fuel tanks ! The new ones they make now are a real pita ! :lol:
 

gm280

Supreme Mariner
Joined
Jun 26, 2011
Messages
14,605
Yea Sam, I do have plans for those two tanks. And so my new plastic 6 gallon fuel tank will probably be going on Evilbay later on. I really wanted the metal type because it takes up less space and just looks neater in my opinion. :thumb:
 

WinnipegJet91

Seaman
Joined
May 17, 2016
Messages
65
slick rehab project on your tri-hull GM... definitely will be following along.

i'm just starting my trailer rehab so i'm going to be using your "rebuilt trailer project" as a reference/ideas on my slightly smaller trailer for the 15' Starcraft im rebuilding. I'll keep you in mind for some PM's when needed!

Thanks again for a detailed post, don't worry I'm in Canada so my imperfection welds won't hold up in court anyways! Talk soon,
 

gm280

Supreme Mariner
Joined
Jun 26, 2011
Messages
14,605
Thanks Kcassells on the fiberglass comments. I tried to match Red Herring's efforts, but not as good obviously. But I will keep trying with other efforts. That is the only way you get better at anything...keep trying.

WinnipegJet91, PM me for any question. If I can accurately answer you, I most certainly will. Years ago when I first got my welding setup, I had no idea how to use it. But my younger son did have a few welding certifications and between him and my constant efforts, soon my welds started to come out pretty good. Now I love welding and can make a real nice joint knowing the proper ways to accomplish that. I think I actually like welding more then soldering. And I've been soldering well over 45 years now. So PM away if need be.
 

gm280

Supreme Mariner
Joined
Jun 26, 2011
Messages
14,605
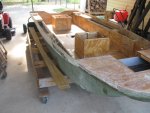
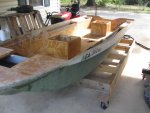
Okay, here is where my boating project stands. I have basically finished most everything needed on the top side of this boat. No, I haven't installed the actual live well. But that is because I didn't want to add anymore weight to the hull for the painting flip. So that will get installed after the paint job is finished. About the same time the carpet, seats and gauges gets installed as well. I removed the side supports so I can flip the hull without hitting any side supports. And since this will lay flat on the cross supports, I see no need for side supports anymore. Here are a few pictures.
IMG_0005.JPG
The step up side support on the starboards side is gone now. The remaining board is there to set the hull on when flipped over.
IMG_0006.JPG
And the port side view. Yes it is outside presently because the flip should be easier outside.IDK.
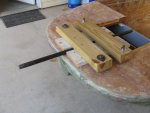
IMG_0014.JPG
Trying to figure out what to actually lift the bow with, I chose to make this setup. It only has four bolt holes to fill in after this effort. So that was my final decision. It probably doesn't look like it is solid, but it is amazingly solid and easily can handle the weigh with a come-along lifting it via the attic rafters over head. I do plan on adding a sleeve over the 3/4" black pipe with large washers against the bow and after the sleeve to allow it to swivel easily and not slide off the pipe.
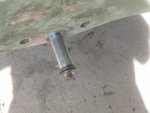
IMG_0017.JPG
And here is my engine hoist lifting point on the transom. It is a ~ 1" bolt with a sleeve over it installed through the bilge drainage hole. It too allows it to swivel easily as well. If the transom can't handle the weight doing this, I don't want to be boating in it either. So we will see.

So once I get up into the attic area (when the temps allow me to) I will proceed. Until then, little things for the boat, and other projects are the daily routine.

Until next time, you all have a wonderful day... :thumb:
 
Top