1976 Tom Boy Boat, 1976 40 HP Johnson Outboard and who knows what Trailer

gm280

Supreme Mariner
Joined
Jun 26, 2011
Messages
14,605
Sooooo, those panels are plastic NOT aluminum??? WOW...very nice looking!!!!

Yes WOG, and that is the usual material they put in a lot of boats for panels these days. Take a real close look at the boat panels and you will see that material. A lot cheaper to LASER engrave plastic type panels then cut metal patterns out. But it you like wood grains, carbon fiber look or anything, there is a LASERable material for it.
 

Tnstratofam

Commander
Joined
Aug 18, 2013
Messages
2,679
Gm I may have missed it in an earlier post, but are you engraving these panels yourself? If so what is your setup like?
 

gm280

Supreme Mariner
Joined
Jun 26, 2011
Messages
14,605
Gm I may have missed it in an earlier post, but are you engraving these panels yourself? If so what is your setup like?

instratofam, yes, I am designing and LASER engraving the panels myself at home. We, wife and I, bought a Universal Large Bed LASER Engraver and I make all types of things with it. My wife retired a few years ago now and she was the Head over a LASER engraving shop inside a trophy and craft shop. So she was LASER engraving before I took it up. It uses a CO2 LASER and is powerful enough to cut through wood and plastics easily. But it can't cut metal. That takes a different type LASER and frequency setup.
 

Tnstratofam

Commander
Joined
Aug 18, 2013
Messages
2,679
Very cool. I may have to investigate this further. On a side note I had a friend who had a trophy shop. I never thought much about the possibilities of other engraving ideas. Sadly he passed away this spring, and I believe his family sold most if not all of his equipment. I may have to make an inquiry into if they have any of it left.

This is why I love this forum so much. People have great ideas and these threads are full of them. I'm hopeful that I can get some of my projects around the house finished and get started back on our Stratos. Keep up the great work. Your thread is one that inspires me. Thanks Dave
 

gm280

Supreme Mariner
Joined
Jun 26, 2011
Messages
14,605
Very cool. I may have to investigate this further. On a side note I had a friend who had a trophy shop. I never thought much about the possibilities of other engraving ideas. Sadly he passed away this spring, and I believe his family sold most if not all of his equipment. I may have to make an inquiry into if they have any of it left.

This is why I love this forum so much. People have great ideas and these threads are full of them. I'm hopeful that I can get some of my projects around the house finished and get started back on our Stratos. Keep up the great work. Your thread is one that inspires me. Thanks Dave

If his family/wife still has the LASER engraver, you could pick one up cheaply. However, these LASERs are not cheap to buy. A nice quality new one can go for $30,000 dollars or more, depending on size and capabilities. There are smaller ones on the market but they won't take very large material so you will be limited to the size of the items you want to LASER. We bought ours used. But it was still a chunk of money. These LASER engravers are merely CNC type machines that use a LASER beam to do the work. And thanks for the kind words as well.

nuresman, Thanks. I have a lot more to come. The gauge panel is really nice as is the helm panel. A lot more complicated to deign to accommodate all the things being installed and connected up. I try to lay things out like I will use them. That doesn't necessarily make them likeable for others. But then I design for my usage.

More to come.
 
Last edited:

saginawbayboater

Senior Chief Petty Officer
Joined
Mar 8, 2012
Messages
677
That's High Class GM! If your not careful you may drum up a bunch of business around these parts!! :thumb:
 

gm280

Supreme Mariner
Joined
Jun 26, 2011
Messages
14,605
Curiosity killed the cat - Post# 559 what is that panel for? Trolling motor?

Yes TDF, that is my trolling motor panel. It will be mounted on the left-hand side of the helm area. It has a Pulse Width Modulation circuit built in so if you have a regular trolling motor, you can adjust the speed from ~5% to 100% while allowing longer battery life. The green LED comes on when in PWM mode so you know which mode you're in at a glance. If you select BYPASS mode, the trolling motor receives straight battery voltage. I couldn't find anything online that satisfied my needs to I designed my own.

saginawbayboater, thank for the kind words. Actually I am not looking for any business presently. Being retired and not haven't any deadlines to meet feels too good to me. I just like building unique things for my own projects.

Anybody can design their own panels as I have been posting all over these forum threads. If you can think it, you can make it. Any typical trophy shop should have this same ability. Check them out!

A little update on the actual boat. Yesterday I decided to drill out the holes in the transom after drilling them out the first time and then filling them back it with PB. I know that sounds odd. But I drill all the holes out larger then needed and then fill them back in so when I drill them for the proper size fittings, the holes are surrounds by nothing but Polyester Resin, Cabisol and 1/4" Chop Strand Fiberglass. And that way water can't get to any wood...ever. So I drilled the holes out again. WOW, I can say that was a long hard effort. It is like drill into concrete. I am amazed how hard that PB gets. I used a corded 1/2" drill with a 1" forester bit and it was a long time work.

More to come! You all have a wonderful fall day... :thumb:
 

gm280

Supreme Mariner
Joined
Jun 26, 2011
Messages
14,605
Some sad news. Since last update, my neighbor that lived directly across the street died from cancer. He was an elderly man (79) that I talked with a lot. He had mouth/throat cancer and it finally went into his lungs and then bones. He passed quickly after finding that news. He will be missed. Very nice guy.

I was again working on the panels and boat in general and now have another project I have to fix first. Seem the intake gasket on my '98 Blazer 4.3l is leaking water out the back. So I ordered in all the parts and started disassembling the upper section of the engine. I have everything removed now but the two high pressure fuel lines in the very back of the engine. Seems the manufacturer thought they should be tighten to infinite foot pounds to keep from leaking. And since they are at the back of the engine up nearly against the firewall, most tools won't even fit on them. So I am looking for a crows foot to see if I can get them broken loose. And they are 3/4" (or 19mm) which ever you have. One I get them loose, it is all ready to remove the intake(s). I bought marine grade FelPro replacements without the plastic composition but with quality rubber seals. Should fix the water leak.

I did LASER the third panel poster board copy of the Helm panel and once I verify all the parts fit properly, I will LASER the actual panel and post it on here.

You all have a great day... :thumb:
 

gm280

Supreme Mariner
Joined
Jun 26, 2011
Messages
14,605
Okay, it's been a while (again) since last update. However, I've had tons of other things crop up that took first place again, as usual. Yes my '98 Blazer 4.3L is in the shop, sort a speak. It was leaking about a gallon of water (antifreeze long since gone) about every two weeks or so. And that leak was coming from the stupid plastic gaskets used in the intake manifold. So I ordered FelPro Marine gaskets as replacements and decided to fix that before winter actually comes.

And we had a large tree main branch break off and was in the front yard looking ugly also. And as usual, when you need the branch trimmer, it is dead on scene. Seems every time I have to use the weed eater, branch trimmer, gas blower, or chainsaw, I have to rebuild the carbs first. And in ever situation the diaphragms are harden up and won't start or if they do, won't run properly. So I had to order carb kits again and rebuild those little PO? to get them work perfectly again.

I did manage to rebuild the little carb and then the trimmer started and run like new. Odd how that works. :facepalm: And I was able to cut down that branch as well. And I am still awaiting the new MPI spider to show up. Supposed to be here today, who knows?

So the boat work effort has come to almost a complete halt...again. I did manage to make the third Helm switch panel and have yet to see how the parts fit in it presently. I hope to do that real soon.

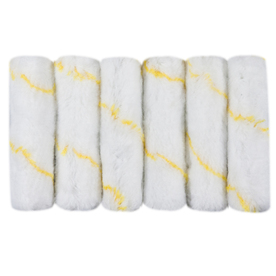
However, I did order a lot of the little 4" mini polyester resin rollers for a great price. I was getting them at Lowes for around $9 dollars for 6 and was low again needing some more. And I bought a lot of them at that price. :eek:
732087940145lg.jpg

But I decided to check out EBay for them and low and behold I found the exact same little rollers for around $.60 cents a piece or even less delivered. So I bought 20 more. 20 should allow me to finish up the polyester work remaining on the hull. But I thought I would tell you all about them if anybody is/was interested in them. The exact same type and even the stripped color band is the same. These are not the foam type but the soft woven acrylic material types. And if you buy larger quantities the price goes even lower. The place is out of Florida if anybody is interested, with fast shipping and a nice roller for rolling polyester resins. :thumb:
 

gm280

Supreme Mariner
Joined
Jun 26, 2011
Messages
14,605
Well I did get to work on the panels for the boat today. First time in a long while being how so many other things cropped up that took priority.

I made a decision to install SeaDog large rocker type switches for all the panels. They are even sold on here at iboats The reason is the larger switches will be easier to flip on and off even when it is cold out side on the water. However, I managed to buy all the types I needed but for one switch. I needed a DPST (double pole single throw) switch without a center "OFF". Simply a rocker on, rocker off setup. But SeaDog doesn't make such a configuration. So I had to buy a DPDT ON/OFF/ON switch instead. However, I modified it so it is now ON/ON and it works perfectly. I don't know if many of you have ever opened up rocker switches before, but it is really easy to modify them.

You take a little flat blade screw driver and pry open the sides and the center rocker portion will easily pop out. And then you can see exactly how they work. Well with a center OFF configuration switch there is a detent for a center off position on the little brass flip plates inside. In this case two such brass plates. So you simply flatten that center portion a little and I filled the indention up with solder so there is no stopping point for it. And then I cleaned the area really well with alcohol and reassembly it again and WALA an ON/ON configuration with no center OFF position now. So even though it is now actually an ON/ON rocker setup, it can be easily used for DPST setup. You just use four of the six connections. Easy Peasy!

So I am finishing up the three panels I have LASERed out now. One more panel to go. But that one holds the gauges and other things for the boat. So it will be the final panel. Then I can PB in the rod boxes for a final. And then flip the hull for priming/painting prep. I will certainly love that flipping point too. :thumb:
 

sphelps

Supreme Mariner
Joined
Nov 16, 2011
Messages
11,468
Any progress is good progress ! I wish I had your knack for all the electrical stuff ... Hopefully when I wire mine I can get everything to work right . I'll prolly turn the bilge pump on and the nav lights come on instead .. :lol:
 

gm280

Supreme Mariner
Joined
Jun 26, 2011
Messages
14,605
Sam, I've seen your work and you will never have any issues making things work. Electronics isn't anything mysterious or weird, but a simple common sense layouts. Just remember that each circuit has to have one source of supply power and one return or ground wire and think of them as separate little circuits and not the entire electrical system. Then you can wire most anything. Nurseman, while that would be interesting to see, I don't think it will be Sam's project going down for the count. Unless he names it Titanic II. :facepalm:

Well on to some more panel building now. :thumb:
 

gm280

Supreme Mariner
Joined
Jun 26, 2011
Messages
14,605
Okay a little progress with the third Helm Panel and some pictures.

As you all know I was working the boat panels and showed two of them already and now I have the third one ready for install. Here is the design display.
Front Helm Panel-1.jpg
This is the Visio Drawing of what I wanted for the Helm Panel.


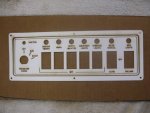
Front Helm Panel-2.jpg
This is how the LASER Engraver sees it.

IMG_0015.JPG
This is the poster board version from the LASER.

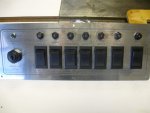
IMG_0016.JPG
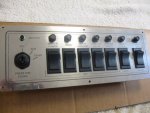
And this is the finished panel with all the goodies install ready for install.

You can see the key switch with the Neutral light so you know when the engine is in neutral so you can start it up. There will also be a tiny LED on the gauge panel to show the same Neutral position. You can also see I went with circuit breakers for a few reasons. I came across a bunch of them for a song and they are aircraft grade circuit breakers. So not the usual suspect breakers you buy for $10 and $15 dollars a piece. These are very very good ones with military spec to back them up.

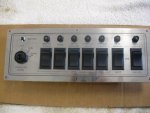
IMG_0019.JPG
Another shot.

IMG_0020.JPG
And one final shot.

I like designing and building these things. :smile:

So now I can work the last panel. The next and last panel will have the gauges in it.

So until next time, you all have a wonderful day... :thumb:
 

gm280

Supreme Mariner
Joined
Jun 26, 2011
Messages
14,605
On this old '76 Tom Boy boat, there were no such electronics for any type options. So everything is new to this setup now. Including the neutral light(s). Not hard to install. The neutral switch at the engine makes ground only when in the neutral position. So adding an indicator is so easy to do. That switch only grounds in the neutral position, if it is properly installed and adjusted, which allows the starter solenoid to engage for starting. So adding an LED indicator is no big issue. But it does offer the operator to see when that position is made. Just a little nicety.
 

gm280

Supreme Mariner
Joined
Jun 26, 2011
Messages
14,605
Once again, its been a while since last post. However, things have been done towards the boat, and so many other activities as well.

I did PB the starboard side rod box in and that seems to be very solid. I still have the port side to PD. But so many other things have taken place and the boat hasn't been worked on like I would have liked to. But that is life.

I need to get seriously moving to have this ready for the spring fishing season that really isn't that far away. But I still have the last gauge panel to finish up yet too. The original layout was 20" long. Now that really isn't that big, but bigger then the aluminum backing plate material that I usually install to help give them some solid backing. Seems I have lots of 19" aluminum material everywhere. So I decided to shrink the panel just a little to make things work out. And that is still being redesigned. Not a huge issue, but I have to make it look good as well. Can't have a panel that looks silly or out of place on this boat.

So as I get more done, pictures will be posted. You all have a great day... :thumb:
 

kcassells

Fleet Admiral
Joined
Oct 16, 2012
Messages
8,737
Hey GM...don't be so hard on yourself! Your continuous support, advice, work, help is more than enough. I've been told it's more of a hobby than a task no matter what you put in and do in it's own good time.
Well done Sir!
 
Top