1976 Tom Boy Boat, 1976 40 HP Johnson Outboard and who knows what Trailer

gm280

Supreme Mariner
Joined
Jun 26, 2011
Messages
14,605
Actually at present time I want to glue/seal all the live well fitting in place before I install the live well (cooler) in the box in the boat. So I need it to seal the parts and stick to the cooler plastic really well. Does it do that? I don't want to cut open the tube until I am absolutely ready with everything. And then I seen a way to seal the tube up again using a hot glue gun and apply some hot glue into the tip after I use it. :noidea:
 

sphelps

Supreme Mariner
Joined
Nov 16, 2011
Messages
11,468
It does take a little while to cure ... You can speed up the process by misting a little water on it ...
 

Woodonglass

Supreme Mariner
Joined
Dec 29, 2009
Messages
25,928
It really doesn't adhere well to plastic substrates. Not to many adhesives do. Not sure what I'd use to try and bond to a cooler????? You might consider this...[video]https://www.youtube.com/user/dmtbor[/video]
 
Last edited:

gm280

Supreme Mariner
Joined
Jun 26, 2011
Messages
14,605
Thanks for the link WOG. I watched it and seems interesting for sure. I've been searching around and there are a lot of interesting glues out there. Weld On makes a lot of really interesting glues and I used to glue Lexan plastic together using some of their products. They have a two part epoxy type glue that will absolutely glue Plexiglas or Lexan together and even make it water proof too, and it is totally clear when it cures. Great for aquarium building. I may consider that glue again.

I have been steadily working on the boat. I know, no pictures, but what I am doing now is the little things to finish up the rod boxes. But the problem is so many things are incorporated into the rod box that it is taking a lot of time getting everything to fit properly. All the parts to make the boxes and the lids and storage sections. But then I have to install the PVC tubing for the control cables and electrical harness as well. And then inside lighting when you open the libs. And wires running to the Navigation light in the back. So tons of things to incorporate into the design as I go.

I also have to fit the control box itself and the kill switch, the helm controls and of course the cup holders too. And I am almost finished with them now. Making all the parts waterproof is a total pain, and it takes a lot of time doing that to all the small wooden parts. But I want this to last, so I am pushing through. I also am ready to install the live well assembly into the hull as well.

I have designed all the control panels for all the electronics. And when I get them LASERed out and ready to install, I will show the procedures I use to do that. And since we do own a large LASAR engraver, it is really nice how the panels come out. I'll show the initial design program(s) and the steps along the way. So even if you don't own a LASER engraver, you can still duplicate the procedures and have your local trophy shop LASER them out for you. A lot easier them most think.

Until next time, you all have a wonderful day... :thumb:
 

Decker83

Commander
Joined
Apr 5, 2011
Messages
2,593
I've been reading your thread.. You sir or a truly skilled craftsman..
I really liked your version of the 5 gallon resin holder.. :D
Mine was not as fancy as yours, but it sure did help this old man out..
Another way is to lay the resin bucket on its side with the spout at the top.. Remove the cap and roll the bucket until the resin starts to pour out..
Have a great weekend.. ​ ​
 

sphelps

Supreme Mariner
Joined
Nov 16, 2011
Messages
11,468
Decker83;n10072900) Another way is to lay the resin bucket on its side with the spout at the top.. Remove the cap and roll the bucket until the resin starts to pour out... ​ ​ [/QUOTE said:
Ok now I have to try that ... I am to lazy to build a bucket holder .. :facepalm:
Gm I do have a laser .. But it's just made for making things plumb and level ... :D
 

gm280

Supreme Mariner
Joined
Jun 26, 2011
Messages
14,605
Ok now I have to try that ... I am to lazy to build a bucket holder .. :facepalm:
Gm I do have a laser .. But it's just made for making things plumb and level ... :D

Plumb and Level, what's that? :noidea: I don't use things like that... :facepalm:

I can say that bucket holder has come in mighty handy for sure. And I am right at opening up my fourth 5 gallon bucket in the next day or so. But I am also about to finish up with the polyestering (if that is a word) shortly as well. So there will be a lot left over.

Thanks Decker83 for the kind words. I try to do good work. But it doesn't happen all the time either. But thanks for watching.

TDF, I know exactly what you mean about using an engine hoist for the 5 gallon buckets. That IS one reason I made the bucket holder/pourer. I literally couldn't hold and pour, with any great precision, the polyester resin in the containers. So I had to build something that took near zero effort. And that bucket pourer works like it is on ball bearings even though it is simple pipe in a wooden hole for the pivot points. One finger pours it.
 

Mikeopsycho

Senior Chief Petty Officer
Joined
Feb 6, 2014
Messages
738
I've been reading your thread.. You sir or a truly skilled craftsman..
I really liked your version of the 5 gallon resin holder.. :D
Mine was not as fancy as yours, but it sure did help this old man out..
Another way is to lay the resin bucket on its side with the spout at the top.. Remove the cap and roll the bucket until the resin starts to pour out..
Have a great weekend.. ​ ​

^^^^ I like the roll and pour method. It works very well for me, and it's easy to pour accurate amounts. By the sounds of it the bucket holder may even be easier to use, and I would have considered building one if I could see a need for it in the future.

Keep up the good work GM280! I'm looking forward to seeing the whole laser engraver procedure.
 

gm280

Supreme Mariner
Joined
Jun 26, 2011
Messages
14,605
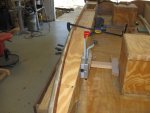
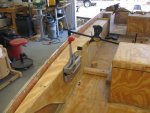
Okay an update...finally! I am continuing with the rod boxes and all the particular items that have to be installed before I can PD them in place for a final. Yes I know I am slow, but I have to think about every possible things that has to be installed before jumping in there and PBing them in place and think UH OH I screwed up! :facepalm: So I try to cover everything before that point. And usually I get it right the first install as well. Here are a few rod box pictures. NO there are not PBed because I still have a few wiring details that need to be in place first. But it is getting there.
IMG_0005 (2).JPG
Here you can see the layout and the areas for the rod box openings.
IMG_0006.JPG
And a slight different angle. I have temporarily mounted the control box so I can get the control cables setup as to where they will run. But I also have rod PVC tubes for the rods to slide in to, and PVC tubing for the control cables and engine harness. But I also had to work the navigation rear light and courtesy lights when you open the box or storage areas. So a lot of thing that have to fit perfectly without taking away too much storage. It is getting there.

As promised before, I was also working the design of the panels I am installing in the boat. As I stated, I use a program called Visio Pro. While Visio Pro is not actually a design software program, you can actually do a lot with it once you learn about it. So I use Visio Pro for a lot of initial design work, even printed circuit board designs. So I am going to show the steps I use to make panels for the boat.

Step 1, I design the panel in Visio Pro, but seriously most any drawing programs can do this part. And I align everything up to actual sizes. That is real important when designing anything, having actual parts and components set to their actual sizes to design with. I made my own library for electronic components and that way I only have to design the sub-component once.

Here is that initial design for the read seat power outlet panel As I finished it in Visio Pro ready for transfer.

Rear Seat Panel-1.jpg
This is a screen capture directly from Visio Pro. As you can see this panel is very easy with not much going on. But they get a lot more intricate as I go on.

Step 2, after you are satisfied with the layout, you have to remove the components so you can see how the panel has to be cutout to allow the parts to be installed.

Here is that design;

Rear Seat Panel-2.jpg
As you can see there are no parts and the design is now black and white. You actually have to change all the opening or cut out area colors to red when you transfer them to CorelDraw so the LASER will cut the openings out and raster everything that is not done in red. SO for the typical panel design you will only use two colors, being Red and Black.

Step 3, you transfer the design to CorelDraw and make all the adjustments you want before sending it to the LASER for printing. The LASER engraver only knows two things, that is Vector and Raster. Vector is the LASER cutting forms while Raster is merely LASER engraving forms. For example, if I want to cut an opening for a DPDT rocker switch like in this panel, I tell the LASER to Vector the opening. But if I want to engrave a label for that opening, then I tell the LASER to Raster that label. Sound complicated but you do those things via colors. Not hard at all. And you can easily just do your design in CorelDraw and skip the Visio Pro work. But I know Visio Pro like the back of my hand and can make a panel in mere minutes as oppose to CorelDraw taking my hours because of the learning curve. But only because I've used Visio Pro for years. So I do the initial design and transfer it. But if you are not familiar with Visio Pro, just use CorelDraw or any other Vectoring program.

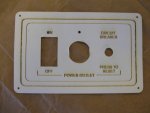
Step 4, I LASER the panel out using poster board. This is actually not a needed step, but I always do this before the actual panel print just to on the safe side. When you have everything like you want, a poster board panel cost near nothing. But the actual material for the panel does cost some money. Not much, but I like to be sure.

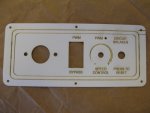
So here is the poster board LASER panel right off the LASER engraver:
IMG_0009 (2).JPG
Yes it looks a little burnt, but all the parts fit and this is a lot cheaper then the panel material.

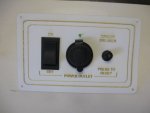
Step 5, I usually install the part to verify everything fits and works together
IMG_0006 (2).JPG
Here is that same poster board panel with the parts installed. Looks like everything fits just fine. Even the little green LED fits perfectly.

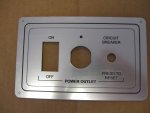
Step 6, Now it is time to use the real panel material for the final panel. So I select my material, in this case a horizontal brushed aluminum look, and install the material in the LASER and run it,
IMG_0010 (2).JPG
Her is the finished panel before installing the parts. Look nice to me. So let's install the parts now.
IMG_0011.JPG
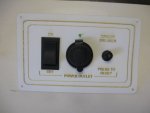
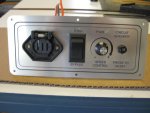
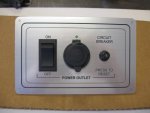
And here is the finished power outlet panel all parts installed. Not all that hard to do. Now all I have to do is finish installing this in the boat and finish the others as well.

I have four panels totally for the boat and as I get them all finished I will post them. I just wanted you all to see the many options for making your own panels. The components and panel colors and textures are endless. So design away and even if you don't have a LASER engraver, your local trophy shop does this type work all day long... Something to think about now! And a huge issue with LASER engraved panels, the print will never ever wipe away. It is engraved there forever.

Until next time, you all have a designing thoughtful day. :thumb:
 

Attachments

  • IMG_0006 (2).JPG
    IMG_0006 (2).JPG
    95.7 KB · Views: 1

Tnstratofam

Commander
Joined
Aug 18, 2013
Messages
2,679
GM as usual outstanding work. I too spend lots of time double and triple checking my work before the final install. The rod boxes are gonna be nice, and the laser etched panels are a great idea. Thanks for sharing. I've said it before your boat is gonna be solid as a rock when you're done.
 

sphelps

Supreme Mariner
Joined
Nov 16, 2011
Messages
11,468
Awesome as usual ! Now a ?
How does the black raster cut make it black ?
 

TruckDrivingFool

Lieutenant Commander
Joined
Jul 30, 2007
Messages
1,818
Holy smokes that panel is better than factory. :D

Wheels are turning now and must remember to check out local trophy shop services.
 

Decker83

Commander
Joined
Apr 5, 2011
Messages
2,593
Rod box looks great.. Very nice layout.. It's always better to take your time and do it right the first time than to have to do it twice..:facepalm:
That is awesome work for the panel.. I don't think I've seen this on iboats before.. :clap2:
 

gm280

Supreme Mariner
Joined
Jun 26, 2011
Messages
14,605
tnstratofam, thanks for the kind words. But it really is easier then it looks and once you actually see it in operation, you would go crazy with ideas and uses. I've been designing and building equipment that absolutely looks factory from every respect, and been doing that for years. I had a guy argue with me that I bought a special piece of equipment that I actually designed and built. Even after I told him I design and built it myself. It was only after others verified I did it that he finally believed me. So once you know how, the door is wide open. Your inventive mind is the only thing holding you back.

Sam that is a very good question. You actually buy the material in the panel color and lettering color you want. The LASER merely burns through the top color to the second color underneath. So you control how deep the LASER cuts with setting up the different colors on the layout for both speed and power. And that is how the LASER both labels things and is able to cut all the way through it too. Power and speed settings. And the color combinations are near endless. Every solid color, wood-grain pattern, metallic and even metal flake colors and patterns are available. I used brush aluminum with black lettering to match the gauges. But anything you can imagine is available.

TDF, yes once you see how easy it is, the mind is the only stopping point. And like I said, if you don't own a LASER engraver, take your designs to most any trophy shop and they can do it. My wife retired from such a shop and she was the leader of the LASERing department. So we bought a LASER ourselves, not really cheap either. Honestly not worth the expense unless you are doing work for the public. But I like playing with it and making things anyway. From printed circuit boards to signs to desk labels to panel to basically anything you can imagine. Even LASERing wood working items as well. :thumb:
 

sphelps

Supreme Mariner
Joined
Nov 16, 2011
Messages
11,468
I think a lazered Woody's backyard boat builder emblem would be cool ! Or something similar ... :cool:
I'm placing my order now .. :D
 

gm280

Supreme Mariner
Joined
Jun 26, 2011
Messages
14,605
Yeah, How much problem to make a 3"x3" one of these in a piece of Aluminum...

Actually WOG, the LASER doesn't engrave in any type metal. It looks like metal but is actually plastics with metal looking finishes. I can LASER in glass, plastics, wood, Lexan, Plexiglas. leather, cardboard and things like that. But Not metals. It takes a different type LASER at a different frequency to do metal. And that is a really costly setup. :sorry:
 

gm280

Supreme Mariner
Joined
Jun 26, 2011
Messages
14,605
Here is another panel I finished with.
First the initial design.
Trolling Motor Panel-1.jpg
Next the LASER panel
Trolling Motor Panel-2.jpg
And the poster board print.
IMG_0008 (2).JPG
And the poster board with parts to verify they fit.
IMG_0007 (2).JPG
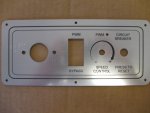
Then the actual panel.
IMG_0002 (2).JPG
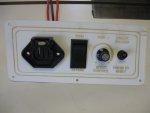
And the finished panel
IMG_0001 (2).JPG
Again even the green LED fits nicely. When I switch from BYPASS (which is straight 12 volts to the trolling motoro) to PWM, the LED comes on and lets me know power is applied to the PWM circuit. This way if I use a trolling motor without a digitizer/PWM (Pulse Width Modulator) built in it, I can use my own installed in this panel. Once I clean up all the smudges off the panel and install it, it will look perfect in the boat.

More panels to come for Helm/ignition circuits and even the Gauge panel yet. Just want folks to see what they can do as well.

Until next update, you all have a wonderful day... :thumb:
 
Top