1976 Tom Boy Boat, 1976 40 HP Johnson Outboard and who knows what Trailer

sphelps

Supreme Mariner
Joined
Nov 16, 2011
Messages
11,468
Sounds like good progress to me ! Now get them puppies all glassed in and ready for the dance floor ! ;)
 

gm280

Supreme Mariner
Joined
Jun 26, 2011
Messages
14,605
Sounds like good progress to me ! Now get them puppies all glassed in and ready for the dance floor ! ;)

Ha thanks sphelps. I figured you would understand something like that because you've done this before and know what it takes. So that was a huge hurdle to get done.

Today I finished trimming and sanding the actual two stringers (again) to make then work with the side supports. Then after fitting them perfectly, I had to mix up some more peanut butter and fill in the last of the plywood voids before PBing them in place. That will probably happen tomorrow after I sand down all the fuzzies off the stringers where I filled the voids in. If only they made quality plywood these days, filling voids would not be needed... I mixed up some 1% polyester and allied the second tabbing of 1708 to the bottom of the transom and then with the left over poly mix, I made some PB from that and did the voids in the plywood stringers. I know most everybody knows what PB or Peanut Butter is, but for those that are reading this that doesn't know, PB (peanut butter) is a mixture of polyester resin, MEKP (Methyl Ethel Ketone Peroxide), Cabisol (fumed silica) and milled 1/4" long fiberglass fibers. And most everybody has their own mixture of how they make their PB. So here is mine.

I mix say 400ml of polyester resin, and 4ml MEKP (a 1% mixture because of the warm weather). Then I mix that for about two minutes to make sure it is mixed well. Then I add in about the same amount of Cabisol by volume, 400ml by volume, not by weight because Cabisol weights nearly nothing. So mix by volume. Then after that is mixed until all the Cabisol is mix in well, and that may take a little time to mix, I add about a 25ml to 30ml of milled fiberglass fibers until it is all mixed well and all through the entire mixture. You can mix any amount you like until you like what you see. The PB then should be stiff enough to apply horizontally or vertically without running. You can even put that mixture into a zip-lock baggy and cut the corner out of it and use it like a pastry bag to apply it exactly where you need it to make nice smooth fillets or whatever you mixed it up for. That is my custom double secret mixture...so don't tell anybody! :tape: :whistle:

So until next time, you all have a great day... :thumb:
 

gm280

Supreme Mariner
Joined
Jun 26, 2011
Messages
14,605
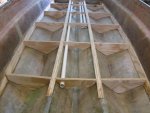
Some more progress. Knowing it is getting time to cut the floor and install it REAL soon now, I thought about things I need to consider before quickly gluing the floor down and then needing to remove it because I forget to do something. So I thought about where everything was going to be installed. The rear seat, the front seat, the helm controls, the live well, the front gauges. and then it dawned on me, I need someway to run wires and live well hoses and even front to rear large battery cables and such. So I decided to put some 1" PVC piping in for such things. I used the thin wall because there are no forces on this tube. They can either be used for inlet and outlet tubes for live well hoses or even to run wires in later. So I got my forstner bits set out and cut out some holes to allow such PVC tubing installation. And knowing I can't bent the PVC tube very far, so I have to install them as I PD the center bulkheads in place as well. So I cut two PVC holes in each center bulkhead for the live well setup and an addition hole for wires from the front battery to the Perko switch I'll install to select batteries later on. I will PB the tubes in as I do the bulkheads so that they are solid and won't move around or make any noise...

Floor-14.JPG
Here is a shot just after I cut those holes through the center bulkheads and before I PBed them in place.
Floor-15.JPG
This is a trial fit after cutting the holes.
Floor-16.JPG
This is from the back again to show how I will stop them at the bilge area..
Floor-17.JPG
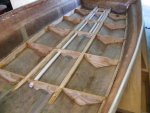
This is just after I PBed the two side sections in but not the center section yet. I mixed 2.5 liters of PB and ran out at the last front port side bulkhead. So I called it a day. I was tired of PBing and filleting by that time. I will do the center section tomorrow...

To my amazement, this floor came out on the money. It is total straight that level. And I don't know how it came out that straight with all the problems I had with it. I know I worked for days to get to that point, but everything was a fight being no flat straight level anything with this tri-hull. So I am very glad for these floor supports now... Cutting the actual floor wood will be a snap compared to these under floor support stringers and bulkheads. I know it seems like I've been on this section of the build forever, but I wanted this to be perfect as I could get it knowing everything else was gong to be measured from the floor after it is installed. Everyone of those sections will be filled with mix and pour 2lb foam, of course after the floor is installed. So that should also make this one solid boat. The center section will not be filled to allow drainage to the bilge area. But everyth9ing will be polyed and covers in either CSM and/or 1708...

Well until next time. You all have a wonderful day... :thumb:
 

sphelps

Supreme Mariner
Joined
Nov 16, 2011
Messages
11,468
Ha thanks sphelps. I figured you would understand something like that because you've done this before and know what it takes.:

Nope I have yet to glass in any stringers ... I did do quite a bit of glassing on the MFG.. Luckily it had factory all glass stringers and deck . The only wood was the transom and I installed seacast in it . I have installed a wood transom in my son in laws Glassmaster so the stringers are up next with it ..
I'm still learning like the rest of us .. ;)
I just have been enjoying watching you with all the great fab work you've been doing just like all the other great restorations going on ..
Theres always something to learn !! :cool:
 

Mikeopsycho

Senior Chief Petty Officer
Joined
Feb 6, 2014
Messages
738
Nice work gm280. You're putting way more thought and planning into it than the original builders did, and that's a good thing. :high5:
 

gm280

Supreme Mariner
Joined
Jun 26, 2011
Messages
14,605
I little more update. But again without pictures because it still looks basically the same as the last pictures I've posted. Unless you could see the little fillets I've applied, it really doesn't look much difference for all the work I've done. I finally got all the subfloor bulkheads installed and even the PVC pipe as well. And I'd love to say some really nice fillets too, but some of them look bad. So after this latest PB install cures, I'll be sanding and a little grinding to make the fillets more presentable and to allow better flow of the 1708 tabbing to come next. All the effort I tried to make filleting go as smooth as I can, it still is a really sticky gooey mess yet. I take and lay out everything in a nice orderly fashion and mix the poly, MEKP, Cabisol and 1/4" milled fibers and manage to mix up a nice PB fillet material. And then I spoon that into a large plastic bag and seal it and cut a little section out of the corner of the plastic bag and use it like a pastry bag to apply the PB mixture to try and control the fillets. But before it is all over, I have it on the gloves and arms and it gets really sticky and the fillets start to look questionable. But I have great sanding and grind capabilities so it comes out nice in the end. Luckily the bulkhead fillets are now finished. So when I get everything sanded, I can tab the bulkheads into place and start with the actual floor. Finally I see a floor in this project coming real soon. I have to say that this hull has a real solid feel to it now. So I really like that. Well until next time, you all have a nice day...
 

Quantumn

Petty Officer 2nd Class
Joined
Jul 17, 2012
Messages
142
Your doing an outstanding job GM280. I love the fact that your are over-engineering that machine, props to you good sir. I've read through your whole journey and I am impressed, you give us all inspiration. Mind if I tag along?
 

gm280

Supreme Mariner
Joined
Jun 26, 2011
Messages
14,605
Your doing an outstanding job GM280. I love the fact that your are over-engineering that machine, props to you good sir. I've read through your whole journey and I am impressed, you give us all inspiration. Mind if I tag along?

Of course you can tag along Quantumn. Funny I just read you boat project in its entirety and was impressed with your work and attitude. So I will be following your project as well. And thanks for the kind words. But also, if you see anything to help me out, chime in and tell me. I'm new at this type effort and this is my first boat project. So let me know if you see anything I need to change or redo... Thanks again, and I would be proud for you to tag alone... :smile:
 

Quantumn

Petty Officer 2nd Class
Joined
Jul 17, 2012
Messages
142
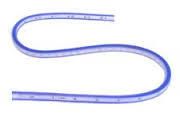
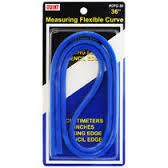
In my past career, I worked car-audio and was heavily involved in custom fiberglass/woodworking. You would be amazed what people would spend money on, hehe. Anyways, a couple tools that I picked up and have used a few times on the OMC resto are these two items;


Those two items can be purchased at your local hardware store or even at an office supply facility. It works wonders in holding a curve to transfer onto new wood that needs to be cut. Quite flexible and made of plastic so is durable.

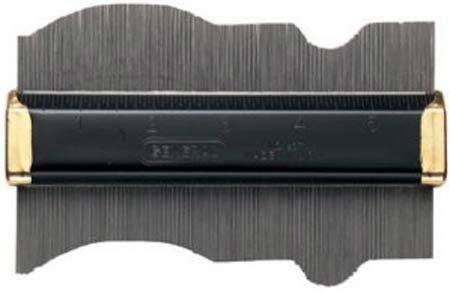
Also I use this, purchased from sears about 20 years ago and it still works like a champ. Its called a contour guage.


Just a few little helpful tools.
 

gm280

Supreme Mariner
Joined
Jun 26, 2011
Messages
14,605
In my past career, I worked car-audio and was heavily involved in custom fiberglass/woodworking. You would be amazed what people would spend money on, hehe. Anyways, a couple tools that I picked up and have used a few times on the OMC resto are these two items;


Those two items can be purchased at your local hardware store or even at an office supply facility. It works wonders in holding a curve to transfer onto new wood that needs to be cut. Quite flexible and made of plastic so is durable.

Also I use this, purchased from sears about 20 years ago and it still works like a champ. Its called a contour guage.


Just a few little helpful tools.

Ha Quantumn, I have seen and used those things before, but for some strange reason I haven't thought about them for this boat project. However, I did use the old standby pencil compass. You know those little pencil scribing tools we use to use in school;

photo3.php

And it really worked extremely well making all those bulkheads. I would cut the plywood to the correct length and even cut the 12 degree angle on the outsides and then use the compass to scribe the pencil marks along the bottom of the hull to the plywood. And then band-sawed the marks. Before I was all finished I was turning them out pretty quickly too. But I will have to remember those other options and use them as well. Thanks for the info. Ideas are never wasted on me. I listen to everything and use them some times and some times they make me think of other good ideas as well. Everybody's ideas are worthy of listening too in my opinion. You just never know! Thanks again...
 

gm280

Supreme Mariner
Joined
Jun 26, 2011
Messages
14,605
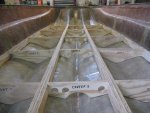
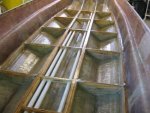
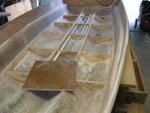
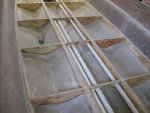
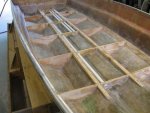
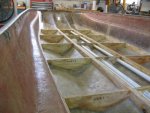
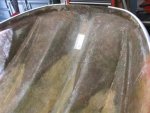
Some new updates. Well today I put in a lot of hours. But sadly the pictures will not look very interest or even new because some times what you do is not going to show up in the pictures. But I have some to post anyways. I grinded all the fillets today in preparation for tabbing. Amazing how hard the Polyester Resin, Cabisol and 1/4" Milled Fiberglass strands can be when wanting to concave the fillets. I used both a 4 1/2" angle grinded with flapper disk and a pneumatic angle grinder with 2" 36 grit Rolock R disk to work the fillets over. Equally amazing is the amount of dust it creates as well. Of course I wore the respirator and eye protection, but the dust went everywhere. This grinding was inside my shop because it has been raining nearly everyday around here for a long time. In fact it was raining while I was grinding. And anybody that has ever done this before can tell you, you WILL get fiberglass splinters with both the fiberglass AND the harden poly resin. And they really do hurt...a lot. But all part of the effort. And I can tell you if you think that you can flip boats and make money, you have a better chance of selling yellow snow cones to Eskimos in the dead of winter...if you do the work correctly. Well here is the pictures;
Tab-1.JPG
This first picture actually show the dust in the hull before I vacuumed it out. and this is the third time for that dust collection too. Hard to actually see the concave fillets. I used a piece of plywood to sit on while grinding.
Tab-3.JPG
A different angle. You can see my markings to make sure each bulkhead went back to the correct place.
Tab-5.JPG
Here is the boat afer vacuuming the dust out. Really still can't see the fillets very well.
Tab-7.JPG
And yet another angle after vacuumed. If you look closely, you can see the bow eye support I made and PBed in place. It is absolutely solid and many times better then the original setup. If you can pull that block through the hull, you used an amazingly strong winch with the boat filled with concrete...that for sure.
Tab-8.JPG
Here is a closer look at the bow eye block. It is rock solid and about 1 1/2" to 2 1/2" thick as well with PB spread out over a very large area to increase the holding capability with about 7 layers of 1708 and CSM applied before the actual block itself. And then there is an aluminum backer plate too.

Well if the weather hold, I hope to tab in the all stringers and bulkhead tomorrow. Being how some of the areas are only an inch or two high off the hull, I will do the best I can with the 1708. But if it doesn't want to lay down properly, I will use CSM to finish the tabbing. I know that isn't the usual protocol, but I don't know anything else to do with such small parts. However, they will be tabbed and they are already so strong that I think you would have to use a sledge hammer to try and break them out...

Until the next time, you all have a amazing day... :thumb:
 

sphelps

Supreme Mariner
Joined
Nov 16, 2011
Messages
11,468
Looks great ! One thing I have found that works well cleaning up the fillets is bend a 4.5" or 6" 24 grit disc to conform to your radius and sand it by hand ... Just knock the nubs down ... Although ya got quite a bit of fillets going on there ... :eek:
 

gm280

Supreme Mariner
Joined
Jun 26, 2011
Messages
14,605
Looks great ! One thing I have found that works well cleaning up the fillets is bend a 4.5" or 6" 24 grit disc to conform to your radius and sand it by hand ... Just knock the nubs down ... Although ya got quite a bit of fillets going on there ... :eek:

Oh yeah, I did try everything...believe me. I even used a rotary metal file in a straight hand grinder for some of them. However, that portion of this rebuild is now done and today comes the tabbing. I wanted to get all the fillet grinding done so I didn't have to do any of that today. All those stringers and bulkhead did make for a lot of fillets, but I want this to be well rebuilt. I am getting more excited now because hopefully after today comes the floor. And once that is installed, this boat is on its way to being completed. The seat boxes and rod boxes will be worked off straight measurements again and that will be a blessing to work with for a change. All that under floor support was multi-angled and not one part was straight without some type angle needed cut. I learn so much though. I think the next boat project would take a lot less time and effort knowing some of the things I can do better and quicker now.

Well off to the shop and poly resin and 1708....yea! :high5: :clap2:
 

Woodonglass

Supreme Mariner
Joined
Dec 29, 2009
Messages
25,928
Newb's take note!!!! When doing your fillet's take the time to smooth your fillets as best you can. It saves a lot of "Go Back" time and Sanding/Grinding. Big Plastic Spoon Dipped in Mineral Spirits and a Bondo Spreader to do the final cleanup and smoothing just as it's kicking off will really save you some later aggravation. GM280 Your work, as always, is Top Notch. If the MFG's did this type of work, iBoats would be out of business. There wouldn't be any need for Boat restoration forums. Boats would last for 100 years. Yours will last until your Grandkids-Kids are done with it!!!!!
 

gm280

Supreme Mariner
Joined
Jun 26, 2011
Messages
14,605
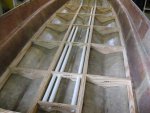
Ha Wood, I'm still a newbie...I think? And yea, I actually knew to do that, and believe it or not, I actually thought I actually watch for such things as I was filleting. But as usual, when the smoke clears, I mean poly cures, there were those nasty fiberglass nibs and blobs. And my way to tell if the fillets are concaved and ready for tabbing is to slide my hand across them to feel them. Hence, poly and fiberglass splinters...ouch!!!! You would think I would learn about doing that, but no, I still use my hand to feel the surface for imperfections. I guess that is from my auto body work project before this boat project. So yes I got my share of splinters. Some even drawing blood too... Oh I feel so weak now with such lose of blood... :facepalm: But all that is now behind me and I finish tabbing all the stringers and bulkheads today. That was a long job as well with so many bulkheads. You would think I was building a huge ship to cross the ocean the way I installed bulkheads, but I wanted the subfloor to support the weight. I installed 4" wide 1708 tabbing and in some locations that went all the way to the top of the stringers. I know the usual idea is to install two tabbings with the follow on wider then the first, but I honestly don't know if I really should do that with these small stringers. I mean there are basically 2" tall or less. Well I didn't post any pictures because it basically looks like yesterdays pictures. But now I can move forward with designing the actual floor. You pros let me know if you would put the second tab in on top of the first? It has no other place to go but on top of the first. There is no room to catch new untabbed structure. But if you guys think I should, I certainly will... So let me know...

As usual, everybody have a great day... :thumb:
 

Woodonglass

Supreme Mariner
Joined
Dec 29, 2009
Messages
25,928
Put the 2nd tabbing on. It's all about bulk and strength. Once the glass and resin cures, it carries the majority of the load along with the wood stringers.
 

gm280

Supreme Mariner
Joined
Jun 26, 2011
Messages
14,605
Okay WOG, today I will install the second tabbing and see how well that goes. I hopefully goes a little quicker. So many places to tab tha *** takes a long time doing that... But I want this to be correct. So to the workshop now... I hope I can get some interesting pictures to post as well.
 

Quantumn

Petty Officer 2nd Class
Joined
Jul 17, 2012
Messages
142
Moving along quite nicely GM280. The way you layed out your stringers and bulkheads should provide a very solid structure, for both the hull and floor. I can sense your pain in all the tabbing needed, but having gone this far, its worth the last stretch to finish it right. Thanks for the updates. :clap2:
 

gm280

Supreme Mariner
Joined
Jun 26, 2011
Messages
14,605
Okay I have one picture to post as I closed up shop this evening after installing the second wider tabbing today. And my back says..."enough now". Leaning over the hull for hours on end has finally taken its toll. My lower back is complaining asking for some relief. But it is done so I can relax until tomorrow... I now have two tabbings of 1708 installed. First was four inches wide and the second six inches wide. I know others do eight inches wide and such, but I only have ~ 2" to 3" max height stringers that taper to about 1/4" in the front. So after this cures, I will do some miniscule things and start the template for the floor. Since I installed bulkheads every 24 inches, I plan on using 1/2" exterior plywood. And I also plan on running that plywood cross ways in stead of length ways to the hull. And that is because it will have its maximum strength that way. And where the plywood will meet will be on bulkheads as well. So no issues with plywood ends flexing. And with the addition of mix and pour 2lb foam, that floor shouldn't move a millimeter at all....I hope. :noidea: But that IS how I planned everything to work anyways. Anyway here is the one picture to prove the second tabbing is installed now... :whoo:
Tab2-8.JPG

I know, not much to look at or really much difference then previous ones. But I had to post it anyways... I will say that even before the floor is installed the sides of this boat has substantially stiffen up. There doesn't seem to be any flex thus far. And before all those stringers and bulkheads were installed, it was like a wet dishrag... So far this hull has been grinded, a total covering of the entire hull of poly and CSM, The new transom, the stringers, the bulkheads, the PB fillets and two tabbings. So I guess it is time to work on the floor now!

Onward... And hoping everybody has a super day.
 
Last edited:
Top