1976 22' SUS O/B "Hydration Break"

DWbaseball

Petty Officer 2nd Class
Joined
Aug 25, 2020
Messages
110
Some pics of the bow seating frame that I have been hacking back together. It will get some blue paint tonight.IMG_20231105_151159985.jpg
IMG_20231105_151207358.jpgIMG_20231105_151218376.jpg

Sanded and cleaned with vinegar before paint.
IMG_20231105_160524468_HDR.jpgIMG_20231105_161524929.jpg
 

DWbaseball

Petty Officer 2nd Class
Joined
Aug 25, 2020
Messages
110
I could use some ideas for how to keep up good wiring management under the gunnels. I was thinking maybe riveting some 1-2 inch cuts of PVC pipe every 18 inches or so under the gunnels then stringing the wires thru?

Planning for steering cable to run behind the side board.

Thanks.
 

SHSU

Lieutenant Junior+Starmada Splash Of The Year 2019
Joined
Mar 8, 2017
Messages
1,665
There were hooks that run under the gunwales originally. I just bent some Aluminum flat bar to ad some rigidity when I replaced them.
DSC04002.JPG


SHSU
 

DWbaseball

Petty Officer 2nd Class
Joined
Aug 25, 2020
Messages
110
A few update pics. Was thankful to get some work in last Thursday morning.

First I got the dashboard installed. Have since realized I want to put one more piece in angle behind it attached to the gunnel, but having this installed opens me up to starting wiring and steering installs. IMG_20231123_113403268.jpg

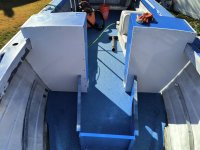
Next I got the framing for the front seats installed. Wanted to have the wood cut for these seats so I could paint before winter cold weather but I think I missed that window.
IMG_20231123_113410755.jpg
IMG_20231123_113424120_HDR.jpg

IMG_20231125_165308354.jpgIMG_20231125_165335428.jpg

And last I got the vent hose for my gas tank installed. I ran it thru this piece of square to keep in place and prevent any sagging.
Still need to do the fill hose for gas as well as my gas lines. Planning a two way valve and a fuel water separator to be bracketed to the inside of the splash well.
IMG_20231123_124924843.jpgIMG_20231123_124934918.jpg
 

Attachments

  • IMG_20231123_113431933.jpg
    IMG_20231123_113431933.jpg
    3.8 MB · Views: 1

Watermann

Starmada Splash of the Year 2014
Joined
Jan 12, 2013
Messages
13,753
Looking real good, nice to see some thought out details. (y)
 

DWbaseball

Petty Officer 2nd Class
Joined
Aug 25, 2020
Messages
110
A quick update from this past weekend. Worked on getting one of my sideboards all upholstered and ready for install. Looks great but it took all day and still need to do it's twin.

Forgot to take pics but used a factory piece of aluminum strap to join the two piece of plywood. Then I upholstered with vinyl, and riveted on the original metal base bracket. IMG_20231215_135457195_HDR.jpgIMG_20231215_135548820.jpgIMG_20231215_154100938.jpg
IMG_20231215_165759264.jpgIMG_20231215_165805128.jpg
Some comments:
Yes I know it's longer than the original.

The hole is for a speaker, but I also realized I forgot to cut holes for speakers in the bow seating.

I think they came out a little shorter than the ones I took out because I only have one layer of floor vs two.
 

SHSU

Lieutenant Junior+Starmada Splash Of The Year 2019
Joined
Mar 8, 2017
Messages
1,665
Looking good. You going to have enough room between the hull and the side board for the speaker to fit?

SHSU
 

djpeters

Lieutenant Commander
Joined
Jun 9, 2010
Messages
1,824
Looks good! I’ll be covering my open bow pieces with vinyl next week hopefully. Did you use any glue?
 

DWbaseball

Petty Officer 2nd Class
Joined
Aug 25, 2020
Messages
110
Looking good. You going to have enough room between the hull and the side board for the speaker to fit?

SHSU
Good call out. Likely not haha. Also there are metal contacts that might be up against the hull
 

DWbaseball

Petty Officer 2nd Class
Joined
Aug 25, 2020
Messages
110
Looks good! I’ll be covering my open bow pieces with vinyl next week hopefully. Did you use any glue?
I did not glue these but I thought about that halfway through and could or should have. I think it will be fine for sideboards where I have it pulled tight, stapled good, and riveted. But you might want it glued for seats where there will be lateral forces and a wider run.

I am going to think about using the remaining vinyl from these for either side of my seats. Then maybe remaining nautolex on the bow board piece. Gotta see what I have left and what that would really look like. Or might need to spend for some more material....
 

Watermann

Starmada Splash of the Year 2014
Joined
Jan 12, 2013
Messages
13,753
I did not glue these but I thought about that halfway through and could or should have. I think it will be fine for sideboards where I have it pulled tight, stapled good, and riveted. But you might want it glued for seats where there will be lateral forces and a wider run.
I used 1/4" batting on my SS panels just to add some cushion for for the vinyl after seeing how easy it gets injured on my Chief with just the plywood underneath.
 

djpeters

Lieutenant Commander
Joined
Jun 9, 2010
Messages
1,824
I used 1/4" batting on my SS panels just to add some cushion for for the vinyl after seeing how easy it gets injured on my Chief with just the plywood underneath.
I am about to cover my bow seating panels with vinyl. I was not going to use any foam underneath. I asked about this on an upholstery forum and most said to add 1/4” foam for the same reason you said. Now I’m really wondering if I should…..
 

DWbaseball

Petty Officer 2nd Class
Joined
Aug 25, 2020
Messages
110
Got my one side board riveted in yesterday.
IMG_20231226_144814732.jpg

Also I restored the captains windshield. I sanded down the frame and then used a headlights restore kit on the plexiglass. Worked great and I even used the headlight wet sanding discs to polish the frame better than just sanding it. Going to try to install this on Friday so maybe some more pics soon.

Going to try to keep pushing on my build over the winter so I can get on the water asap come spring. Still have a few things coming that I haven't shared yet too.
 

DWbaseball

Petty Officer 2nd Class
Joined
Aug 25, 2020
Messages
110
Some Friday pics as promised.
Had to make my own windshield t bolts. Used some original bolts that were thru the factory transom.

IMG_20231229_111315309_HDR.jpg

Then I worked on getting the captains windshield installed. Once that was riveted in I put on a piece of diamond plate to start to seal up the console. I figure with my wiring underneath there, I want it to be pretty dry. Last thing I sealed some seams with jb waterweld putty. IMG_20231229_125356804.jpg

IMG_20231229_160232109.jpgIMG_20231229_160240059_HDR.jpg
IMG_20231229_160255490.jpg
Evening shots.IMG_20231229_180755823.jpgIMG_20231229_180820265.jpg
 

DWbaseball

Petty Officer 2nd Class
Joined
Aug 25, 2020
Messages
110
Did a mock up today of how I want my stern to layout with the battery boxes, and gas tank. Not the best pic but this is how it looked in progress. Im going to get a second fuel tank of the same size and have one sitting flat, and another vertical as shown. I want to be sure I have good fuel range.
IMG_20240101_140502755.jpgThe project for today was installing my fuel water separator, my fuel two way switch, and then the fuel lines themselves. Needed to rivet some custom brackets for these. This completes the fuel delivery from both the main tank and the external tanks. With the the vent already complete, I only have the fuel fill hose and tie downs remaining.
IMG_20240101_141706772.jpgIMG_20240101_152801457.jpg
 

SHSU

Lieutenant Junior+Starmada Splash Of The Year 2019
Joined
Mar 8, 2017
Messages
1,665
I remember having to make my own T Bolts for the windshield as well.

Also pencil in the drill chuck? What is the secret use I don't know?

SHSU
 

DWbaseball

Petty Officer 2nd Class
Joined
Aug 25, 2020
Messages
110
SHSU-I can see what you see but it's not a pencil. Just a rusty flathead that I was using on the hose clamps.
 

DWbaseball

Petty Officer 2nd Class
Joined
Aug 25, 2020
Messages
110
Last post was incomplete and barely coherent so here is a better cold weather update, complete with pics of fuel fill hose installed.
IMG_20240111_095437471_HDR.jpg
This does complete my system of fuel hoses: fill, delivery, and vent. As mentioned (haha) I got some tie down straps that I am going to install to hold the gas tanks in place but I want to wait for the other sideboard to be installed first. I was also sure to follow regulations to run a grounding wire from the fuel fill fitting to the ground in the gas tank. Starting to learn crimping and heat shrink as my next new skill.
IMG_20240111_095643015.jpg

I relocated the fill location from where I had previously drilled so now I have port and starboard matching unused holes on my splash well tops. Might cover one side with a ladder setup and the other with a bait cutting board.
 
Top