1974 Starcraft SS16 Restortation

ShoestringMariner

Lieutenant Commander
Joined
Apr 18, 2015
Messages
1,600
Before I started wiring the boat I was looking at an 8 switch gang panel with USB, Cig Lighter, DC out and and Voltage read out. I also picked up a Blue Sea Fuse Block to run all my components through. However, I did not like the way the gang panel was set up so I re-wired it so I could incorporate the Fuse Block. I also got 2 x bus bars for components that had inline fuses. Such as the USB, Cig Lighter etc.

The fish finder, horn, compass and stereo will all be linked via the Fuse Block so I can take advantage of that particular system.

This is what I have to wire:

- nav lights (done)
- deck lights (done)
- storage lights (done)
- bilge pump (hard wired to the Starter battery with float switch, and manual control switch) (done)
- live well pump (done)
- aerator pump (done, but not connected yet as the live well will be one of the last things I put in)
- fish finder
- stereo
- compass
- horn
- trolling motor (hard wired to the House Battery with 60 amp inline fuse and 8 AWG wire)

Here are some pictures of me mutilating the gang switch so I could get it to where I wanted for my vision of the wiring:

View attachment 314775

Its seems pretty convoluted at the beginning, but I watched some videos and figured out what I had to do in order to re-wire the thing the way I wanted it.

View attachment 314777
I took the positive feeds off of the USB etc, and will run a direct line for these to the bus bar with the inline fuses.

View attachment 314779
Next was to take the positive feeds from the switches so that I can link them all independently to the Fuse Block.

View attachment 314780
This is the finished stripped down version with the negative feed, and the positive negative feeds for the LED lights on the switches. These were linked directly to the Fuse Block with a 3 AMP fuse. These are the little lights that are on all the time. The main LEDs only go on with the switch is activated.

View attachment 314808


My diagram so that I could make sense of things. This actually helped me.


View attachment 314820

This is a diagram of the back of each switch on the gang panel so that I could remember what was what. It helped.

I will post some pictures of the wiring that has been competed in a few days. Maybe with some photos of the lights and what not.
Thanks so much for posting this. I have the exact same components.
 

FIGMO

Petty Officer 1st Class
Joined
Jun 18, 2017
Messages
321
Great looking hatches. I'm also right at that hatch-building (and laying-out) stage on my SS. How large did you make your livewell?
Hello mattsteg,

I will get back to you in a couple of days with the measurements, but I think i made it too big. I just finished cleaning out my garage after winter, so I have to get back in there to get the dimension.
 

FIGMO

Petty Officer 1st Class
Joined
Jun 18, 2017
Messages
321
Really nice work!!!

Boating is really coming along and you will be in the water shortly!!

SHSU
Hey SHSU,

Thanks for that. It has to be this summer. I can't go five years with the boat in the garage. Its killing me.
 

FIGMO

Petty Officer 1st Class
Joined
Jun 18, 2017
Messages
321
Thanks so much for posting this. I have the exact same components.
Hey Shoestring!

I am glad it helped. I took a fair amount of time reading what others did and then "tried" to carefully layout what I needed to do. I have to admit that the wiring was my favorite part of the rebuild.
 

FIGMO

Petty Officer 1st Class
Joined
Jun 18, 2017
Messages
321
Hey Guys,

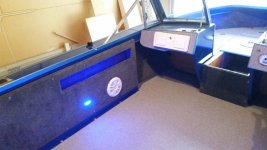
Some more light pictures. This time the deck lights in the back of the boat.

32.jpg

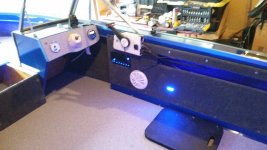
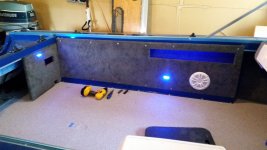
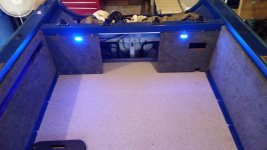
This is pretty straight forward, not much explaining required. In addition to the lights on the panels, I added some blue LEDs under the gunnels to light up the storage area.

32a.jpg

Lots of blue! I am digging the blue theme.

32b.jpg

More of the same.

33.jpg

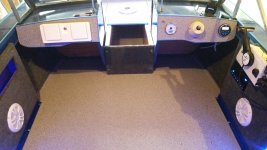
Like like the fact that I can set the colours on the speedometer and stereo head unit to blue as well to match the over all theme.

34.jpg

And the stern.

I have a couple more light shots left to post. Some of the bow. And I took some really blurry night shots. I will do them again now that I have a better camera.
 

SHSU

Lieutenant Junior+Starmada Splash Of The Year 2019
Joined
Mar 8, 2017
Messages
1,742
With all of the nice work on the interior lights, any exterior or underwater lights?

SHSU
 

ShoestringMariner

Lieutenant Commander
Joined
Apr 18, 2015
Messages
1,600
Hey Shoestring!

I am glad it helped. I took a fair amount of time reading what others did and then "tried" to carefully layout what I needed to do. I have to admit that the wiring was my favorite part of the rebuild.
Yeah it shows, totally meticulous work. I’m taking notes!
 

MNhunter1

Lieutenant Junior Grade
Joined
May 12, 2014
Messages
1,058
Lookin’ great FIGMO! Been out of town the past few days and catching up on all the posts. Love how the deck and hatches all turned out and great job with the lighting.
 

FIGMO

Petty Officer 1st Class
Joined
Jun 18, 2017
Messages
321
Hello mattsteg,

I will get back to you in a couple of days with the measurements, but I think i made it too big. I just finished cleaning out my garage after winter, so I have to get back in there to get the dimension.
Hello again mattsteg,

I have the dimensions and some photos. The overall length of the livewell is 36", with 8" on the end for plumbing and 28" for the livewell proper. The height is 11.5" with a depth of 15.5". The area that is 8" was also meant for ice to cool the water circulating through the aeration pump. The idea is to have about 6 to 8' of hose circulating the water through the ice.

I think I will have the livewell remade to make it about 1" lower in height, 2" narrower and 2" shorter. That will put me out about 300 bucks...

Here are some pics:

35.jpg

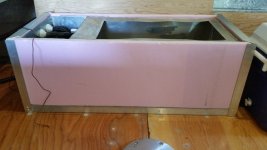
This is the livewell in the aluminum supports with 1" insulation surrounding the livewell. The aluminum frame will get riveted to the deck, and the wood side panels will be riveted to the aluminum supports. I will have to assemble the livewell in the boat starting with the aluminum supports anchored to the deck and then build up. After that I will be able to place the livewell in the supports and add the insulation. Last will be rivet the top supports and then add the wood. The top horiztonal pieces that will be against the back and side panels will have to be in place before it gets riveted to the deck.

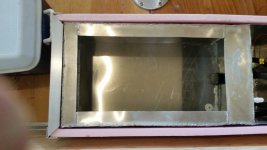
36.jpg

Shot of the main tank with splash guards.

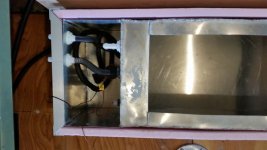
37.jpg

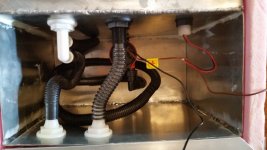
The plumbing area with the intake hose from the livewell pump. The aerator pump. I have a water proof LED light for the main tank.

38.jpg

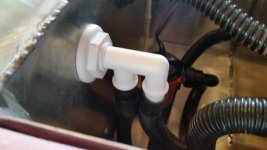
The doubled valve with the hoses to the left is for the aerator pump. One hose circulates the water in the well. The second hose exhausts the water out of the well by adjusting the head unit on the inside of the well.

39.jpg

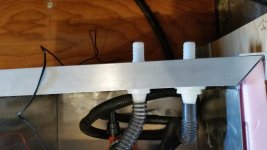
Intake and exhaust fittings

100.jpg

More of the same.

101.jpg

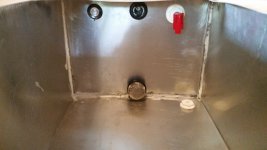
Here you can see the LED light on the left. In the middle is the filler valve. The red spout on the valve can be pushed in or pulled out depending on whether you want the pump to circulate or drain the well. At the bottom is the intake for the pump to circulate the water, and a drain at the bottom.

That is about it for the livewell. Its just too bad that I made it too big to start with. However, I am prepared to bite the bullet on the 300 bucks in order to get a livewell at a size that will work for the configuration in the boat. The good news is that I can resize all of the aluminum supports and side panels as I am going a bit smaller.
 
Last edited:

FIGMO

Petty Officer 1st Class
Joined
Jun 18, 2017
Messages
321
With all of the nice work on the interior lights, any exterior or underwater lights?

SHSU

Hello SHSU,

I thought about adding some underwater lights, but decided that was a bridge too far. No exterior lights either, other than the navigational lights.
 

FIGMO

Petty Officer 1st Class
Joined
Jun 18, 2017
Messages
321
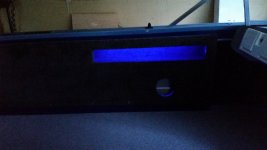
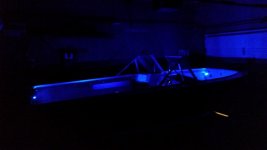
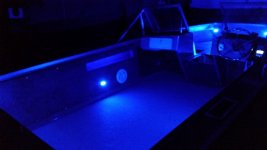
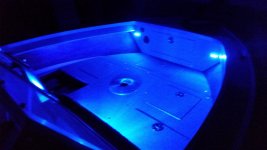
Here are some really blurry night shots, but the pics give an idea of what the boat will look like in the dark all lit up.

I'll do some better pictures when I get closer to finishing this project.

37.jpg


38.jpg


39.jpg

That is about it. I am pretty much caught up on the pictures I took last year. Once it gets a little warmer, it will be back at it! I think the first order of business will be the back panel door, and the main hatch in the front deck.

40.jpg
 

mattsteg

Petty Officer 2nd Class
Joined
Mar 25, 2019
Messages
177
Hello again mattsteg,

I have the dimensions and some photos. The overall length of the livewell is 36", with 8" on the end for plumbing and 28" for the livewell proper. The height is 11.5" with a depth of 15.5". The area that is 8" was also meant for ice to cool the water circulating through the aeration pump. The idea is to have about 6 to 8' of hose circulating the water through the ice.

I think I will have the livewell remade to make it about 1" lower in height, 2" narrower and 2" shorter. That will put me out about 300 bucks...

Here are some pics:

View attachment 337098

This is the livewell in the aluminum supports with 1" insulation surrounding the livewell. The aluminum frame will get riveted to the deck, and the wood side panels will be riveted to the aluminum supports. I will have to assemble the livewell in the boat starting with the aluminum supports anchored to the deck and then build up. After that I will be able to place the livewell in the supports and add the insulation. Last will be rivet the top supports and then add the wood. The top horiztonal pieces that will be against the back and side panels will have to be in place before it gets riveted to the deck.

View attachment 337099

Shot of the main tank with splash guards.

View attachment 337100

The plumbing area with the intake hose from the livewell pump. The aerator pump. I have a water proof LED light for the main tank.

View attachment 337101

The doubled valve with the hoses to the left is for the aerator pump. One hose circulates the water in the well. The second hose exhausts the water out of the well by adjusting the head unit on the inside of the well.

View attachment 337102

Intake and exhaust fittings

View attachment 337103

More of the same.

View attachment 337104

Here you can see the LED light on the left. In the middle is the filler valve. The red spout on the valve can be pushed in or pulled out depending on whether you want the pump to circulate or drain the well. At the bottom is the intake for the pump to circulate the water, and a drain at the bottom.

That is about it for the livewell. Its just too bad that I made it too big to start with. However, I am prepared to bite the bullet on the 300 bucks in order to get a livewell at a size that will work for the configuration in the boat. The good news is that I can resize all of the aluminum supports and side panels as I am going a bit smaller.
Thanks...I'm in the planning phase for adding a livewell of roughly similar dimensions to my SS.
 

SHSU

Lieutenant Junior+Starmada Splash Of The Year 2019
Joined
Mar 8, 2017
Messages
1,742
Hello SHSU,

I thought about adding some underwater lights, but decided that was a bridge too far. No exterior lights either, other than the navigational lights.

lol

Ya, I found I had so many grand ideas but not enough boat for them all. I too did not have any permanent underwater lights. I just have flood lights and a green light I can throw over the side.

Still great work!!

SHSU
 

FIGMO

Petty Officer 1st Class
Joined
Jun 18, 2017
Messages
321
lol

Ya, I found I had so many grand ideas but not enough boat for them all. I too did not have any permanent underwater lights. I just have flood lights and a green light I can throw over the side.

Still great work!!

SHSU

Lol SHSU, during the rebuild did you ever think to yourself "we're gona need a bigger boat"
 

mattsteg

Petty Officer 2nd Class
Joined
Mar 25, 2019
Messages
177
Lol SHSU, during the rebuild did you ever think to yourself "we're gona need a bigger boat"
I'm sure that a lot of us alternate between "gonna need a bigger boat" and "gonna need a bigger garage".

Every boat is simultaneously too small and too big. That's why you need a fleet.
 

SHSU

Lieutenant Junior+Starmada Splash Of The Year 2019
Joined
Mar 8, 2017
Messages
1,742
@FIGMO ,
Yes, all the time, but as @mattsteg pointed out I needed a bigger garage to go that route. Admiral said "NO" and I couldn't convince myself to pay to store it somewhere else.

I just have to drool and look on in envy at the guys with huge shops or work areas to do their boat projects.

SHSU
 

mattsteg

Petty Officer 2nd Class
Joined
Mar 25, 2019
Messages
177
@FIGMO ,
Yes, all the time, but as @mattsteg pointed out I needed a bigger garage to go that route. Admiral said "NO" and I couldn't convince myself to pay to store it somewhere else.

I just have to drool and look on in envy at the guys with huge shops or work areas to do their boat projects.

SHSU
What about those of us who somehow shoehorned 27 ft of boat+trailer into a 24ft deep garage and are still digging out of the mess that created?
 

Watermann

Starmada Splash of the Year 2014
Joined
Jan 12, 2013
Messages
13,794
Very nice work, everything is looking top notch!

y4mUx-QlmUmNRuGNeBC5R1T9BFRlbr8xD7nlCdkdslyyniOVw-kppaIavCE-WCKIHQ_NIfiHktZ4PiuHojCjNk3vVzJ-Oa88BK6ohmh7h-vr-735YNCm8-Pf5RImT4xbZ56cpwBLtoGpIr4zd_g4862TEq6tq7d3s5Ct2nIYDXDUsLCDmYGfaeX8FBTXWwmRPXo
 

FIGMO

Petty Officer 1st Class
Joined
Jun 18, 2017
Messages
321
@FIGMO ,
Yes, all the time, but as @mattsteg pointed out I needed a bigger garage to go that route. Admiral said "NO" and I couldn't convince myself to pay to store it somewhere else.

I just have to drool and look on in envy at the guys with huge shops or work areas to do their boat projects.

SHSU
I hear you. However, if this goes well enough, I think I will be happy with what I have. Sometimes its nice just to be able to enjoy looking at the big flashy boats, without the headaches.
 
Top