1974 Starcraft Chieftain 18' OB refit

Status
Not open for further replies.

tomynoks

Petty Officer 1st Class
Joined
Jan 1, 2007
Messages
252
Re: 1974 Starcraft Chieftain 18' OB refit

Hey Mike, I tried putting my batteries way up front as well, but lost too many amps to trun the starter over. Just thought I'd share in case you run into the same problem, you won't have to replace your starter and everything else you can think of before some rocket scientist tells you your leads are too long! I hope it works for you! I had my batteries under the deck at the cuddy entrance. I still have my trolling motors there.
 

MichaelP

Lieutenant Junior Grade
Joined
Apr 26, 2010
Messages
1,190
Re: 1974 Starcraft Chieftain 18' OB refit

Tom, thanks for the heads up!
The cables I have are something like 04 guage. I wonder if the loss with 16' feet of that and the original 6' or so of original cable of similar size will be OK.
 

jasoutside

Supreme Mariner
Joined
Dec 20, 2009
Messages
13,269
Re: 1974 Starcraft Chieftain 18' OB refit

Lately, I have been reconsidering locating my batts up front vs. at the stern as well, good info there.

I have been reading 2 ga wire for that kind of length?
 

MichaelP

Lieutenant Junior Grade
Joined
Apr 26, 2010
Messages
1,190
Re: 1974 Starcraft Chieftain 18' OB refit

One of my local sources for such info shared the following, mind you I'm no electrician or mechanic so bear with my layman terminology...

"The 04 cable wont be a problem so long as the battery has enough cranking amps and I can get 7 volts at the engine while cranking its should be fine". "Something like a G27 marine battery with 800 cranking amps should do the trick".

I might post up on one of the OB threads on this one. It would be good to hear from Reeves or other masters.
 

jasoutside

Supreme Mariner
Joined
Dec 20, 2009
Messages
13,269
Re: 1974 Starcraft Chieftain 18' OB refit

Uh, I had my V6 Mercruiser thinking going there, sorry.

Yah, we are talking OB forgot. Seems 4 ga would be totally fine I'd think.
 

parrisw

Ensign
Joined
Jun 8, 2009
Messages
985
Re: 1974 Starcraft Chieftain 18' OB refit

Hey Mike, I tried putting my batteries way up front as well, but lost too many amps to trun the starter over. Just thought I'd share in case you run into the same problem, you won't have to replace your starter and everything else you can think of before some rocket scientist tells you your leads are too long! I hope it works for you! I had my batteries under the deck at the cuddy entrance. I still have my trolling motors there.

You just need the right size of cable. I have 16' of cable, and cranks over my 115 just fine. I think I used 1/0 cable. http://www.iboats.com/1-0-50-Black-Tinned-Copper-Battery-Starter-Cable/dm/*******.047372058--**********.085820164--view_id.69110
 

MichaelP

Lieutenant Junior Grade
Joined
Apr 26, 2010
Messages
1,190
Re: 1974 Starcraft Chieftain 18' OB refit

Checked the size of my 16' cable last night and its 2/0. The PO was using it but I'll be moving the battery further forward and will have to add the 8' OEM cable that came with the motor. I can cut it down to only whats needed (maybe loose 3') and solder them together or just bolt the lugs together and wrap them with tape and shrink tubing. Does this sound reasonable for my 90 hp Evinrude? I'll be buying a new battery when the time comes so I can size that accordingly.
 

ezmobee

Supreme Mariner
Joined
Mar 26, 2007
Messages
23,767
Re: 1974 Starcraft Chieftain 18' OB refit

When I needed a new battery, there happened to be a big sale going on at BassPro. I ended up buying a fairly ridiculously oversized one. Man you should hear that sucker crank now!
 

MichaelP

Lieutenant Junior Grade
Joined
Apr 26, 2010
Messages
1,190
Re: 1974 Starcraft Chieftain 18' OB refit

Thats one of the things I know I need but have time. When A good deal comes along like that I'll jump. How many cranking amps on yours?
 

MichaelP

Lieutenant Junior Grade
Joined
Apr 26, 2010
Messages
1,190
Re: 1974 Starcraft Chieftain 18' OB refit

1988 OEM Manual
Battery cable extensions
Minimum recommended gauge
60 to 140HP and V6 motors.
Total extended length
10' --->4 gauge
15' --->3 gauge
20' --->1 gauge

My plan is to try my cables when the motor is ready to go on and make sure I'm getting the propper voltage at the starter when cranking over. If not I'll go to larger cable or move the battery aft.
 

parrisw

Ensign
Joined
Jun 8, 2009
Messages
985
Re: 1974 Starcraft Chieftain 18' OB refit

Checked the size of my 16' cable last night and its 2/0. The PO was using it but I'll be moving the battery further forward and will have to add the 8' OEM cable that came with the motor. I can cut it down to only whats needed (maybe loose 3') and solder them together or just bolt the lugs together and wrap them with tape and shrink tubing. Does this sound reasonable for my 90 hp Evinrude? I'll be buying a new battery when the time comes so I can size that accordingly.

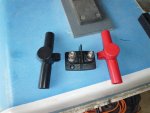
Use a power post. You're not supposed to solder your joints on big batter cables, better off the crimp them.

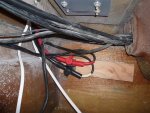
This is what I used in the back for a power post, then the factory engine batt cable's bolt to this, that way if you ever have to remove them you can.

attachment.php


attachment.php
 

Attachments

  • P1030493.JPG
    P1030493.JPG
    120.5 KB · Views: 0
  • P1030502.jpg
    P1030502.jpg
    142.1 KB · Views: 0

MichaelP

Lieutenant Junior Grade
Joined
Apr 26, 2010
Messages
1,190
Re: 1974 Starcraft Chieftain 18' OB refit

Use a power post. You're not supposed to solder your joints on big batter cables, better off the crimp them.

This is what I used in the back for a power post, then the factory engine batt cable's bolt to this, that way if you ever have to remove them you can.

attachment.php


attachment.php

Nice, Thanks!!! I'll be getting one of those If I can use both cables.
 

MichaelP

Lieutenant Junior Grade
Joined
Apr 26, 2010
Messages
1,190
Re: 1974 Starcraft Chieftain 18' OB refit

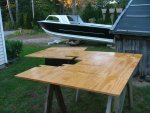
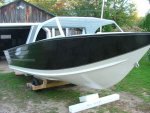
Nice long weekend and the weather could not have been nicer. Mid 80s on Sunday so needless to say I got some painting done. Top sides and interior white all applied. Got the deck started and worked on securing the new belly tank.

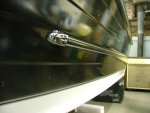
Having a terrible time with the stripe on the side over the last week. First time I painted it with gloss black it came out good except for a large sag at the top and it all went down hill from there. That rusto in rattle cans is a bear to feather out when its fresh and when I tried to fix it just got worse and of course I tried to bring the other side to perfection and screwed that up too. Thursday, ended up stripping it all down and started from scratch but the stripper lifted the edges of an epoxy patch so I sanded that out pretty good again. The Primer went pretty well bit as soon as the black went on its like OMG it's still crap. Desperate, I filled over the bad spots with marine tex right over the 24 hour old paint. I thought I got it feathered out pretty good but nope. By now the wife is suggesting I use hammer tone silver so I tried it and lit looked good OK (in poor light). Sunday afternoon I taped off the silver stripe with the super duper yellow tape and shot out all the white. Yesterday is the big day...Pulled off all the tape and the yellow stuff left a nice wide mark and I like the black better after seeing the whole thing uncovered. Noe the stripe is dry I can see where I didn't do such a good job of feathering so I'm going to strip it again. To add insult over injury...last weekend I painted some aluminum trim with rusto metallic silver and it looked awesome. Let it set up for 2 DAYS then taped it off with yellow frog tape and its a disaster! I think I have to remove it all and strip it, so, if I have to do that I might as well polish it instead of painting it.

Sorry to ramble here but I guess I just need to vent off a little steam. The crush of time is on me and the stripping and painting has taken way too long.

On a positive note...Took out the SS for a spin and put her to bed for the season yesterday. It was a beauty day for a boat ride and a good way to clear my head.
 

Attachments

  • DSCF2796.jpg
    DSCF2796.jpg
    148.9 KB · Views: 4
  • DSCF2798.jpg
    DSCF2798.jpg
    149.5 KB · Views: 4
  • DSCF2784.jpg
    DSCF2784.jpg
    71.1 KB · Views: 4
  • DSCF2805.jpg
    DSCF2805.jpg
    138.5 KB · Views: 4
  • DSCF2804.jpg
    DSCF2804.jpg
    72.8 KB · Views: 4

jasoutside

Supreme Mariner
Joined
Dec 20, 2009
Messages
13,269
Re: 1974 Starcraft Chieftain 18' OB refit

Oh man, that sounds of frustration Michael, bummer:(

Hey, that aft deck piece looks really nice man, well thought out:)
 

MichaelP

Lieutenant Junior Grade
Joined
Apr 26, 2010
Messages
1,190
Re: 1974 Starcraft Chieftain 18' OB refit

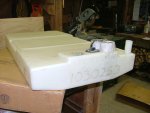
I have a question about mounting my poly belly tank that I'm planning to sandwich in place with no clamps and concerned about expansion vs rigidity. It fits between the stringers with about 1" clearance per side so 1" foam fills the gaps. I made wooden platforms to support the weight on the 2 tapered sides on the bottom making the top of the tank almost flush with the bottom of the deck. On either end I have aluminum angle rivited between the stringers and the tank fits snug between them. The The bottom middle of the tank has a large obvious bow that smooths out about half way when filled with water so there is expansion space even if I put more foam under the middle flat section. Does sandwiching it in place as described sound like a reasonable approach for installing this 23 gallon tank?
 

Attachments

  • DSCF2784.jpg
    DSCF2784.jpg
    71.1 KB · Views: 1
  • DSCF2618.jpg
    DSCF2618.jpg
    112.6 KB · Views: 1
  • DSCF2624.jpg
    DSCF2624.jpg
    142.2 KB · Views: 1

MichaelP

Lieutenant Junior Grade
Joined
Apr 26, 2010
Messages
1,190
Re: 1974 Starcraft Chieftain 18' OB refit

Looks like I'll have to start a new thread on that one.^^^

Installed the first boat bling last night. Look familular Jason? Thanks for a good deal on these.

Main deck pieces are ready to go in. After 1 good coat of epoxy they wont absorb anymore so I'm done. Probably do one more coat when all other wood is done. 3 coats on the edges just because. Pics are a few posts back.
 

Attachments

  • DSCF2811.jpg
    DSCF2811.jpg
    108.2 KB · Views: 1

jasoutside

Supreme Mariner
Joined
Dec 20, 2009
Messages
13,269
Re: 1974 Starcraft Chieftain 18' OB refit

Dood, did those come off of my Jet Star? They look sweet against the black!

I did pretty much the same thing you are proposing on my fuel tanks...
P1040908.jpg


Riveted down some rubber strips on the ribs, wedged in the tanks with foam and noodles. I also squeezed in a bunch of PL for a little extra wedge in factor. My midships tank had bolt brackets too so there are stainless bolts tank to stringers.

Good progress man!
 

MichaelP

Lieutenant Junior Grade
Joined
Apr 26, 2010
Messages
1,190
Re: 1974 Starcraft Chieftain 18' OB refit

Yep those are the ones.

Thanks for the pic of your tank, looks like I'll secure mine the same way.
 

MichaelP

Lieutenant Junior Grade
Joined
Apr 26, 2010
Messages
1,190
Re: 1974 Starcraft Chieftain 18' OB refit

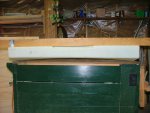
Slow progress hardly worth pics. Stripped the stripes again and faring with Tex. Its taking for ever to cure. Mounted the wiring conduit and ran all my wires inside. Mounted the bow cap and aluminum transom cover using #4 x 1/2 SS wood screws @.07 each.

Question. My tank has fill and vent on the same end and I think the boat will not be level on the water, so, should I tilt the tank in the hull so it will be closer to flat when on the water? Or add another vent to the front of the tank?
 
Status
Not open for further replies.
Top