1974 Ebbtide Restoration - SPLASHED

mercurymang

Master Chief Petty Officer
Joined
Jul 14, 2012
Messages
853
Re: 1974 Ebbtide Restoration

Re: 1974 Ebbtide Restoration

How the heck do these guys do it. I was really hoping to catch a break with a local provider, but even with shipping, USC is cheaper than the local guy.
 

Woodonglass

Supreme Mariner
Joined
Dec 29, 2009
Messages
25,927
Re: 1974 Ebbtide Restoration

Re: 1974 Ebbtide Restoration

They make their money by selling a LOT of product. They're in Florida where Poly Resin is like BBQ Sauce in Texas!!!!:D:eek::lol:
 

Decker83

Commander
Joined
Apr 5, 2011
Messages
2,592
Re: 1974 Ebbtide Restoration

Re: 1974 Ebbtide Restoration

I pick up my resin in Mansfield.. Bought a 5 gallon pale (45 lbs) for $153.00 including tax last Oct.

Give me a pm and I will give you all the info if you like..
 

mercurymang

Master Chief Petty Officer
Joined
Jul 14, 2012
Messages
853
Re: 1974 Ebbtide Restoration

Re: 1974 Ebbtide Restoration

It's been butt cold down here the last couple of days. It finally got up above freezing today so I got out after work and decided to start removing the transom. I was thinking it was going to be quite a job chiseling it out so I decided to drill it and then chisel it.

I started digging around and found that the second piece of plywood was separating fairly easily from the other one. As it turns out I was able to simply pry it off. It was not glued or glassed but was held to the other ply like this.

EbbtideRestoration+035.JPG


After I got that out, all I had left was the inner piece of plywood.
I got a 1\2" bit and put a stop on it and then got a block of would so it would bottom out before drilling through the transom.

EbbtideRestoration+018.JPG


EbbtideRestoration+019.JPG


EbbtideRestoration+020.JPG


EbbtideRestoration+030.JPG


That started to were me out so I grabbed my router and put in a scroll bit and set the depth just shy of the transom skin.
 
Last edited:

mercurymang

Master Chief Petty Officer
Joined
Jul 14, 2012
Messages
853
Re: 1974 Ebbtide Restoration

Re: 1974 Ebbtide Restoration

EbbtideRestoration+036.JPG


From there, I just chisled out the sections which came out quite easily.

Only thing left to do now if grind the remaining bit of would out.

Edit: It actually made me feel good to see that the lower half of the transom was more rotted than I thought.
 
Last edited:

Woodonglass

Supreme Mariner
Joined
Dec 29, 2009
Messages
25,927
Re: 1974 Ebbtide Restoration

Re: 1974 Ebbtide Restoration

Router or Circular Saw works great on cutting a grid into the transom wood and then chiseling out the wood as you have discovered. Your pics will be a good resource for others to follow. Thanks for posting!;) It's sad in that if the originlal installation would have follow good glassing practices and coated the ply with resin and laminated the 2 pieced together and then covered with CSM you probably would not be replacing the transom.:rolleyes:
 

mercurymang

Master Chief Petty Officer
Joined
Jul 14, 2012
Messages
853
Re: 1974 Ebbtide Restoration

Re: 1974 Ebbtide Restoration

Router or Circular Saw works great on cutting a grid into the transom wood and then chiseling out the wood as you have discovered. Your pics will be a good resource for others to follow. Thanks for posting!;) It's sad in that if the originlal installation would have follow good glassing practices and coated the ply with resin and laminated the 2 pieced together and then covered with CSM you probably would not be replacing the transom.:rolleyes:

This is true. However, with my boat, If I have to replace the stringers, I have to replace the transom anyway as to get to the front portion of the stringer, i have to... ok get ready for this... cut the transom in half in order to remove the cap, in order to remove the bow section, in order to remove the floor, in order to get to the stringers in the front. That is one advantage to having the older style boat like you have with the windshield way up front with the console as part of the cap. You can fully get to your stringers with removing the cap. Plus you don't have to cut that bow section part out. :mad-new:

But nobody said it would be easy did they :D
 

Woodonglass

Supreme Mariner
Joined
Dec 29, 2009
Messages
25,927
Re: 1974 Ebbtide Restoration

Re: 1974 Ebbtide Restoration

Like Momma always said..."It keeps ya off the streets, and oughta Trouble!!!!!":D
 

mercurymang

Master Chief Petty Officer
Joined
Jul 14, 2012
Messages
853
Re: 1974 Ebbtide Restoration

Re: 1974 Ebbtide Restoration

Like Momma always said..."It keeps ya off the streets, and oughta Trouble!!!!!":D

That it does, that it does.

Say, I've been thinking about when I put the stringers in. My hull is pretty thin and for while, I will need to walk around on the inside. Even now when I do it I hear creaking and cracking. Is that just normal or do I run the risk of cracking my hull?
 

Woodonglass

Supreme Mariner
Joined
Dec 29, 2009
Messages
25,927
Re: 1974 Ebbtide Restoration

Re: 1974 Ebbtide Restoration

You might consider placing some extra supporting bunks under her. You can probably rig them into the existing bunks on the trailer. Others have done it that way with good success. Take some pics of how she sits now so we can see, and we'll be better able to guide you to a proper solution.
 

mercurymang

Master Chief Petty Officer
Joined
Jul 14, 2012
Messages
853
Re: 1974 Ebbtide Restoration

Re: 1974 Ebbtide Restoration

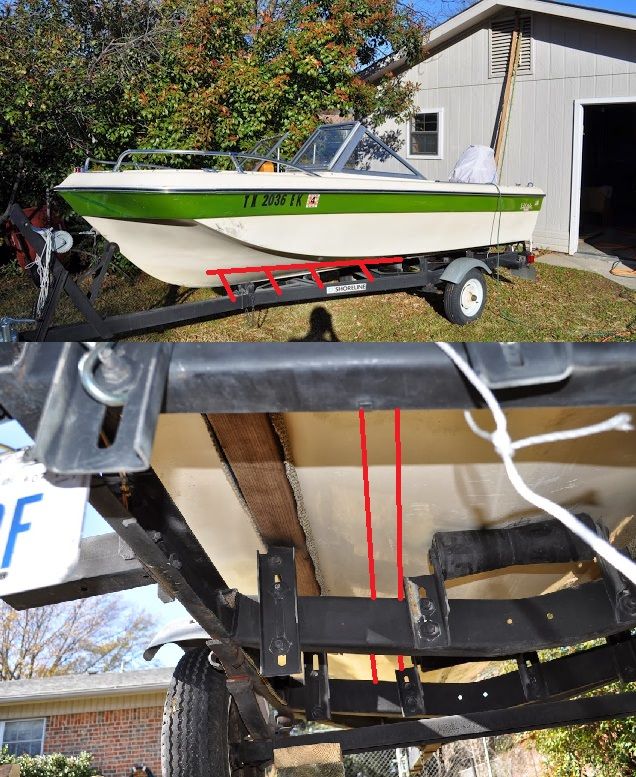
Here is a shot from underneath and one from the side. I think it will give you an idea of how it's setting.

01042014-Ebbtide+011.JPG


0RcWtXzk-dGnop4l1Q-teWv44qBUDiAKl_OgKISRY8Q=w640-h425-no
 

Woodonglass

Supreme Mariner
Joined
Dec 29, 2009
Messages
25,927
Re: 1974 Ebbtide Restoration

Re: 1974 Ebbtide Restoration

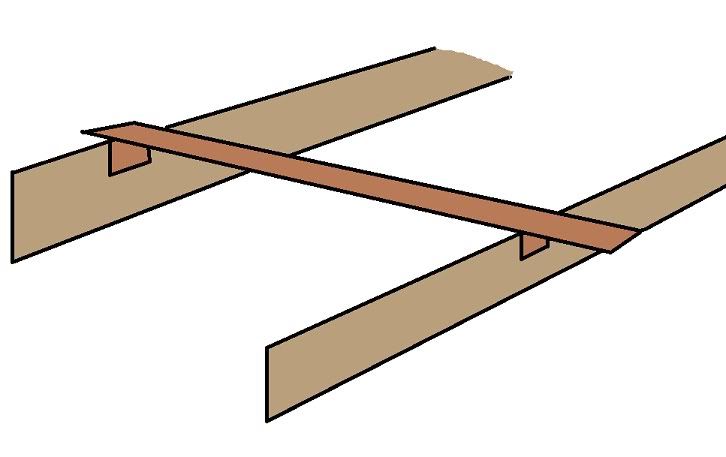
Yeah, I'd recommend you try and add some additional supports something maybe like this...
Boatsupport.jpg


You should be able to use Carpet scraps on 2x4's and then wedge it under the trailer frame or use metal screws to hold em in place.
 
Last edited:

mercurymang

Master Chief Petty Officer
Joined
Jul 14, 2012
Messages
853
Re: 1974 Ebbtide Restoration

Re: 1974 Ebbtide Restoration

Ok, thank you sir. I'll see if I can rig something up for support.
 

mercurymang

Master Chief Petty Officer
Joined
Jul 14, 2012
Messages
853
Re: 1974 Ebbtide Restoration

Re: 1974 Ebbtide Restoration

Last night I got the remainder of the transom out and ground it good and flat down to good glass. I think I will use the term "last known good glass" to represent that point where you can stop grinding. It's interesting how when you are grinding, you see how it was put together and where all the tabs were that you could previously not see.
I still need to get the stringers out and do a tad more grinding, not much, but I got to get to the last know good glass everywhere. Man, does it ever end? At this point I am seriously looking forward to doing some fiberglass work. Anything but demo!!!
Oh, and I still have to make some supports. The weather looks like it will be good this weekend so maybe i'll make some good progress.
 

jb93

Petty Officer 1st Class
Joined
Feb 21, 2008
Messages
267
Re: 1974 Ebbtide Restoration

Re: 1974 Ebbtide Restoration

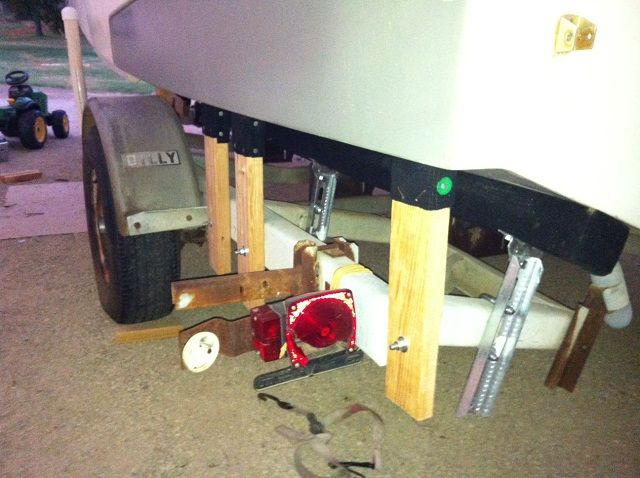
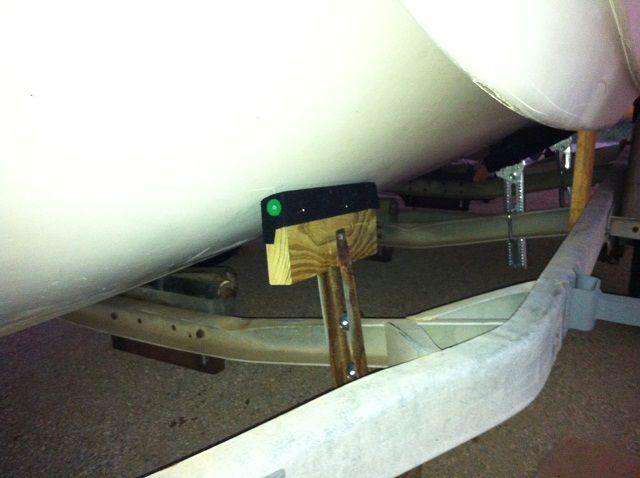
I did the same on my boat using some 2x4 pieces and bolted them to various spots on the trailer. Redneck solid!!

Port Side from transom (two views - board bolted to trailer frame with top cut to fit tight to hull)


Port side from bow (used some old bunk brackets I had to bolt to trailer frame)


mercurymang

Master Chief Petty Officer
Joined
Jul 14, 2012
Messages
853
Re: 1974 Ebbtide Restoration

Re: 1974 Ebbtide Restoration

Saturday, I did a full day of work. Half of it I spent putting in extra bunks in the rear. I'll still need to come up with something for the front. I also built some jigs for holding my stringers. I'll post up some pics of it them this evening.
Let me throw out there what I am planning to do and see if anyone sees a problem. I'm kind of going through analysis paralysis because I'm afraid to do this wrong. I plan to cut my stringers so that they will ride 1/4 to 1/2 above the hull. My jigs should ensure that the tops are all level and will secure them while i'm bedding them. The way I plan to bed them is to set them in place and then pb them in from the side using the bag with a corner cutout method.
Will this work or would it be a better idea to lay the PB down and then set the string in it?
 

jbcurt00

Moderator
Staff member
Joined
Oct 25, 2011
Messages
25,029
Re: 1974 Ebbtide Restoration

Re: 1974 Ebbtide Restoration

Except trying to hold to a 1/4" above the hull, I don't see any problems doing it as you describe. The plan actually sounds like most.

The larger the gap under the stringer, the more PB you'll need, so try to keep the 1/4" gap constant. A little less, or a little more is OK as long as the tops of the stringers line up across the beam of the boat & are at the correct height for the deck.
 

mercurymang

Master Chief Petty Officer
Joined
Jul 14, 2012
Messages
853
Re: 1974 Ebbtide Restoration

Re: 1974 Ebbtide Restoration

Thanks JB.
 

Woodonglass

Supreme Mariner
Joined
Dec 29, 2009
Messages
25,927
Re: 1974 Ebbtide Restoration

Re: 1974 Ebbtide Restoration

Easy way to hold your stringers 1/4" off the hull...lay 2 - 2x4's across the top of the hull about 6 ft apart. Staple some twine to them spaced at the spacings for your stringers. Lift the stringer 1/4" off the hull and staple it to the dangling twine. You might need to have twine on both sides to keep it from tilting. Move forward and do it again. It's now suspended at the height you need and you can squirt the PB under it and easily adjust it into place. Make a couple of these to slip over them to keep em vertical and spaced properly.

stringerBraces.jpg
 
Last edited:

mercurymang

Master Chief Petty Officer
Joined
Jul 14, 2012
Messages
853
Re: 1974 Ebbtide Restoration

Re: 1974 Ebbtide Restoration

I got to two side stringers out last night. That center one is proving to be quite a bear, mainly because it's actually in pretty good shape and up near the bow, for about a 5 foot section it looks like they just poured straight resin in covering about 1/2" of the bottom of the stringer. I guess I could just cut it out but i was trying to keep it intact so I could use it as a pattern. Plus the angle up there becomes fairly steep and it may be a little difficult to get a blade on it.
 
Top