1974 Duo Vagabond 17' sterndrive Transom and stringers project

Redtruck12

Petty Officer 1st Class
Joined
Jan 25, 2018
Messages
344
Hello all
starting this thread to document my project boat.
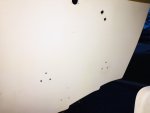
recently purchased (last fall)1974 Duo Vagabond (Starcraft Capri) really like the style of this little bowrider and started the tear down recently.
i knew the transom was likely original and possible soft, same with the rear section of the stringers.
had it up to my shop (I am an Automotive Technician) pulled the lower unit , removed thr battery box, fuel tank and engine, removed the inner transom plate and gimble assembly and was quite surprised how easily and quickly everything came apart.
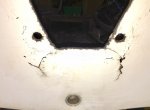
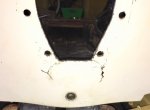
as I suspected the lower 8-10 inches of the transom and rear section of the stringers are rottenšŸ˜’
Not any surprise but no good news either.
i have worked on pretty much everything with wheels and an engine over my 30 odd years in the business but this is my first boat.
This hull design only uses 2 stringers.
my expectation is likely stringers the entire length and a complete transom board replacement.
i have some experience with Fiberglas and a fair bit of experience working with wood.
Realisticlly I know I will need some guidance form more experienced members on some of the details but look forward to working through this project with my 2 sons.
i will add some pictures as the tear down continues.
Should be an interesting experience

planning ahead, I keep reading about "Marine grade Plywood" ? Is this something through a specialty shop? I was at a local big box hardware store today and had a look at what they had for 3/4 " plywood (I assume I need that doubled.
they had what looked like ordinary plywood with 5 layers but also had Oak plywood that was I think 9 layers and looked very high quality with no knots or roughness, was about $20 more than ordinary for a 4x8 sheet.
what do I need to use?
also, for stringers, what type of wood is the preferred to use? Pressure treated? Pine? Spruce?

thanks for reading.
feel free to comment with your advice.
 

Redtruck12

Petty Officer 1st Class
Joined
Jan 25, 2018
Messages
344
Update with a couple questions

so so finally getting some decent enough weather here in Southern Ontario.
over the past few weeks I have
- removed the engine and sterndrive
- removed fuel tank, battery and all related wiring
- stripped the rear section of flooring
- cut out, chipped , scraped the wood out of the transom and rear 3feet of stringers

over this weekend I started accumulating materials. I found a reputable supplier and purchased 5yards of "1708" and a couple gallons of Polyester resin (1 waxed , 1 non waxed)

lookks like the the front engine mount fell through the floor (due to rotted stringers).
Due to the added tress from the engine mount sagging along with the lower 1/3 of the transom being rotten it has cracked the fibreglass at the bottom of the "keyhole, both sides aprox 2" crack that is almost a tear!

my plan is to repair these cracks along wit a number of screw holes in the transom (previous fish finder, ladder and kicker motor mounting plate (I assume)

my thought is thoroughly and permanently repairing the holes and cracks before the new transom wood goes in.

I'm thinking grinding the crack out , building it up with cloth and then a fairing material, finally gellcoating the entire transom

Any advice before I jump into it?
 

Woodonglass

Supreme Mariner
Joined
Dec 29, 2009
Messages
25,924
Pics Always help us to give the best advice. For all glass repairs make sure to grind to fresh glass, clean with acetone and then apply the new. Only use Ext. Grade/Rated Plywood. Use it for the transom AND the stringers. You're gunna need a lot more glass and resin. Take the Waxed resin back. You'll Only need the unwaxed kind. It takes 1 gallon of resin to wet out approx. 4 yds of fabric. You'll also need a fair amount of cabosil and some milled fibers for fillet work etc... Read the 2nd link in my signature below. It'll provide some good info on How To '

Don't forget the pics!!!
 

Redtruck12

Petty Officer 1st Class
Joined
Jan 25, 2018
Messages
344
Update with a couple questions

so so finally getting some decent enough weather here in Southern Ontario.
over the past few weeks I have
- removed the engine and sterndrive
- removed fuel tank, battery and all related wiring
- stripped the rear section of flooring
- cut out, chipped , scraped the wood out of the transom and rear 3feet of stringers

over this weekend I started accumulating materials. I found a reputable supplier and purchased 5yards of "1708" and a couple gallons of Polyester resin (1 waxed , 1 non waxed)

lookks like the the front engine mount fell through the floor (due to rotted stringers).
Due to the added tress from the engine mount sagging along with the lower 1/3 of the transom being rotten it has cracked the fibreglass at the bottom of the "keyhole, both sides aprox 2" crack that is almost a tear!

my plan is to repair these cracks along wit a number of screw holes in the transom (previous fish finder, ladder and kicker motor mounting plate (I assume)

my thought is thoroughly and permanently repairing the holes and cracks before the new transom wood goes in.

I'm thinking grinding the crack out , building it up with cloth and then a fairing material, finally gellcoating the entire transom

Any advice before I jump into it?
 

Redtruck12

Petty Officer 1st Class
Joined
Jan 25, 2018
Messages
344
Thanks for the reply and sorry for the duplicate post.
yes I also got "3M Bubbles" as well. Will that work for a crack repair.
didnt have very much time tonight but did get things cleaned up a bit and verified cracks ONLY at the bottom of the keyhole.
the cracks are full thickness and slightly misaligned.
im thinking of drilling the ends of the cracks ang grinding out the bad sections, filling with thickened resin but not sure what else to add for reinforcement. Thin cloth? C.S.M? 1708?
look forward to experienced opinionsšŸ˜Š
 

Attachments

  • photo290484.jpg
    photo290484.jpg
    38.4 KB · Views: 0
  • photo290485.jpg
    photo290485.jpg
    75.6 KB · Views: 0
  • photo290486.jpg
    photo290486.jpg
    62.2 KB · Views: 0

Woodonglass

Supreme Mariner
Joined
Dec 29, 2009
Messages
25,924
That needs a full glass repair. Grind out all the area at least 3" all around. feather towards the crack to create a hollowed area. Then repair by using progressively larger pieces of 17oz glass to fill the area back to level. Probably take 5-6 layers. Do this on both inside and out side. Bubbles don't give any strength. Use some cabosil and Milled fibers to fill for strength. Bubbles are use to make fairing material that's easily sanded.
 

Redtruck12

Petty Officer 1st Class
Joined
Jan 25, 2018
Messages
344
Quick update

thanks for the advice so far.
Ground down at my transom crack from both sides until paper thin at the crack, did similar but from the inside only in preparation to fill the holes that had been drilled in the transo over the years. Built up with poly resin and 1708 to thickness, worked out well, I am quite happy with the outcome (so far) I have sanded out the high spots but it still requires a fairing coat

today I finally found a sheet of exterior grade 3/4" Doug fir plywood and am working to get everything thing sanded smooth and am working up a template for the new transom wood.

planning on transom install (although I'm still quite a few steps away) I understand that fibreglass cloth doesn't wrap sharp corners well,
what if I cut the tabbed edges at a 45deg angle?.

has anyone ever tried it?

do you think there would be an advantage?

would enjoy any thought
 

Redtruck12

Petty Officer 1st Class
Joined
Jan 25, 2018
Messages
344
Quick update

thanks for the advice so far.
Ground down at my transom crack from both sides until paper thin at the crack, did similar but from the inside only in preparation to fill the holes that had been drilled in the transo over the years. Built up with poly resin and 1708 to thickness, worked out well, I am quite happy with the outcome (so far) I have sanded out the high spots but it still requires a fairing coat

today I finally found a sheet of exterior grade 3/4" Doug fir plywood and am working to get everything thing sanded smooth and am working up a template for the new transom wood.

planning on transom install (although I'm still quite a few steps away) I understand that fibreglass cloth doesn't wrap sharp corners well,
what if I cut the tabbed edges at a 45deg angle?.

has anyone ever tried it?

do you think there would be an advantage?

would enjoy any thoughts
 

chevymaher

Commander
Joined
Mar 29, 2017
Messages
2,915
With 1708 inside corners no problem. Outside it likes a little CSM underneath or it will bubble sometimes. Got to babysit it to keep it laying down till it hardens.
 

Redtruck12

Petty Officer 1st Class
Joined
Jan 25, 2018
Messages
344
The 1708 I picked up has mat backing. Would you advise additional mat under it as well?

so opinion is that the additional work to cut the edges (sides and top) are not worth the extra effort? Or just not required with 1708?
 

kcassells

Fleet Admiral
Joined
Oct 16, 2012
Messages
8,600
Ok so for inside corners you need to run a pb inside rounded filet. For outside corners try to bevel the edges of ghe wood to a 45 degree or more. 90 degrees won't make the turn with 1700 or 1708.

On a 90 degree angle you can clip the poop out of it, put plastic saran wrap over the edge and pray. You will still have to butter it up later.
 
Last edited:

kcassells

Fleet Admiral
Joined
Oct 16, 2012
Messages
8,600
I had to make a support for under my bait tank. I beveled down the edges using 1700 and EEEpppoxy. Still had issues with the turn. Will grind that out and fill with csm.
Some it will work so hey...

Click image for larger version  Name:	fish well support.jpg Views:	1 Size:	552.0 KB ID:	10575866
 

Woodonglass

Supreme Mariner
Joined
Dec 29, 2009
Messages
25,924
Kevin,
When you do edges next time try this. Cut the fabric to size and then where the edges will be pre-fold the fabric and lay it on the bench and pound it with a rubber mallet. This will establish the crease line and at the same time loosen the fibers and let them conform to the edge much better. Also keep watch on the EEEEEEEPoxy and right when it starts to kick use your gloved hands to roll over the edges and stretch em tight.
 

kcassells

Fleet Admiral
Joined
Oct 16, 2012
Messages
8,600
I think you have it right with the hammer method! I had creases but that method just rules. Thanks Mike!
I'll try that on the flip side. :cool:
 

Redtruck12

Petty Officer 1st Class
Joined
Jan 25, 2018
Messages
344
So if you had it to do over as a handy but not experienced guy, would you cut a 45deg and avoid issues with the outside 90deg and save on doing a large filet?
makes good sense in my mind
using 1708 for strength and having weak corners makes little sense. Having to grind out and applying c.s.m. Sounds VERY weak.
A filet seems like a patch fix not a smart solution.
Am I wrong? Am I over thinking things?
i realize my rebuild will likely be stronger than original but if I am going to do it I would prefer to do it the best I can
 

chevymaher

Commander
Joined
Mar 29, 2017
Messages
2,915
I found taking the grinder to the edge and just rounding it out a little worked wonders.
 

Redtruck12

Petty Officer 1st Class
Joined
Jan 25, 2018
Messages
344
With all due respect to those who have done this and are doing this the "way it has allways been done" I think there is a better way.
If using biaxial cloth for strength and loosing the majority of the strength in a weak corner by "buttering" and "bashing" it in to place and even grinding it out and band aiding it with CSM is the way it is done /has been done I really think this is overdue for an improvement of technique.
A filet is also a patch fix in my mind and reducing the use of filets material can only make things stronger. The strength is in the fibre not the resin. Thickened resin likely has even less strength.

my plan (unless someone can explain why not to is to spend a little extra time on the table saw and cut sides and top of the new transom at 45deg, reducing sharp corners, reducing amount of filet material and improving overall bond and strength.

i will definitely share my progress, success / problems etc.

So call me crazy, rogue, inventive or whatever you want, I'm new here but I'm not new. šŸ˜‰

Lets t's discuss this possible BETTER WAY
 
Top