1973 wellcraft 165 sport airslot project w/ pics

jonesg

Admiral
Joined
Feb 22, 2008
Messages
7,198
Re: 1973 wellcraft 165 sport airslot project w/ pics

wow that transom is the cats meow, you could put 300 hosses on that.

to pre-glass or not to pre-glass,?

I pre-glassed a 4x8 sheet , both sides w/ polyester and mat, then I cut my stringers from the sheet. Saved a lot of time.
I use non waxed poly, no sanding required between coats and it goes off very fast, epoxy is great except for that quality and the expense.

with epoxy I wouldn't bother pre-glassin unless access made it necessary but you're working in the open , you'll save at least a day by not pre-glassin.

your hull looks identical to my chrysler, they ride nice.
 

chrishayes

Senior Chief Petty Officer
Joined
Apr 9, 2009
Messages
691
Re: 1973 wellcraft 165 sport airslot project w/ pics

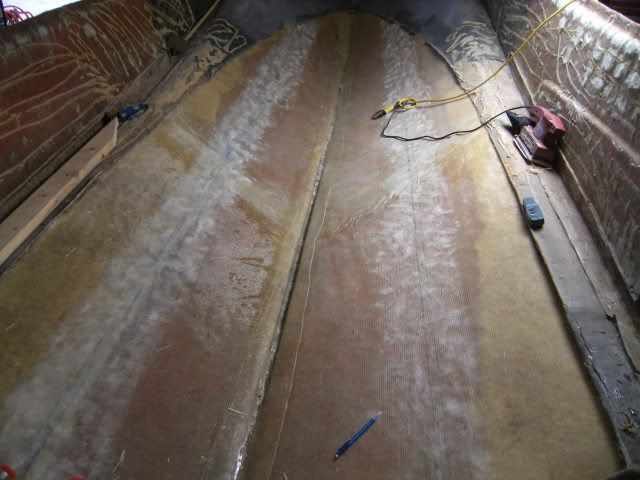
Well, thank you to all of you who visit from time to time! And, to those that use this as a tutorial keep in the back of your mind...this is NOT hard to do. The best advice I can give you is the same as any type of project...buy the best supplies you can afford and work with purpose. Dont let anything distract you from doing it right the first time. If there is a spot in your glass that has an air bubble, stick with it. It may take up to a few hours for the resin to get tacky but once it does it is much easier to get it to stick. That and use a squeegee to get the excess resin out of your layup. It is amazing how much extra there really is in there even though I am applying my resin with a 1.5" chip brush! Also, dont buy a bunch of different glassing tools. The only thing that I use is a chip brush(buy lots, like 30 or more for something close to what im doing) a FG roller(bubble buster) and some squeegees. I got all kinds of stuff that I really do not use. Like nap rollers and corner rollers. They just dont work that well for me so I dont use them. The small chip brush allows you to spread the resin on and then to stipple to really force the resin in deep. This is especially true for 1708. I did the entire floor layup with the same small brush and a squeegee believe it or not...

I beleive this to be why I have only went through 3 gallons of epoxy. I mix in 3 to 1 amounts. Thats 3 quirts of epoxy and 1 squirt of hardener. THis is a small amount but it ensures that I dont waste any. If you go thise route it is imperative to have a helper to mix for you!

The last thing I can tell you is, keep at it but if you get frustrated, walk away and veg on the couch for the rest of the weekend. I truly have fun doing this project, if I didnt I would not finish it properly. Also, take one task at a time and remember that every minute you work on it thats one minute closer to being done:D
 

chrishayes

Senior Chief Petty Officer
Joined
Apr 9, 2009
Messages
691
Re: 1973 wellcraft 165 sport airslot project w/ pics

Well, I recieved my tank hold down kit. sortof...they advertise on their site(www.moellermarine.com) that for my 25 gallon permanent tank to use a part number that doesnt work. It is actually the strap style hold down that I need but for 40 dollars plus shipping, I think I will source my own. I am thinking of not even using a hold down kit. Any of them require screws to be installed through some portion of your wood understructure. Screw that...haha, after all this work I aint puttin no screws through my glassed wood! I think I will try to build some type of frame around the tank within a 1/2" around all sides then fill that 1/2" with neoprene. That way the tank can expand by pushing the neoprene and it will also hold it in place pretty well too. What do you think?
 

jcsercsa

Captain
Joined
May 21, 2007
Messages
3,401
Re: 1973 wellcraft 165 sport airslot project w/ pics

Well, thank you to all of you who visit from time to time! And, to those that use this as a tutorial keep in the back of your mind...this is NOT hard to do. The best advice I can give you is the same as any type of project...buy the best supplies you can afford and work with purpose. Dont let anything distract you from doing it right the first time. If there is a spot in your glass that has an air bubble, stick with it. It may take up to a few hours for the resin to get tacky but once it does it is much easier to get it to stick. That and use a squeegee to get the excess resin out of your layup. It is amazing how much extra there really is in there even though I am applying my resin with a 1.5" chip brush! Also, dont buy a bunch of different glassing tools. The only thing that I use is a chip brush(buy lots, like 30 or more for something close to what im doing) a FG roller(bubble buster) and some squeegees. I got all kinds of stuff that I really do not use. Like nap rollers and corner rollers. They just dont work that well for me so I dont use them. The small chip brush allows you to spread the resin on and then to stipple to really force the resin in deep. This is especially true for 1708. I did the entire floor layup with the same small brush and a squeegee believe it or not...

I beleive this to be why I have only went through 3 gallons of epoxy. I mix in 3 to 1 amounts. Thats 3 quirts of epoxy and 1 squirt of hardener. THis is a small amount but it ensures that I dont waste any. If you go thise route it is imperative to have a helper to mix for you!

The last thing I can tell you is, keep at it but if you get frustrated, walk away and veg on the couch for the rest of the weekend. I truly have fun doing this project, if I didnt I would not finish it properly. Also, take one task at a time and remember that every minute you work on it thats one minute closer to being done:D

Very well said there Chris , it is all so true !!! John
 

chrishayes

Senior Chief Petty Officer
Joined
Apr 9, 2009
Messages
691
Re: 1973 wellcraft 165 sport airslot project w/ pics

Well, got the stringers rounded over on the top side tonight and another coat of epoxy on them! I used my cheapy harbor freight 11 dollar router and a 3/8" round over bit. It turned out ok, although there is a slight gouge where the neck of the bit is...oh well. I filled this gouge with PB to smooth it out. I am getting excited about this weekend! Got lots of work to do and an extra day to do it.

To all those who have the 4th as their deadlines, good luck and happy boating if you actually made it! Hapy 4th!

I do have a quick question though. What do you use to hold the stringers in place after pl'ing them down? I mean how do you keep them plumb? Also, I know from experience that PL expands a bit while curing. So, how do you keep them held down? I am thinking of cuting some 2x's the width of the space between the outer stringers to hold them from floping down the hull angle and then just stacking some "stuff" the length of the stringer. Will that work? I intend on using a few chunks of neoprene about 1/4" thick at a few spots along their length to space them so that the stringer is held off the hull at least that much. Any tips?
 

Jonezin

Petty Officer 1st Class
Joined
Jun 15, 2009
Messages
200
Re: 1973 wellcraft 165 sport airslot project w/ pics

Well, that was a tease!!!! I read the whole thing thinking it was " the" book. MAn, that sucked...thanks for getting me interested!:rolleyes::D
sorry man i didnt get a chance to read it through i just saved for later review im baby sitting to night wife working late
 

chrishayes

Senior Chief Petty Officer
Joined
Apr 9, 2009
Messages
691
Re: 1973 wellcraft 165 sport airslot project w/ pics

its cool, its the thought that counts right? I know what your intent was and for that I thank you. Have you thought anymore about what you want to do with your boat situation?
 

ezmobee

Supreme Mariner
Joined
Mar 26, 2007
Messages
23,767
Re: 1973 wellcraft 165 sport airslot project w/ pics

What do you use to hold the stringers in place after pl'ing them down? I mean how do you keep them plumb?

Couldn't you just take 2 pieces of scrap wood and cut them to the width of the inside of the hull and just tack them on top of the stringers with small nails? Then lay a sheet of something on top of that and weigh it down.
 

MikDee

Banned
Joined
Jun 6, 2007
Messages
4,745
Re: 1973 wellcraft 165 sport airslot project w/ pics

Man, You're building some boat there Chris! :) It should go into The Guiness book of world records for the Best restored Wellcarft Airslot on the planet! :D
I bet Richard Cole the designer, would be jumping for joy!, if he were alive to see it! ;) I bet his son would be very proud as well, you ought to send a link over to him when you get it done. Good Luck, and keep up the good work! Mike
 

chrishayes

Senior Chief Petty Officer
Joined
Apr 9, 2009
Messages
691
Re: 1973 wellcraft 165 sport airslot project w/ pics

ez, that is pretty much what I was talking about in that post up there. Just wondering if there is a better way? Maybe someone knows of a thread I could look at. I tried the search function, but no one seems to show this step...
 

chrishayes

Senior Chief Petty Officer
Joined
Apr 9, 2009
Messages
691
Re: 1973 wellcraft 165 sport airslot project w/ pics

Man, You're building some boat there Chris! :) It should go into The Guiness book of world records for the Best restored Wellcarft Airslot on the planet! :D
I bet Richard Cole the designer, would be jumping for joy!, if he were alive to see it! ;) I bet his son would be very proud as well, you ought to send a link over to him when you get it done. Good Luck, and keep up the good work! Mike


Woooooow, really? man, I was not aware that I was doing THAT good of a job...I dont think that guiness should be called, but thank you, that was a very nice thing to say.
 

chrishayes

Senior Chief Petty Officer
Joined
Apr 9, 2009
Messages
691
Re: 1973 wellcraft 165 sport airslot project w/ pics

Well, got a lot done this long weekend, but as usual, what I wanted to get done and what I got done are not one and the same. I wanted to have all of the internal structure coated with epoxy and bedded down. But, I only got the two outer stringers bedded and tabbed in and all the other wood peices cut out and ready to be coated and installed. I am having a really hard time getting all the pieces to be at the exact same height so that the deck will lay flat and be the exact right height. See, I have to have the bow portion of the deck exactly as the factory height installed. My walkthrough section sits on top of the deck here. The rest is of little concern.

On the bright side, the transom is 100% complete now...pics when I get the battery charged!
 

chrishayes

Senior Chief Petty Officer
Joined
Apr 9, 2009
Messages
691
Re: 1973 wellcraft 165 sport airslot project w/ pics

I promised an update so here goes.

I had the long weekend to work with so I had ambitious plans. I wanted to have all of the substructure cut and coated with epoxy and bedded and tabbed in plus the final wrap of 1708 on the transom. Well, I got close but life happens. See, stuff like this always gets in the way of boat building!
pics546.jpg


you have to watch this video! One of the craziest things ive seen!


Throughout the week I had put 3 coats of epoxy on my 2 outer stringers after rounding the top edges with the router and round over bit.
morestuff032.jpg


morestuff035.jpg
 

chrishayes

Senior Chief Petty Officer
Joined
Apr 9, 2009
Messages
691
Re: 1973 wellcraft 165 sport airslot project w/ pics

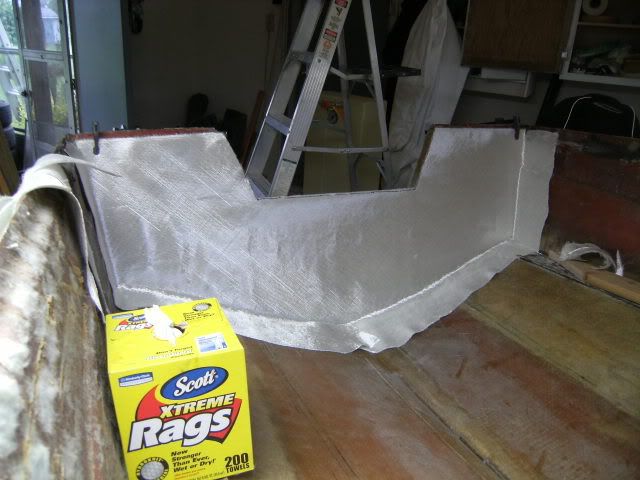
Now these were ready to go in so I rough and scuffed the fully cured glass on the bottom of the hull where these would go and the entire transom to prepare it for glassing.

morestuff030.jpg


morestuff031.jpg


So with that I had to acetone the whole shebang then it was time to cut my 1708 to go on the transom. I had already overlapped three layers to about 6" so this final wrap I wanted maximum contact with the hull for extra strength. I did about another 6" out to about 12" from the transom.

morestuff036.jpg


Then I glassed it in! It was a tough one. I fought this like no other! But I got it. There are a few spots that the glass would just not go clear. I have no idea why? Even after repeated attempts to add more resin and stippling hard enough to break the brush it just wasnt having it... oh well, ya win some ya lose some.

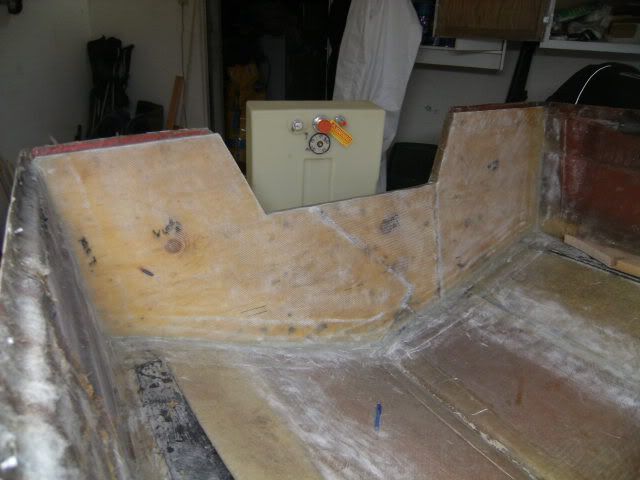
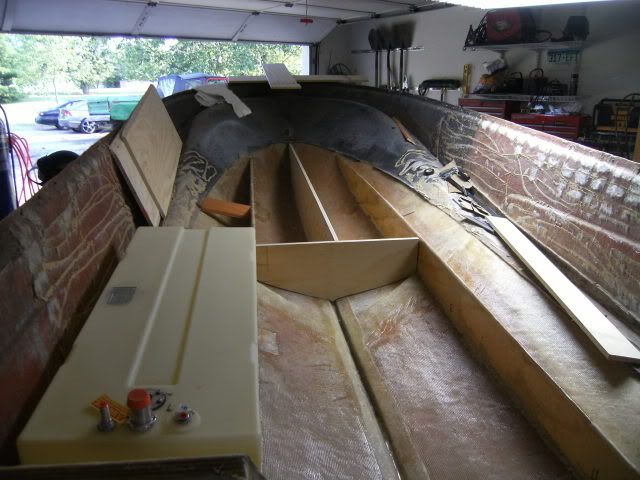
After that I PL'ed the outer stringers in place and boy let me tell you, that was not fun! I had hot glued tile spacers to the bottom on the stringers to get me the 1/4" that I wanted for bedding. THen I globbed on the pl. Let me explain, I dont have a clue what the right plan of attack is here but you NEED a plan! I didnt really have one so my wife's ears got filled with explatives for 10 minutes while I frantically tried to figure it out. The problem is trying to keep everything plumb and parallel while the hole damned thing is sliding down the hull due to the severe angle. I ended up just using my brad nailer and some scrap wood to hold everthing in place. It was just one of those good enough jobs...and this last pic shows the rest of the progress that I made by cutting the remaining pieces that I needed to box in the tank and the center stringer. Sorry I dont have more pictures but the wifey deleted some.

morestuff045.jpg


Tune in next week for another installment of "what else can I hack together?" Hopefully the wood will all be sealed throughout the week so I can get it bedded and glassed.
 

ezmobee

Supreme Mariner
Joined
Mar 26, 2007
Messages
23,767
Re: 1973 wellcraft 165 sport airslot project w/ pics

Good work. It really looks like you got those stringer matched very closely to the hull and bedded nicely. Everything looking very solid.
 

chrishayes

Senior Chief Petty Officer
Joined
Apr 9, 2009
Messages
691
Re: 1973 wellcraft 165 sport airslot project w/ pics

Thanks EZ! It was easy! NOT.
 

escapade

Petty Officer 1st Class
Joined
Jul 30, 2007
Messages
205
Re: 1973 wellcraft 165 sport airslot project w/ pics

thats one reason why my wife is inside while i'm working on the boat:D

its coming along real nice I'm hoping to have my transom cut and first coat of resin.

how thick did you make your transom?? and with all those bolt holes what did you use to seal them up?
 

chrishayes

Senior Chief Petty Officer
Joined
Apr 9, 2009
Messages
691
Re: 1973 wellcraft 165 sport airslot project w/ pics

thats one reason why my wife is inside while i'm working on the boat:D

its coming along real nice I'm hoping to have my transom cut and first coat of resin.

how thick did you make your transom?? and with all those bolt holes what did you use to seal them up?

My transom is 1.5" thick, two sheets of 3/4" ply. I used as many holes as I could that would be left and needed. I think I only drilled 3 holes that were necassary to fill. To fill them I used cabosil thickened epoxy squeezed in with a squeegee. I backed the exterior with a sheet of wax paper to hold the resin and to make it flat. I will just touch up the spot with a little paint. And, while we are talking about this, I am going to use the West system style of over drilling my bolt holes 3/4 of the way through then filling with thickened resin, wait for that to cure then redrill to the correct size. This way I will have a barrier for water to not have an exposed wood to soak into.
 
Top