1973 Starcraft SuperSport 16ft. restoration questions

piperjoe

Chief Petty Officer
Joined
Jul 11, 2013
Messages
551
Thank you, Rasdiir! I appreciate your kind post, my friend.

Safe boating, Joe
 

piperjoe

Chief Petty Officer
Joined
Jul 11, 2013
Messages
551
Today I continued the paint removal process on the inside bow area. The starboard side of the inner hull has now had all the paint removed and has also been power washed. THAT was a "feel good" moment for me! The port side of the inner hull has most of the paint removed (forgot to take a photo of that work before I tarped the boat for the night) and I should have the inner hull stripped of paint tomorrow. YAY!! There is some old glue residue, or whatever it is, on the inner side panels that keeps catching my attention and I will try and remove that residue during tomorrows work time. Nevertheless, the inside of the boat is coming along nicely. Have also given thought today to applying one more coat of Gluvit on the inner hull rivets to make sure I covered everything properly. One thing of note: I used the Citristrip from a spray can today because of all the inside bow rivets (I wanted those areas clean) and it worked very well as an alternative to the normal, thick, Citristrip and a brush wasn't needed to use it. So, after an afternoon with the boat, and some yard work while the Citristrip did its thing, it's now time for a shower and then...some watermelon!!

Safe boating,
Joe
 

Attachments

  • 004.JPG
    004.JPG
    122.7 KB · Views: 7
  • 005.JPG
    005.JPG
    123.7 KB · Views: 7
  • 002.JPG
    002.JPG
    120 KB · Views: 7

piperjoe

Chief Petty Officer
Joined
Jul 11, 2013
Messages
551
The inner hull is now void of original paint and is clean! It took awhile for the Admiral and me to get to this stage of the restoration but arrive we did; the Admiral is happy and said she never thought the inside of the boat would look so good. Made my day! After I took a few photos of the clean aluminum I have to admit that I just stood at the transom, looked at the boat, and enjoyed the view. A lot of work went into getting to this stage and it was fun, at times, and not so much fun, at times. Have also decided that I will go ahead and apply that second coat of Gluvit to the inside hull rivets and then I won't have to wonder about it throughout the rest of the restoration. Okay, so now I'm thinking: 1) Gluvit on the rivets as a second coat 2) Rivet the cleaned decking stringers to the inner hull ribs 3) Get all the marine plywood decking pieces cut to shape and apply the West Systems epoxy to each piece, 3 coats on all surfaces. 4) Work on stripping paint off the outer hull and cleanup of aluminum parts. That's enough to think about for now.

Safe boating,
Joe
 

Attachments

  • 001.JPG
    001.JPG
    129.1 KB · Views: 12
  • 002.JPG
    002.JPG
    124.3 KB · Views: 10
  • 003.JPG
    003.JPG
    134.7 KB · Views: 11
  • 004.JPG
    004.JPG
    148.3 KB · Views: 11

piperjoe

Chief Petty Officer
Joined
Jul 11, 2013
Messages
551
On the other hand, maybe I should put a couple of milk crates or two folding chairs, cushions, tackle box and poles, strap on the 5.5 Johnson, and take the Admiral fishing 🎣
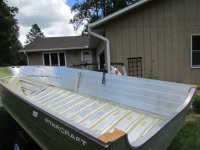
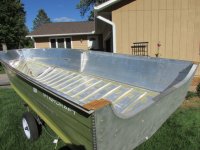
. We would need our sunglasses, too. A "splash" of sorts for the old gal...I can just tell the Admiral that I need to put the boat on the lake so we can check for rivet leaks. On second thought, perhaps "leaks" would not be the best word to say to the Admiral...

Safe boating,
Joe
 

Moserkr

Chief Officer + Starmada Splash Of The Year 2021
Joined
Nov 23, 2020
Messages
826
Boat is looking clean! Nice work! Im sure the warm weather makes that water tempting for an early splash! Haha. Coming along nicely. Once the floors go in, it comes together quickly.
 

piperjoe

Chief Petty Officer
Joined
Jul 11, 2013
Messages
551
Thank you for the kind comments, Moserkr, my friend! After the next Gluvit application dries it will be time for deck stringers, floatation foam, and then getting the deck pieces attached to the stringers. Lots to do in order to get to that point.

Safe boating,
Joe
 

piperjoe

Chief Petty Officer
Joined
Jul 11, 2013
Messages
551
A question for you regarding the flotation foam. I purchased the green 4' x 8' x 2" thick sheets which are now cut to 4' x 4' size. The plan is to cut the foam to required size using a blade and straightedge. That said, my question is: do I need to seal those cut edges on the block flotation foam with epoxy or something similar to keep water out of the foam that will be under the decking?

Safe boating,
Joe
 

piperjoe

Chief Petty Officer
Joined
Jul 11, 2013
Messages
551
Went out today and purchased the Gluvit...no one had it except the most expensive place...but at least I found it locally. The weatherman is now calling for potential heavy rain tonight through Wednesday night, and the boat tarp leaks, so I'll wait until Thursday morning to apply the second coat of Gluvit over the inner hull rivets. Nice weather being forecast Thursday through Saturday so the Gluvit epoxy can cure without getting wet. In the meantime I can work some more on cutting the marine plywood decking pieces to shape...hope my West Systems epoxy is still useable as its been on the shelf in the house for awhile.

Safe boating,
Joe
 

Attachments

  • 001.JPG
    001.JPG
    130.7 KB · Views: 1

Moserkr

Chief Officer + Starmada Splash Of The Year 2021
Joined
Nov 23, 2020
Messages
826
In regards to the floatation foam question, if it is closed cell foam, you do not need to seal the edges. Each cell is already closed so any actually cut open will be minimal and not affect the entire sheet, or even the next cell over.
 

piperjoe

Chief Petty Officer
Joined
Jul 11, 2013
Messages
551
In regards to the floatation foam question, if it is closed cell foam, you do not need to seal the edges. Each cell is already closed so any actually cut open will be minimal and not affect the entire sheet, or even the next cell over.
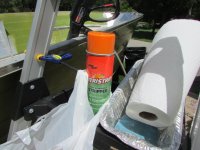
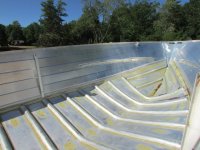
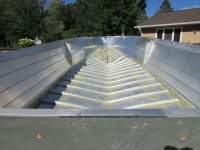
Thank you for the confirmation of my thoughts on the floatation foam. Wanted to double check with those who know more about this than I do before cutting it to size and placing it into the boat.

Safe boating,
Joe
 

BWR1953

Vice Admiral
Joined
Jan 23, 2009
Messages
5,802
The EPS foam blocks are waterproof all right. No need to protect against that.

When I installed mine, I put the blocks towards the stern into HDPE trash bags and sealed them up with aluminum tape, so they're gasoline proof in case of a casual spill.
1.jpg
 

piperjoe

Chief Petty Officer
Joined
Jul 11, 2013
Messages
551
Had a real eye opener experience today while looking for the Gluvit at the boat shops. With the exception of my friend, who will be 80 years old this month and still operates his own boating repair business, no one said they would work on the Johnson motor if required in the future...because of its age and because of problems getting parts for the motor. This news got my attention as I certainly don't know how to work on the motor if it should require anything extensive in the future. I would like to think the motor would run good for quite awhile but we all know how that can work out. My friend suggested that I consider putting a new 4-stroke long shaft, 60-75 hp, (no, he doesn't sell motors) because of our age and my lack of knowledge should a problem arise with the Johnson. A Suzuki was his suggestion for reliability, mileage per gallon, ease of operation and quiet ride for the Admiral and me. Even the motor tilt is built into the motor so I would not have to use the original control and hardware. Sounds nice but GeeeZooow...always something to think about. And then there are the transom holes in the original sheet metal (I have not drilled the matching holes through the new wood transom yet), and that new marine plywood motor mount that has all the holes drilled to match the aluminum transom sheet. I could chuck that piece though and cover the aluminum transom sheet holes with a new aluminum piece instead of making another wood motor mount piece. Thanks for letting me think 💭 out loud for a bit...just consider it an old farts 💨 thing! LOL

Safe boating,
Joe
 

piperjoe

Chief Petty Officer
Joined
Jul 11, 2013
Messages
551
The EPS foam blocks are waterproof all right. No need to protect against that.

When I installed mine, I put the blocks towards the stern into HDPE trash bags and sealed them up with aluminum tape, so they're gasoline proof in case of a casual spill.
View attachment 367113
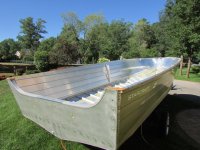
Thank you for the second confirmation regarding the restoration foam. It is certainly appreciated. And your idea of bagging the aft foam is great; had not thought of that (or recalled it if I had read of it) but will want to use the idea when the floatation foam is placed into my boat.

Safe boating,
Joe
 

Moserkr

Chief Officer + Starmada Splash Of The Year 2021
Joined
Nov 23, 2020
Messages
826
I know a lot of guys have rebuilt their old motors and they can run great. Im still working on mine and have another sitting next to it that Im yet to get to. On one hand, a lot of time/money can be spent fixing the old motors to keep em alive. They drink fuel too like a bar fly. But you can work on them unlike the newer motors.

On the other hand, you arent getting younger and you can’t spend money from 6’ under. Looked back and saw that the thread started in 2013. My memory has been shot recently so dont even remember the whole thread or if your 85hp 50th anniversary Johnson runs. Shops around here wont work on mine either, but if it runs well, run it! My plan is a new one regardless when I can afford it. Tend to buy everything new so I know its well taken care of and the new ones sip fuel quietly.

Whatever you do, get her built, on the water, and have fun!
 

piperjoe

Chief Petty Officer
Joined
Jul 11, 2013
Messages
551
Man, I am definitely embarrassed! 2013 was a long time ago and the restoration effort has only progressed to the present point. Lots of "life" came along, mainly the mini-stroke and vertigo, that certainly slowed down the enthusiasm and progress from time to time. The boat is still being worked on though and decisions are still being considered. I planned on running the Johnson from the get go and may still end up that way. However, with the information received today and the plain facts that I am getting older, have neither the background, tools or space to work on a motor that might not run correctly all come to mind. Also, and this is the biggest concern I have, the Admiral is having some memory/beginning Alzheimer's problems that are sometimes accompanied with anxiety. I absolutely do not want her to worry about getting safely back to land while on the water. I want her to enjoy the ride and outing while able to do so as we have plenty of beautiful lake scenery for her to enjoy. Sometimes there's more to a project than initially meets the eye, eh? But, it's all good and with the continued support and guidance from my friends here I will keep on keeping on!

Safe boating,
Joe
 

piperjoe

Chief Petty Officer
Joined
Jul 11, 2013
Messages
551
Went outside this morning to check the boat tarp after a night of storms and heavy rains as it usually fills up with water. There wasn't much water in the boat though I found that I definitely needed to bail the water off the tarp and I took a photo of the new "warm air escape hatch" that appeared in the tarp. Think I'll buy a better quality tarp. LOL. As it was quite wet and very humid outside I decided to look around in my model workshop and located the blades for cutting the floatation foam to size. There is about 2 3/4" of exposed length from the sturdy handle and I'll give these blades a try while using a metal straightedge to help keep the cut where I want it to be. It's amazing how many of those "model making tools" have been put to good use while working on the boat, and since I'm not building RC model planes anymore that's a good thing. I also found the very sharp Japanese trim saw that was purchased for remodeling trim work in the house and that might prove useful. Other than that, unless the humidity level falls, I think I'll spend some time in the model shop today...maybe.

Safe boating,
Joe
 

Attachments

  • 006.JPG
    006.JPG
    109.8 KB · Views: 6
  • 001.JPG
    001.JPG
    96.5 KB · Views: 6
  • 005.JPG
    005.JPG
    92.9 KB · Views: 6

Michigan Lakes

Petty Officer 3rd Class
Joined
Dec 20, 2018
Messages
86
A Suzuki was his suggestion for reliability, mileage per gallon, ease of operation and quiet ride for the Admiral and me. Even the motor tilt is built into the motor so I would not have to use the original control and hardware. Sounds nice but GeeeZooow...always something to think about. And then there are the transom holes in the original sheet metal (I have not drilled the matching holes through the new wood transom yet), and that new marine plywood motor mount that has all the holes drilled to match the aluminum transom sheet. I could chuck that piece though and cover the aluminum transom sheet holes with a new aluminum piece instead of making another wood motor mount piece. Thanks for letting me think 💭 out loud for a bit...just consider it an old farts 💨 thing! LOL

Safe boating,
Joe
The new Suzuki and and vintage OMC motors likely have the same transom mounting pattern. My understanding is that by mid-1980s virtually all of the outboard motor companies had switched to the Johnson/Evinrude (OMC) mounting pattern as it was the most common at that time and opened up more of the market to them. It's commonly referred to as "BIA standard" if you'd like to do some further research/confirmation.
Ironically, those manufacturers (still using the OMC pattern) were able to put what was left of OMC out of business 3 decades later.
 

piperjoe

Chief Petty Officer
Joined
Jul 11, 2013
Messages
551
Thank you for the BIA standard information, Michigan Lakes! That would surely be a blessing to find out the mounting holes matched to a new motor if we go that route. The Admiral thinks we should spring for a new motor...I am still recovering from sticker shock.

Safe boating,
Joe
 

piperjoe

Chief Petty Officer
Joined
Jul 11, 2013
Messages
551
Called my friend at his boat shop to ask about the BIA standard bolt pattern and didn't hear back (yesterday he was working on four different boat/motor projects!) so I went online to investigate. How about this: found an iboat thread dealing with just this topic and containing a link to the BIA dimensional pattern measurements. Drew the pattern/dimensions on a post it note pad and went out to the hull to check my transom bolt hole measurements.

The top two mounting holes were originally drilled at the correct 2" down from the transom top; that's a good start. Those top two mounting holes were also the correct 12 7/8" apart; that's good too. The BIA pattern calls for an 8" vertical dimension between the horizontal centerlines of the top two mounting holes and the bottom two mounting holes. My port side measurement is 8 1/16", and the starboard side measurement is 8 1/8"; not to BIA standard pattern specs. The horizontal distance between the two bottom mounting holes is 9 7/8" on the BIA pattern and my aluminum transom is drilled at 9 15/16". So, the two top mounting holes are drilled correctly and the two bottom mounting holes are drilled incorrectly; not by a lot but you would think the holes would have been drilled correctly. In any case, the original motor mount holes may be something we can work with with regards to a possible new motor . I admit to knowing nothing about mounting a marine motor but at least the mounting holes situation looks promising. And, I gained some new knowledge today which was interesting in and of itself.

Safe boating,
Joe
 
Top