1973 Starcraft SuperSport 16ft. restoration questions

piperjoe

Chief Petty Officer
Joined
Jul 11, 2013
Messages
553
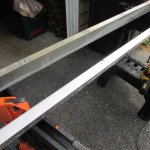
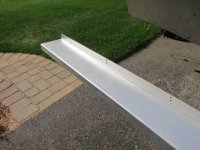
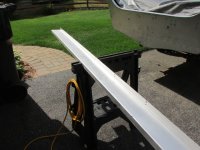
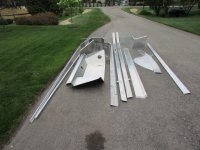
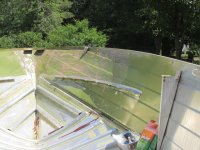
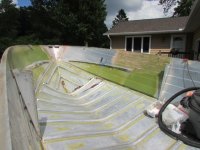
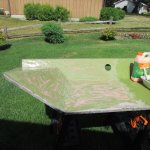
Finished up removing the paint from both aluminum channels that hold the upper rubber rub rails. Those things were nasty but they are clean now by golly! Lots of scratches and places on the channels that need a good sanding to smooth the exposed surfaces. Need to remove a few of the aluminum "stick out and grab the finger" things standing proud around the rivet holes, too! Tomorrow I will get at the lower rub rail channels and take paint off of those. No photos today...nothing exciting so thought you might like a break!

Safe boating,
Joe
 

piperjoe

Chief Petty Officer
Joined
Jul 11, 2013
Messages
553
Well, I did not find the lower rub rail channels that were mentioned in the above post until late today so I did the paint and clean thing on the two aluminum pieces that go on the gunwales from the window to the transom. I tried the white vinegar and distilled water mixture using an old plastic scrub brush like that used for cleaning dishes and I found it really worked great for cleaning the aluminum items after the paint was removed. Cheaper to use and safer for this 'ole man's skin! I'll save and use the harsher chemical spray for the final boat cleanup prior to spraying the etching primer. Tomorrow I plan to continue working on the boat if the weather cooperates.

Safe boating,
Joe
 

Attachments

  • 003.JPG
    003.JPG
    116.8 KB · Views: 7
  • 004.JPG
    004.JPG
    92.8 KB · Views: 7

Alecapone

Seaman Apprentice
Joined
May 8, 2021
Messages
42
Did you get your rivets yet? I keep forgetting to call during midwest business hours. At this point, it might be easier for me to stop in and get them in person. I'll be in that area in like 3 weeks.

Where are you located?(roughly) ill be driving from detroit to hale in a few weeks. Since you are not comfortable ordering on line, I could possibly pick them up for you, and swap them for cash. We should need roughly the same sizes and variety. Im guessing they get the 'im restoring a starcraft' call fairly often. ;)
 

piperjoe

Chief Petty Officer
Joined
Jul 11, 2013
Messages
553
Thanks for the very kind offer on the rivets. I have found a supplier just a couple miles from the house that is willing to sell me the rivet types and quantities as needed so I'll be purchasing them from that location. I'll be installing the aluminum floor stringers soon so that should be an interesting task! Need to get the floor/decking in the boat so I can stand up without the hull rocking and my vertigo kicking in...don't want the neighbors to see me pitched out of the boat unto the lawn or driveway before I even get it on the water LOL!!

Safe boating,
Joe
 

piperjoe

Chief Petty Officer
Joined
Jul 11, 2013
Messages
553
Removing paint from the splash pan today...and that's a big piece of metal. The paint is pretty well baked on and each strip area I work on will most likely require two applications of the Citristrip. At least the back side/bilge side is paint free so that will only require a good cleanup. Laying out the bow floor piece and one side is in real good shape so I just drew a centerline on the floor piece and I'll trace the good side, flip it over, and then draw the other edge. Each of those floor pieces has just enough to be able to use as a template, along with my drafting skills, to draw the required section. I got lucky there as most of the flooring is quite brittle with damaged edges and areas. And the work goes on...and the work goes on...

Safe boating,
Joe
 

Attachments

  • 002.JPG
    002.JPG
    112.6 KB · Views: 10
  • 003.JPG
    003.JPG
    105.6 KB · Views: 9
  • 005.JPG
    005.JPG
    95.9 KB · Views: 10
  • 004.JPG
    004.JPG
    108.3 KB · Views: 9

piperjoe

Chief Petty Officer
Joined
Jul 11, 2013
Messages
553
Didn't work on the boat restoration over the last couple of days...needed a break...and thought you folks needed a break, too! LOL
Today I finished the paint removal/cleanup task on the splash pan. Got out the bow seat metal former and will be removing some rivets, paint, and then a general cleanup. Still on the fence as to using this aluminum item so I'll get it ready just in case it goes back on the boat.

Safe boating,
Joe
 

Attachments

  • 001.JPG
    001.JPG
    114.8 KB · Views: 8
  • 003.JPG
    003.JPG
    110.6 KB · Views: 7
  • 004.JPG
    004.JPG
    114.6 KB · Views: 7
  • 005.JPG
    005.JPG
    123.8 KB · Views: 7
  • 006.JPG
    006.JPG
    97.8 KB · Views: 8
  • 010.JPG
    010.JPG
    97.7 KB · Views: 7
  • 009.JPG
    009.JPG
    73.9 KB · Views: 8

piperjoe

Chief Petty Officer
Joined
Jul 11, 2013
Messages
553
Today I removed the remaining rivets from the bow seat aluminum piece and then removed the two black edge guards from the storage openings. I was surprised to find the edge guards in good condition and pleased that they didn't break when removed due to being brittle. A bit of cleanup and they can be put back on the boat if needed. The original green paint was removed following the Citristrip method as above. I left the floor straps in place on the bow seat aluminum piece with the original rivets for now. This brings on a sort of restoration "milestone", if you will, for the Admiral and me as we now have most (if not all) of the large aluminum pieces stripped of original paint. There may be some parts hidden in the garage that have a bit of the green paint on them, we will have to see. I have yet to remove a small area of paint on the inside bow area and then I'll do the outside of the hull. Was looking at the hull today and I am going to try and remove as much of the side paint that I can while the boat sits upright on the trailer. Working in reasonable size areas and using a trailer protection covering under the stripping area should work as the Citristrip pretty much stays where I put it and the power washer should take care of required "slop" cleanup.
 

Attachments

  • 001.JPG
    001.JPG
    90.3 KB · Views: 10
  • 002.JPG
    002.JPG
    97.8 KB · Views: 9
  • 004.JPG
    004.JPG
    104.6 KB · Views: 8
  • 003.JPG
    003.JPG
    95.2 KB · Views: 8
  • 005.JPG
    005.JPG
    87.8 KB · Views: 8
  • 006.JPG
    006.JPG
    102.3 KB · Views: 8
  • 009.JPG
    009.JPG
    122.2 KB · Views: 8
  • 011.JPG
    011.JPG
    127.2 KB · Views: 9
  • 012.JPG
    012.JPG
    129.2 KB · Views: 10
  • 013.JPG
    013.JPG
    127.5 KB · Views: 10

piperjoe

Chief Petty Officer
Joined
Jul 11, 2013
Messages
553
Found a small plywood piece in with the StarCraft boat items (and have not figured out or remember what it is for, or where it goes on the boat...yet), so, as long as it was raining I used the original piece as a template and cut a new plywood piece from marine plywood. It's now sanded smooth and ready for a couple coats of West Systems epoxy later during the restoration. I know it's not much but it IS a part...I don't remember which part it is but I'll get that sorted out. Maybe.

Safe boating,
Joe
 

Attachments

  • 003.JPG
    003.JPG
    106.3 KB · Views: 8
  • 005.JPG
    005.JPG
    86.9 KB · Views: 8

piperjoe

Chief Petty Officer
Joined
Jul 11, 2013
Messages
553
Cut out the new plywood piece that goes on the outside of the aluminum transom sheet from marine plywood. I have it in my workshop and will drill the misc. size holes using my drill press and Forstner bits. Traced out the front bow flooring piece onto marine plywood and, as one side was not fully intact, am matching the bad side to the outline of the good side.

Safe boating,
Joe
 

Attachments

  • 001.JPG
    001.JPG
    107.9 KB · Views: 4
  • 003.JPG
    003.JPG
    83 KB · Views: 4
  • 004.JPG
    004.JPG
    85.9 KB · Views: 4

piperjoe

Chief Petty Officer
Joined
Jul 11, 2013
Messages
553
Have not worked on the boat since the last post. Life has a way of getting a nod from time to time so I took care of a few things for the Admiral. Divided the Iris plants in a 20' long bed and found new homes for about 200 rhizomes, then, close to 800 square feet of patio and walkway pavers got a power washing and new joint sand. The Admiral is happy 😊 
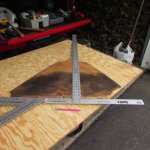
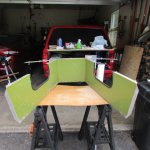
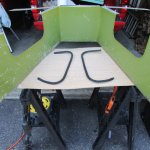
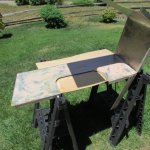
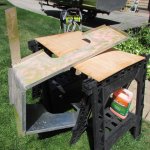
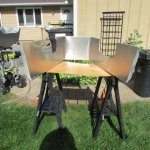
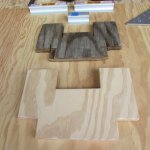
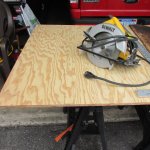
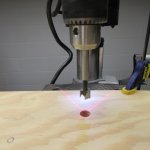
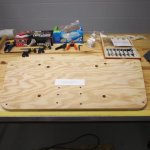
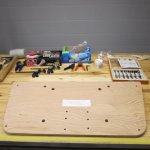
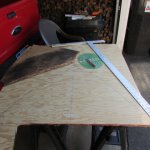
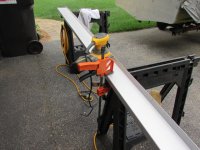
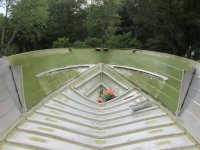
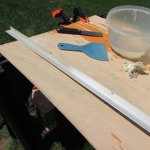
and went to town with me this morning to purchase a new 10" drill press to be used for the boat restoration. I had set up the smaller Microlux drill press after the last post (a really nice workshop tool by the way) and got out the Forstner drills so I could start drilling holes in the outside plywood transom piece shown above. Opened the chuck all the way and when I tried to put the drill shank into the chuck it would not fit...chuck maximum opening is 1/4" diameter and the Forstner chuck end is 5/16". As a result I now have a new boxed/sealed Ryobi 10" drill press awaiting assembly... and it is about 94 degrees hot and humid in the garage today! Think I will retrieve it from the pickup bed, take it downstairs to the shop, and assemble the drill press where it is cool and comfortable. Wait, I'll see if the Admiral will carry the box down the stairs for me... and maybe even put it together...while I go take a nap...

Safe boating,
Joe
 

piperjoe

Chief Petty Officer
Joined
Jul 11, 2013
Messages
553
Hooray! The 10" drill press is assembled and works great 👍
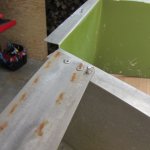
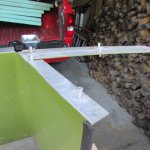
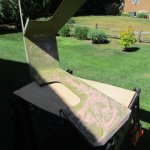
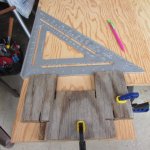
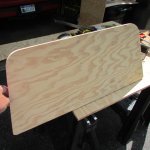
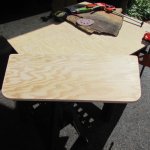
. I am testing my "put it together" work by drilling the miscellaneous sized holes in the motor mount transom plywood and so far so good 😊. Nice and clean drill through with no rip out on the exit perimeter using the Forstner drills. Camera battery is charging now so will get a few photos posted later.

Safe boating,
Joe
 

piperjoe

Chief Petty Officer
Joined
Jul 11, 2013
Messages
553
Finished drilling the 16 holes in the transom plywood piece (hole locations and size match the original plywood pattern) and it is ready for me to apply the spar varnish to seal the wood.

Safe boating,
Joe
 

Attachments

  • 001.JPG
    001.JPG
    66.1 KB · Views: 5
  • 003.JPG
    003.JPG
    78 KB · Views: 5
  • 005.JPG
    005.JPG
    80.1 KB · Views: 5

piperjoe

Chief Petty Officer
Joined
Jul 11, 2013
Messages
553
I went out to the boat to check the newly drilled plywood transom piece against the original holes drilled in the aluminum transom sheet. To my initial dismay the holes in the new plywood piece were about 1/8" too low and you can be sure I did a double take on that one! After a few moments I remembered that I had cut the top edge about 1/8" or 3/16" proud to allow for adjustment if needed. Got out the power saw and trimmed off 1/8" from the top edge and the new marine plywood transom piece now fits nicely while allowing for a relief space of about 1/32" between the bottom of the transom top trim piece and the new plywood item. This will allow a good opening for the 3M "white goop" to ooze out to where I can wipe the excess off to make a watertight seal around the plywood edge. Glad I found this out before applying the spar varnish.

Safe boating,
Joe
 

Attachments

  • 001.JPG
    001.JPG
    85.8 KB · Views: 2
  • 002.JPG
    002.JPG
    92.7 KB · Views: 2
  • 003.JPG
    003.JPG
    73.1 KB · Views: 2

piperjoe

Chief Petty Officer
Joined
Jul 11, 2013
Messages
553
The front decking piece has now been drawn, using the old decking piece as a template to get started, onto a section of marine plywood. I transferred the dimensions from the good side of the original piece, measuring from the centerline to the plywood edge, to the other side of the centerline on the new plywood thereby keeping both outer sides of the new decking piece symmetrical about the centerline bow to aft edge. Came out much better than drawing the outside decking edge line via using a pencil to trace the old and rotted edge of the original decking piece onto new plywood. Now I should be able to set the sabre saw blade at a 45 degree angle and cut the new decking piece out of the new marine plywood. Should be interesting to see how this comes out...tomorrow.

Safe boating,
Joe
 

Attachments

  • 004.JPG
    004.JPG
    88 KB · Views: 3

piperjoe

Chief Petty Officer
Joined
Jul 11, 2013
Messages
553
The bow decking piece has been cut from the marine plywood sheet via sabre saw. This is the first time that I cut a piece out with the 45 degree outer edge and the curves along the sides. Was an interesting time and I learned a few things along the way. The new plywood piece is now sanded and ready for a couple of coats of West Systems epoxy to seal the wood.

Safe boating,
Joe
 

Attachments

  • 001.JPG
    001.JPG
    86.9 KB · Views: 5
  • 006.JPG
    006.JPG
    97 KB · Views: 5
  • 007.JPG
    007.JPG
    92.7 KB · Views: 5

renns

Petty Officer 1st Class
Joined
Dec 20, 2017
Messages
316
Wow, beautiful work! If the original builders of these boats could see the care taken in a restoration 50 yrs later, they'd be shocked I'm sure.
 

piperjoe

Chief Petty Officer
Joined
Jul 11, 2013
Messages
553
Thank you, renns! I know that I am slow with this restoration but I want the results to reflect the "labor of love" attitude that the Admiral and I have slowly developed. If the boat looks good and runs smoothly when the "old gal" is splashed then the experience will have been worthwhile.

Safe boating,
Joe
 

piperjoe

Chief Petty Officer
Joined
Jul 11, 2013
Messages
553
Started cleaning the deck stringers/rails using the orbital sander with 80 grit and then 150 grit sandpaper to remove the misc. corrosion and whatever else lay on the aluminum. This work is also removing those pesky aluminum burrs from the original rivet holes...I seem to have a knack for finding those. These stringers will most likely be re-installed as my first ever riveting experience later on during the restoration. That should be an interesting experience...

Safe boating,
Joe
 

Attachments

  • 003.JPG
    003.JPG
    105.2 KB · Views: 6
  • 005.JPG
    005.JPG
    69.5 KB · Views: 6
  • 006.JPG
    006.JPG
    93.6 KB · Views: 6

piperjoe

Chief Petty Officer
Joined
Jul 11, 2013
Messages
553
Continued to work on the deck stringers this afternoon and made a couple of changes that seem to help the cleanup task. First I switched to a more aggressive 60 grit paper and also slowed down the orbital sander speed. This allowed the sander to work under its own weight and the process turned out better. I followed up the 60 grit with the 150 grit as above and the result was nice. The Admiral even liked it and that is very important! Back at it tomorrow.

Safe boating,
Joe
 

Attachments

  • 002.JPG
    002.JPG
    143 KB · Views: 3
  • 004.JPG
    004.JPG
    139.5 KB · Views: 3
  • 005.JPG
    005.JPG
    125.7 KB · Views: 3

piperjoe

Chief Petty Officer
Joined
Jul 11, 2013
Messages
553
Decided to strip paint off the inside bow area today. First I had to empty the boat hull of all the cleaned aluminum boat items. Then I discovered that someone had put a lot of silicon sealer inside the bow area. Can you say "MESS!"? Anyway, the paint stripping is proceeding along at a slower pace but progress is being made on the task. A little suggestion for you: I decided to clamp the aluminum ladder to the side of the boat today because of a little vertigo feeling while walking within the trailered hull. Don't know why I hadn't thought of that simple "fix" before, and it made working inside of the hull so much easier for me when the hull wasn't rocking on the trailer. Sometimes it's the little things that can really make a difference, eh?

Safe boating,
Joe
 

Attachments

  • 001.JPG
    001.JPG
    139.6 KB · Views: 13
  • 002.JPG
    002.JPG
    134.5 KB · Views: 13
  • 004.JPG
    004.JPG
    144.5 KB · Views: 13
  • 006.JPG
    006.JPG
    124.1 KB · Views: 13
  • 005.JPG
    005.JPG
    110.8 KB · Views: 13
Top