1967 Starcraft Jet Rebuilding

TruckDrivingFool

Lieutenant Commander
Joined
Jul 30, 2007
Messages
1,818
I would do some mocking up for sure before mounting the helm, perhaps even some quality Vrooming. :)

On another note about your corners, while out tinkering today I took note of my corners and would have to say that there is some gap from the factory on the inside trim.


catbones

Petty Officer 1st Class
Joined
Jul 15, 2012
Messages
319
I would do some mocking up for sure before mounting the helm, perhaps even some quality Vrooming. :)

On another note about your corners, while out tinkering today I took note of my corners and would have to say that there is some gap from the factory on the inside trim.


Thank you, I really appreciate you taking that photo and posting it. I might have to fill it some how with 5200 and smooth it out, best of all it blends in with the rest being white. One side is better then the other so won't be that hard. Thanks again!
 

catbones

Petty Officer 1st Class
Joined
Jul 15, 2012
Messages
319
No Title

So some of you know when my boat was on the water I had a hard time controlling the two reverse and forward knobs on my controller. So I'm wondering if I sell the oneni have, can I not hookup this one? My motor has a red plug but it'd on the inside not on the outside and its already connected to the cables that I hook up to battery and some other cable very small and a white plug. Is that the red plug that everyone talks about that you connect one of these multi single knob type controls??/

Sorry with my vocab on this subject.
 

Attachments

  • photo226872.jpg
    photo226872.jpg
    5 KB · Views: 0

catbones

Petty Officer 1st Class
Joined
Jul 15, 2012
Messages
319
OK so I'm now into the seats work... Anyone know what the height of the seats originally or proper, was? The old ones I took out, their base is 8" ....
 

catbones

Petty Officer 1st Class
Joined
Jul 15, 2012
Messages
319
Btw also does anyone have wiring diagram for 60s Johnson 30 or 33 or similar??? I'm trying to figure out where the positive, black negative cables go, do they go to the solenoid .. What's the little grayish wire that comes with those two? I know there's a white overall plug in the harness of wires but these three are separate. Help???
 

Watermann

Starmada Splash of the Year 2014
Joined
Jan 12, 2013
Messages
13,787
Normally the original wiring is only long enough to go where it belongs and after so many years it even lays where it has been connected.
 

TruckDrivingFool

Lieutenant Commander
Joined
Jul 30, 2007
Messages
1,818
My seats are the factory ones and sit very low on a tube frame so that they layout.


Not sure if it makes a difference which side (don't think it does) but + goes to the solenoid, My 50 has a stud, my 115 (don't have it anymore) I think it went right to one of the mounting bolts for the starter, and had a Tohatsu that had its own bolt boss for it. So I'd say anywhere you can find a good spot to ground it to the block.
 

catbones

Petty Officer 1st Class
Joined
Jul 15, 2012
Messages
319
So here's an update what I've been doing for the last couple days.

-- done the three seats against the splashwell for my three girls.

-- got the steering mounted
-- mounted the fuse block / ground bar
-- new ignition (drilled the initial hole for it way to big, so I started to think. I don't think it came out bad enough)
-- mounted all lights, etc... Funny thing is, I noticed there is more holes in the side tops and bow then I thought ... Pretty much match em and replaint. Used 5200 and interesting enough, she very very dirty. I'll try to use magic eraser to see if all dusty coating comes off, if not, she will get a fresh coat with everything installed.

Here's some photos!

Feedback is always welcome, love to hear what you guys think so far. Carpet also came in today if I didn't mention it.
 

catbones

Petty Officer 1st Class
Joined
Jul 15, 2012
Messages
319
No Title

How do you guys post images right in vs the little images I'm putting in ...
 

Attachments

  • photo227499.jpg
    photo227499.jpg
    31.3 KB · Views: 0
  • photo227500.jpg
    photo227500.jpg
    38.4 KB · Views: 0
  • photo227501.jpg
    photo227501.jpg
    33.7 KB · Views: 0
  • photo227502.jpg
    photo227502.jpg
    34 KB · Views: 0
  • photo227503.jpg
    photo227503.jpg
    29.7 KB · Views: 0

jbcurt00

Moderator
Staff member
Joined
Oct 25, 2011
Messages
25,034
I use photobucket to host my pix for forums. Works in all 3 boat forums I frequent

When you upload them to PB there is an IMG code for each pix.

You copy and paste that code into a post directly where ever you want the pix to appear.

No uploading or linking it via the forum software.

Pix end up IN the post, nice and big so they dont have to be clicked and opened to be seen.

Whats the deck covering plan?

Else looks good on my cell from Florida...
 

catbones

Petty Officer 1st Class
Joined
Jul 15, 2012
Messages
319
I use photobucket to host my pix for forums. Works in all 3 boat forums I frequent

When you upload them to PB there is an IMG code for each pix.

You copy and paste that code into a post directly where ever you want the pix to appear.

No uploading or linking it via the forum software.

Pix end up IN the post, nice and big so they dont have to be clicked and opened to be seen.

Whats the deck covering plan?

Else looks good on my cell from Florida...

Thank you, I'll have to redo those then...

The deck will have a carpet on it in the end. :)
 

catbones

Petty Officer 1st Class
Joined
Jul 15, 2012
Messages
319
So ... If I can figure this wiring out to the ignition switch and accessories switches, I'll be good to do very first splash this Sunday. Just finished putting in a new cable for the steering. Wiring tomorrow, I hope.
 

Watermann

Starmada Splash of the Year 2014
Joined
Jan 12, 2013
Messages
13,787
We'll be waiting for the pics with good times and smiles! :happy:
 

catbones

Petty Officer 1st Class
Joined
Jul 15, 2012
Messages
319
No Title

Well guys splash won't happen till next weekend :( I spent five hours trying to figure out the wiring and here is where I stand. My 14 gauge I had rolled up doesn't seem to be doing anything unless I'm doing something wrong. I've tried the lights and the pump and I get nothing from the ignition switch when key is in the start position. I've also can't figure out where the big thick wire goes on the ignition, it wasn't connected to the old one. So far the motor starts, but even though I turn the key off it still going. So I need a kill wire... What I've got left is the following; - thick brown wire - slim red - slim white The red I know goes into the overhead bulb... Buy my ignition switch has an M and A pretty much next to each other, does it mean I hook up both wires to one ?? The thick brown runs from the back which I'm thinking is the wire in the second pic ... Attached to a fuse. So accessories I'll have to redo and maybe bypass the whole ignition switch battery wiring. What I have left available on the key switch is "C" and "I" Anyone who can help? I'd like to get a splash this month if I can figure all out.
 

Attachments

  • photo227693.jpg
    photo227693.jpg
    40.1 KB · Views: 0
  • photo227694.jpg
    photo227694.jpg
    27.6 KB · Views: 0
Last edited:

catbones

Petty Officer 1st Class
Joined
Jul 15, 2012
Messages
319
No Title

Here's the back of my switch, still not sure about that fat brown wire ....

The switch has B wire connected, Start wire and two black wires for magento. However turning ignition once and then pus fardest starts the motor and key returns into ignition or start position, but turning the key into OFF position didn't kill the motor. Any ideas?
 

Attachments

  • photo227698.jpg
    photo227698.jpg
    154.9 KB · Views: 0

Watermann

Starmada Splash of the Year 2014
Joined
Jan 12, 2013
Messages
13,787
About all I'm familiar with are 3 post ignition switches. ACC wire for power to the motor. BATT post for your lights, horn, bilge, etc so they're hot all the time. IGN wire to the start solenoid. It sounds to me like you have the run wire on the BATT post rather than the ACC post.
 

TruckDrivingFool

Lieutenant Commander
Joined
Jul 30, 2007
Messages
1,818
I can't read the lettering on the switch but thought this looked close to what I think you have and might help


I think there should also be a ground connection that's not shown but I'm not sure. Might have to just start chasing wires to double check.
 
Last edited:

TruckDrivingFool

Lieutenant Commander
Joined
Jul 30, 2007
Messages
1,818
I also found this that helped to understand whats going on in the switch (the pics across the bottom)


catbones

Petty Officer 1st Class
Joined
Jul 15, 2012
Messages
319
I figured out the switches this morning at 6 am, however motor still won't kill with the switch but I haven't yet flipped the two. Here's she is before that splash that I did which I just couldn't wait.
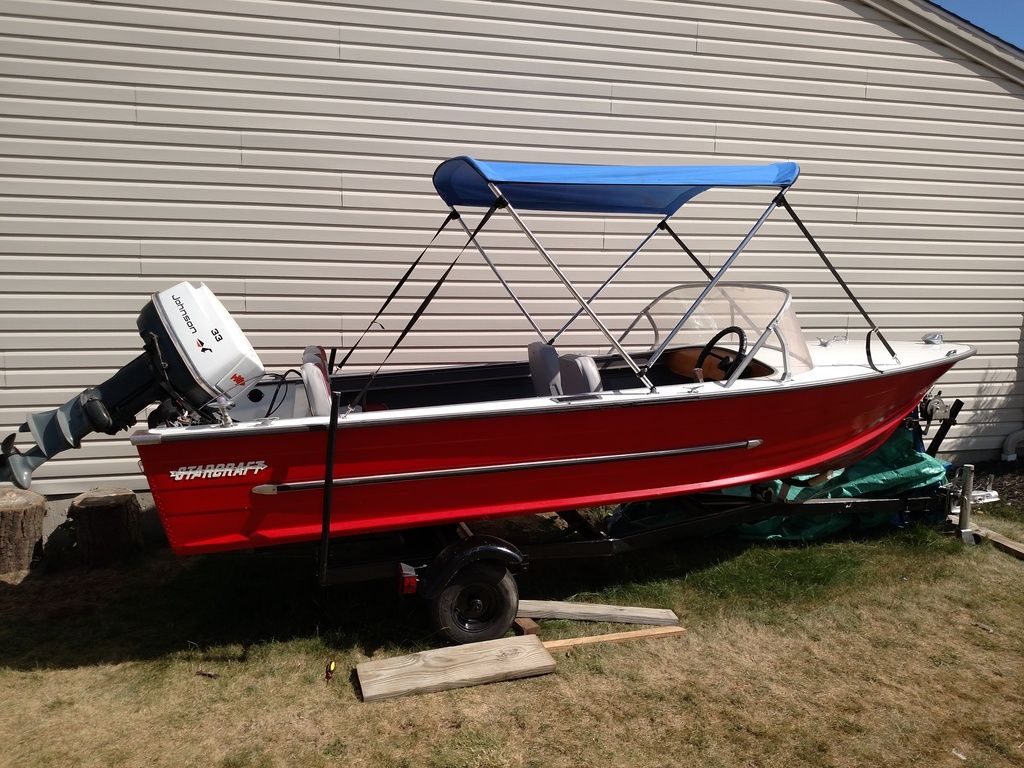


He's couple more of my girls, from all the rush and excitement I forgot to take the pic of the actual splash but it was awesome as you can see;



Few Problems:

Not sure why but having the motor in far slow position, the motor slowly slowly and died... It started back in nutral and sounded perfect but yeah every time it died while in the slowest possible setting forward or reverse.

Also almost lost the motor since it never clamped when I dropped it. Put it in reverse and the thing hopped out of the water.

Another issue was that it was running a little shaky and rough ... What do I tweak for slightly smoother operation in idle or slow moving?

Got some testing and tweaking coming this week. Overall, happy very happy faces :)


jbcurt00

Moderator
Staff member
Joined
Oct 25, 2011
Messages
25,034
Post as many details you can over in the outboard forum. They'll help you get it sorted.

Congrats on the splash, smiles all around, rough running or not!
 
Last edited:
Top