1966 Starcraft Holiday Interior Work

66Holiday924

Chief Petty Officer
Joined
Aug 21, 2017
Messages
525
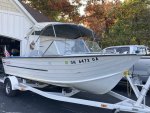
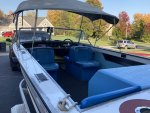
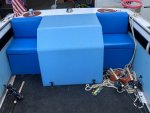
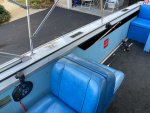
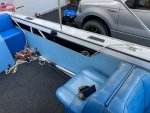
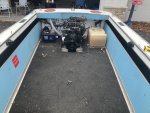
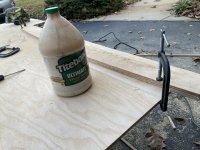
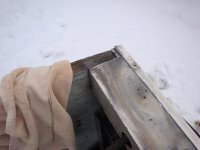
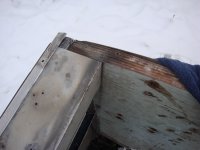
Hi, I'm back, and I'm ready to finish up on a lot of the cosmetic work that's left on my boat. If everything goes well I'd like to spend the next couple of months getting it ready to go to the shop and have the side panels, engine cover, jump seats, and some of the other cosmetics rebuilt/fixed. I hope by the end of December I can have a new floor installed and ready to go. I will not be trying my hand at reupholstering.

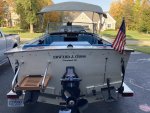
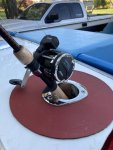
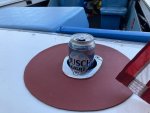
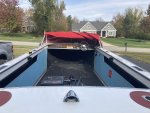
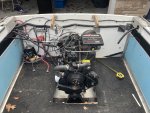
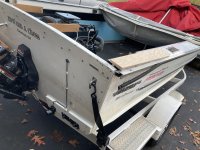
With that said, my boat has been performing pretty good since the close of my last project (transom rebuild). It seems to be pretty mechanically sound (for a 50 year old boat with a 30 year old engine in it). One of my favorite upgrades since my last post is my SS Cupholder/rod holders. They are heavy, heavy, duty and come in handy.
 

Attachments

  • IMG_0161.JPG
    IMG_0161.JPG
    3.7 MB · Views: 83
  • IMG_0162.JPG
    IMG_0162.JPG
    3.4 MB · Views: 82
  • IMG_0163.JPG
    IMG_0163.JPG
    2.9 MB · Views: 84
  • IMG_0164.JPG
    IMG_0164.JPG
    3.4 MB · Views: 84
  • IMG_0165.JPG
    IMG_0165.JPG
    2.7 MB · Views: 72
  • IMG_0166.JPG
    IMG_0166.JPG
    4 MB · Views: 70
  • IMG_0167.JPG
    IMG_0167.JPG
    4.3 MB · Views: 67
  • IMG_0168.JPG
    IMG_0168.JPG
    1.3 MB · Views: 63
  • IMG_0169.JPG
    IMG_0169.JPG
    2.7 MB · Views: 76

66Holiday924

Chief Petty Officer
Joined
Aug 21, 2017
Messages
525
I'm going to add a stereo to the boat. I don't want anything that's super loud. Basically a good quality stereo with sound equivalent to a factory car stereo would be great. The speakers are going to be mounted in the side panels when they are re-built. Any recommendations are appreciated.
 

classiccat

"Captain" + Starmada Splash Of The Year 2020
Joined
Dec 20, 2010
Messages
3,405
Welcome back! That looks like a fun cruisin' rig! That paint still has a nice shine to it.

I use a portable bluetooth bose speaker and my smart phone...No assembly required! :cool:
 

66Holiday924

Chief Petty Officer
Joined
Aug 21, 2017
Messages
525
Out with the old. I spent a few hours today unloading the boat, taking out the seats, engine cover, and I removed my transom cap. My first order of business is the transom cap. It has holes, some pretty good dents in it, and I think I've talked myself into going a little wider with it. It's 14.5"now and I'm thinking about going up to about 30" so it's removed and I'm going to have that rebuilt.

I bought a rivet removing drill bit. It is specifically designed for rivet removal. It helps keep the drill from walking on you, and you can set the depth so that the drill only goes through the rivet head. I bought it for solid rivets but I tried it out on a few blind rivets today. It worked great! 👌
 

Attachments

  • IMG_0172.JPG
    IMG_0172.JPG
    4.2 MB · Views: 49
  • IMG_0173.JPG
    IMG_0173.JPG
    5.3 MB · Views: 44
  • IMG_0174.JPG
    IMG_0174.JPG
    2.2 MB · Views: 43
  • IMG_0175.JPG
    IMG_0175.JPG
    1.6 MB · Views: 38
  • IMG_0176.JPG
    IMG_0176.JPG
    1.2 MB · Views: 43
  • IMG_0177.JPG
    IMG_0177.JPG
    5.4 MB · Views: 49
  • IMG_0178.JPG
    IMG_0178.JPG
    5.9 MB · Views: 50

SHSU

Lieutenant Junior+Starmada Splash Of The Year 2019
Joined
Mar 8, 2017
Messages
1,658
Yep, I have one of those removal tools as well. They work great if you only have a couple to do. Trick for solid heads is to just a drill punch to give it a start. Just helps prevent that little bit of walking when it starts out.

SHSU
 

Watermann

Starmada Splash of the Year 2014
Joined
Jan 12, 2013
Messages
13,747
Yep, I have one of those removal tools as well. They work great if you only have a couple to do. Trick for solid heads is to just a drill punch to give it a start. Just helps prevent that little bit of walking when it starts out.

SHSU
I use a pilot point cobalt bit that I only use for aluminum, no walking and no need for center punch or special tools. My brazier head solids so far have had a nice dimple in the center. and then there's the Friday shift Stacraftsmanship :D

y4mAIdo4BF6FOqmm-uFwzznD481OooWA-oFrBI7GrD_KuNPr_z9sa8Xsj2GviK5Mf-Y6NZmNB4TekI7zTrK93qH6Japai807Z-I-oSRPvSxJUK7toQ4hcF9oBnxEb-t0LzojR-8p2bRW8Y7gGHD5zog0Ht6k0jHfOuqn7nsT2bc_hoMmNnCGmWQ3Ux7uU2Yw01-6AvW4yFgC2-gkfIVx2NRWw
 

SHSU

Lieutenant Junior+Starmada Splash Of The Year 2019
Joined
Mar 8, 2017
Messages
1,658
I use a pilot point cobalt bit that I only use for aluminum, no walking and no need for center punch or special tools. My brazier head solids so far have had a nice dimple in the center. and then there's the Friday shift Stacraftsmanship :D

LOL, I think its a requirement that Friday shift does at least a couple rivets on every boat.

The original rivets on ours didn't have the nice dimple, the replacements did. I think it was a difference between 1100F and 2117T4. I think the 2117T4 had the dimple, but not 100% sure.

SHSU
 

66Holiday924

Chief Petty Officer
Joined
Aug 21, 2017
Messages
525
A while ago I read somewhere not to fill my boat too much when I do the leak test, too much weight. Instead use a few inches of water, dye it red with food coloring so you can see it leaking, slosh it around, and circle the leaky rivets with a grease pen. Is that still the method people are using for that?
 

66Holiday924

Chief Petty Officer
Joined
Aug 21, 2017
Messages
525
I took the old transom cap in to a sheet metal shop yesterday. They're going to re-cut me a new one so I'll have fresh metal with no holes. I'm going wider. it's ~15" now and I'm going to go to ~30". Then, after I build a new support structure, lay out the new cap, and double check it, I'm going to have them punch out the large holes for my rod holders, light, fuel, etc. and they're going to bend me a couple new trim pieces to go across the front and back, that frame the cap.

It was kind of a tough decision to go wider because it's going to make the engine less accessible for repairs, but this is the way I (think :rolleyes:) I want my boat laid out. I'm trying to think of a way to make the transom cap easily removable. I have some thoughts on doing that, open to suggestions.
 

Watermann

Starmada Splash of the Year 2014
Joined
Jan 12, 2013
Messages
13,747
I would frame the cap with angle AL and make it removable by latches or pins. Only issue to overcome is for it to have that slight curve needed to fit properly over the transom.
 

66Holiday924

Chief Petty Officer
Joined
Aug 21, 2017
Messages
525
I would frame the cap with angle AL and make it removable by latches or pins.

I was thinking about framing it with aluminum too. The only option to do that might be to weld it on though, because it needs to be able to lay flush.
 

SHSU

Lieutenant Junior+Starmada Splash Of The Year 2019
Joined
Mar 8, 2017
Messages
1,658
I was thinking about framing it with aluminum too. The only option to do that might be to weld it on though, because it needs to be able to lay flush.
Can you lay most of the panel flush with rivets to an aluminum frame and cut out a section over the engine bay to create a removable cover?

+1 @Watermann suggestion for removable cap
Looking back I wish I had thought more about how I secured my corner caps. I was worried about losing them if I used a simple rivet, so I over secured with SS and Nyloc nuts. Didn't think I would want/need to replace the rub rail so quickly.... Let just say lessons learned about the surf and being tied up to tight to a dock.... With that said, because of this getting the caps off will be a pain, but I am confident they wont pop off either. lol

SHSU
 

66Holiday924

Chief Petty Officer
Joined
Aug 21, 2017
Messages
525
Can you lay most of the panel flush with rivets to an aluminum frame and cut out a section over the engine bay to create a removable cover?

No it won't lay flush. The transom cap lays on the gunnel... I have a plan. I started ordering the hardware... I guess we'll see how this works out.

I ordered some of these SS threaded inserts: 1603453726702.png
As of now, my plan is to tuck the cap under the rub rails and then use the threaded inserts to bolt it down across the transom wood and forward support framing. My engine should be pretty accessible to do maintenance on, but for the occasions that more access is needed I'll have to unbolt it across the front and back trim pieces, unbolt the cleats, and disconnect my aft light, blower, and fuel fill, basically everything that is currently involved with removing the cap, but the inserts will allow it to be done repeatedly without hurting the aluminum or chewing up the wood. It sounds like a hassle but I think it's about the best I'm going to be able to do...
 

66Holiday924

Chief Petty Officer
Joined
Aug 21, 2017
Messages
525
I got a little bit of work done on the boat over the weekend. I cut a couple of pieces of 1/2" marine grade ply to fit under the last 30" of my gunnels. One of the problems I had after my transom rebuild was that aluminum seemed kind of flimsy back there. So I'm beefing it up a little bit, plus they will serve as something really solid to anchor my rear cleats to. I also cut, laminated, and polyurithaned two pieces of the ply for what will be my new forward support under my transom cap. Just waiting on my new transom cap now. It should be finished today or tomorrow.

I have to say, I moved to Michigan since my last project and getting Marine Grade Plywood was much easier this time than last. I got it at a big box store where you can "save big money at". It is the real deal too. It's the same species I got last time, Douglas Fir. I couldn't believe they stocked it there. Boating is big where I live though.
 

Attachments

  • IMG_0182.JPG
    IMG_0182.JPG
    1.9 MB · Views: 1
  • IMG_0183.JPG
    IMG_0183.JPG
    4.3 MB · Views: 26
  • IMG_0184.JPG
    IMG_0184.JPG
    6.1 MB · Views: 1
  • IMG_0185.JPG
    IMG_0185.JPG
    3.9 MB · Views: 24
  • IMG_0186.JPG
    IMG_0186.JPG
    2.6 MB · Views: 0
  • IMG_0187.JPG
    IMG_0187.JPG
    6 MB · Views: 18
  • IMG_0188.JPG
    IMG_0188.JPG
    3.9 MB · Views: 1

Watermann

Starmada Splash of the Year 2014
Joined
Jan 12, 2013
Messages
13,747
One thing that causes the gunnels to have flex when stepped on while boarding, is the distance without support from the gunnel to the side tray. A support can be added where the step pad is to lessen that give.
 

SHSU

Lieutenant Junior+Starmada Splash Of The Year 2019
Joined
Mar 8, 2017
Messages
1,658
While not the same build, my gunnels really stiffened up when I installed the splashwell. So for you, I am wondering if the frame you talked about making for the dog house and such will help with that as well.

SHSU
 

66Holiday924

Chief Petty Officer
Joined
Aug 21, 2017
Messages
525
Part of the problem is during the transom build. I had to cut the piece of my gunnels that rests on top of my transom, to slide the wood in and out. So, a lot of support was lost. I'm going to reinforce those corners and I think that's going to help out a lot.
 

Attachments

  • DSC04318.JPG
    DSC04318.JPG
    2.7 MB · Views: 14
  • DSC04319.JPG
    DSC04319.JPG
    2.6 MB · Views: 14
Top