1966 MFG Rebuild

kcassells

Fleet Admiral
Joined
Oct 16, 2012
Messages
8,732
Well, you could do the bilge and the scuppers. Just need to see how it'll sit in the water. You can always plug the scuppers up if need be.
 

demarko210

Chief Petty Officer
Joined
Jan 2, 2015
Messages
628
Might not be possible since the deck is at the water line and not above. The brown of the under side of the boat is where the deck gets glued to the hull. Big engine will have me squat in the water. I will not try it.

Didnt hardly get anything done yesterday. Went over twice and forgot to bring a marker both times to measure. I did add strings along the floor line every 20 inches or so from port to starboard. I have about 8-10 down giving me original deck height and showing how much space below the hull.

Shed was ok.
 

Mark_VTfisherman

Lieutenant
Joined
Nov 29, 2008
Messages
1,489
Driving screws in on both sides of the boards.
Most old fg boats (well aluminum, too) have so many stinkin’ holes it probably doesn’t matter.
You can tigerhair-bondo all the holes, sand the thing flat, and then hit it with a layer of 6oz and problem solved.
Of course I haven’t read through yet and you mighta already done something…
 

demarko210

Chief Petty Officer
Joined
Jan 2, 2015
Messages
628
Most old fg boats (well aluminum, too) have so many stinkin’ holes it probably doesn’t matter.
You can tigerhair-bondo all the holes, sand the thing flat, and then hit it with a layer of 6oz and problem solved.
Of course I haven’t read through yet and you mighta already done something…
I had a hole off the side of the keel. I fixed that, placed some plastic tape on the outside of the hull. Grinded out about double the size of the hole. Added 5 layers of CSM from small to large. Then added a layer of 1708 on top. I have not gotten to the underside of the hull yet. The rest of the inner hull will be bonded with a layer 1708 before placing the stringers down.
 

demarko210

Chief Petty Officer
Joined
Jan 2, 2015
Messages
628
Resin came in yesterday. Got 1 layer of 1708 on the transom. I will need to do some sanding before the next layer. Brought over the 1 fin roller and it was a fat one. Meant to bring that fat one, 2 small on 1 corner roller. I will grind out a few spots with the 1" Makita belted sander and fill with CSM.

I hate doing large pieces of fabric I never can tell how much resin I need. One large piece looks better than seeing where pieces overlap but they both work. I wet out the 1708 with about 6oz and the other 4oz went on the transom, hulls side and bottom to wet out. Got the fabric tacked up now I need another 6oz to wet out the back side or 8oz. I was bouncing around like my pants was on fire.

I added some ratchet straps across from port to starboard hooked to the trailer to line up the gunwales so I will not have any issues with expansion with the top cap cut off while glassing the transom to the sides. I will add one more layer of 1708 and move on to glassing the hull bottom.
 

demarko210

Chief Petty Officer
Joined
Jan 2, 2015
Messages
628
I am noticing that the first 2 gallons of Total Boat Polyester resin from Amazon is not staying tacky when I return the next day. When I return its a slick as it can be minus the stitches from the 1708.
 

todhunter

Canoeist
Joined
Sep 15, 2020
Messages
1,316
Give it an acetone wipe. If it isn't tacky after that, you may have gotten finishing resin (resin with wax additive).
 

demarko210

Chief Petty Officer
Joined
Jan 2, 2015
Messages
628
Grinded out the bubbles in the corners where I filled the gaps between the transom and hull with putty from not having the right fin roller when I did the first layer. Makita made light work of the new 1708 with little noise, love this sander.
 

demarko210

Chief Petty Officer
Joined
Jan 2, 2015
Messages
628
Added a second layer of 1708 on the transom. With the second layer the inside skin looks thicker than the outside. I am planning on added 1 1708 and 1 layer of csm on the outside.
Went on and started glassing the hull with a layer of 1708 instead of making templates. I figured this will need to be done after the templates so I got started. I learned doing wet on wet with poly do not overlap or you will be chasing bubbles every which way the overlap. I cut 1708 into 12" by 50" took exactly 12oz of resin with 4" 3/8 nap roller. I left some space between the layers. When I glass the stringers it will fill these areas. I still have not decided if I am going to do North South stringers, or East West bulkheads or combo of both.
https://drive.google.com/file/d/1NfvElcyHcS05Ry36lBSXC2VfHlhpV4lZ/view?usp=sharing

Funny thing I wanted to place boat on my jackstand when glassing the hull as the hull flexes when I stand on it but I looked under the boat and it setting on the bow roller part of the trailer where the drain plug is. And at the bow the bow hook to winch on the trailer its setting on that hook. So the boat is on the trailer wrong but the hull is free and rocks side to side like a swivel. Glass from the back and now when I stand on it no flexing (145lbs).
 
Last edited:

demarko210

Chief Petty Officer
Joined
Jan 2, 2015
Messages
628
I purchase these jack plates years ago when working on my Grady but never used them. 4" setback up to 5" inch left. I was thinking about adding this on the transom. It would not restrict me to just getting a 20" engine I could go to 25".
I also was thinking about rigging... I notice most center consoles have a rigging tube that runs under the deck. I was looking at how some whalers are set up and they run a large diameter tube down the keel some opening at the console and running to the bow. The boat when I purchase had the steering cable running along the gunwale starboard and down to the floor where you can step on it and then under the console. It was originally a dual console. That will not be happening with this.
 

demarko210

Chief Petty Officer
Joined
Jan 2, 2015
Messages
628
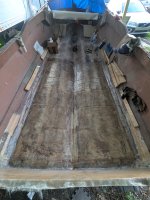
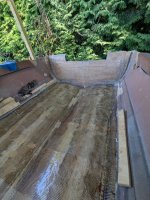
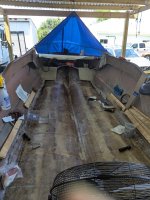
Been some time posting these images. Transom is in but not sealed all the way. Want to wait until I see how much filler I will need when I place the splash well back on. The floor is glassed. I still have one section in the bow to glass in.
Where you see those 2x4 i removed that lip there and now need to grind the glass off as this is where the deck will rest to the hull. I am unsure how I will place the stringers/bulkheads in. I dont want to rush so I am still planning my route of attack.
 

Attachments

  • PXL_20240825_232857918.jpg
    PXL_20240825_232857918.jpg
    3.7 MB · Views: 13
  • PXL_20240825_194540591.jpg
    PXL_20240825_194540591.jpg
    4.6 MB · Views: 13
  • PXL_20240827_170436969.jpg
    PXL_20240827_170436969.jpg
    3.8 MB · Views: 13

kcassells

Fleet Admiral
Joined
Oct 16, 2012
Messages
8,732
Dee, you are on a roll. Keep at it cause the Hawk is on it's way. looking good as usual.
 

demarko210

Chief Petty Officer
Joined
Jan 2, 2015
Messages
628
Dee, you are on a roll. Keep at it cause the Hawk is on it's way. looking good as usual.
I will mostly be grinding and cutting wood over the winter. If I do any glass work that mean I am bored an have extra money to spend on heat lamps etc. I am only $1500 in so far boat included. I am keeping a spread sheet on material cost.
Hope the family is doing good.
 

kcassells

Fleet Admiral
Joined
Oct 16, 2012
Messages
8,732
On mine I knew I was in for the long haul. I don't even want to know what I spent.
Thanks for the 'Well Wishes" ole man.
 

demarko210

Chief Petty Officer
Joined
Jan 2, 2015
Messages
628
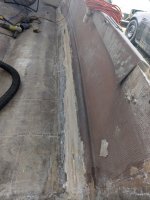
Went over yesterday before the Commanders game to grind down the one side of the bottom of the hull with 40 grit and angle grinder. Grind down the hull inner chines where the deck will come in contact with the hull. Smooth out my rough edges of 1708 i put down and grind down the old thicken resin from the old deck. I will fine tune it with my Makita with some 40 and then 80 grit where I can get in the tight space better. I did put a small gash in the chine that went through the hull. You can see it toward the transom about a foot or 2 forward. No worries just got me thinking is this hull that dam thin or was I not paying attention to the colors I was grinding. Well it will be fixed either way a layer of 1708 up the side will take care of it. As with the bottom of the hull, the 2 chines will get 2 layers of 1708 once preped. I will get the other side sometime this week.
 

Attachments

  • PXL_20241106_174440145.jpg
    PXL_20241106_174440145.jpg
    3.7 MB · Views: 10
Top