1966 MFG Rebuild

todhunter

Canoeist
Joined
Sep 15, 2020
Messages
1,316
Looks like thickened resin to me, or some other kind of adhesive. When demo'ing my boat, I found several things were stuck to the inside of the hull with an adhesive that reminded me of body filler. It was just a temporary adhesive to hold things in position until the glass was laid. I ground it all away and used thickened resin to stick things in place when I rebuilt.
 

demarko210

Chief Petty Officer
Joined
Jan 2, 2015
Messages
628
Looks like thickened resin to me, or some other kind of adhesive. When demo'ing my boat, I found several things were stuck to the inside of the hull with an adhesive that reminded me of body filler. It was just a temporary adhesive to hold things in position until the glass was laid. I ground it all away and used thickened resin to stick things in place when I rebuilt.
whatever it was its setting in that ridgid vacuum cleaner now. Mines kinda had some stuff that was black or turned black later that was glued to the hull also.
 

demarko210

Chief Petty Officer
Joined
Jan 2, 2015
Messages
628
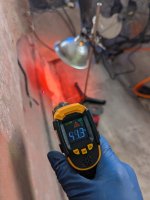
Went over yesterday and tested the heat lamps. Only tested 1 lamp in a small section while doing work on my other trailer. Surface temps were at 34 degrees and end up at the time I unplugged 72. Image was about 10 minutes after starting. I have a cooler with a heat pad to keep the resin warm.

I watched this video video fan of these guys channels. I dont think I want to hang around after laying the glass for 4 hours just watching it cure. Summer I usually glass and come back in 4 hours lol. I m thinking since the hull is not that thick, I can put the lamp on the outer side of the hull where I need to work. I will need to find something else to do while this cures. I will without a doubt need to wrap the shed up from the elements if I do this.
 

Attachments

  • PXL_20241218_171740044.jpg
    PXL_20241218_171740044.jpg
    2.1 MB · Views: 6
  • 1734605772861.png
    1734605772861.png
    565.1 KB · Views: 4
Last edited:

todhunter

Canoeist
Joined
Sep 15, 2020
Messages
1,316
Went over yesterday and tested the heat lamps. Only tested 1 lamp in a small section while doing work on my other trailer. Surface temps were at 34 degrees and end up at the time I unplugged 72. Image was about 10 minutes after starting. I have a cooler with a heat pad to keep the resin warm.

I watched this video video fan of these guys channels. I dont think I want to hang around after laying the glass for 4 hours just watching it cure. Summer I usually glass and come back in 4 hours lol. I m thinking since the hull is not that thick, I can put the lamp on the outer side of the hull where I need to work. I will need to find something else to do while this cures. I will without a doubt need to wrap the shed up from the elements if I do this.
Just be careful with the heat lamp when you're not around - make sure it can't fall over onto something flammable. I almost burned our house down when I was a kid when I turned on a heat lamp in the garage and it fell onto my dad's wooden workbench.
 

demarko210

Chief Petty Officer
Joined
Jan 2, 2015
Messages
628
Just be careful with the heat lamp when you're not around - make sure it can't fall over onto something flammable. I almost burned our house down when I was a kid when I turned on a heat lamp in the garage and it fell onto my dad's wooden workbench.
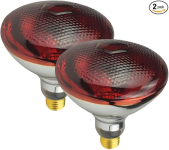
Yeah it may fall if a nice wind come through. I am not using the halogen bulbs they are Incandescent but they still make some heat. I will find something to do in the mean time as I plan ahead.
 

kcassells

Fleet Admiral
Joined
Oct 16, 2012
Messages
8,732
With epoxy I started with the heat lamp to cure and follow up the next day as I was doing something else. Epoxy eventually cures I'm not so sure about poly?
 

demarko210

Chief Petty Officer
Joined
Jan 2, 2015
Messages
628
With epoxy I started with the heat lamp to cure and follow up the next day as I was doing something else. Epoxy eventually cures I'm not so sure about poly?
I will see. I will try to fix that small hole I grind thru the hull. Small section just to try it out. Might have to get me one of those propane heaters.
 

demarko210

Chief Petty Officer
Joined
Jan 2, 2015
Messages
628
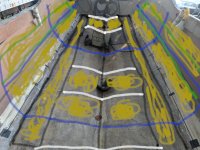
This will be my plans on laying out under my deck.

Legend:
Black-stringers
White-bulkheads
Blue-bulkhead with gunnel ribs
Green-rod storage cut out
Yellow-flotation foam

I plan to encase the gunnels down to the deck and fill with foam with a cut out for rod/gaff storage on the sides.

The console will set in the section after the vacuum I will leave the section without foam for now. That will be for batteries and rigging.

The stringers along the sides I will box of the top with some wood and fill with foam. That will give the deck a good platform on the edge and the bulkheads will in the center.

I will try to build from the deck up to the gunnels being prepared to make all new gunnels if the originals do not work right. If that be case will have to figure something out for the splash well.
 

Attachments

  • boatlayout.jpg
    boatlayout.jpg
    3 MB · Views: 7

kcassells

Fleet Admiral
Joined
Oct 16, 2012
Messages
8,732
This will be my plans on laying out under my deck.

Legend:
Black-stringers
White-bulkheads
Blue-bulkhead with gunnel ribs
Green-rod storage cut out
Yellow-flotation foam

I plan to encase the gunnels down to the deck and fill with foam with a cut out for rod/gaff storage on the sides.

The console will set in the section after the vacuum I will leave the section without foam for now. That will be for batteries and rigging.

The stringers along the sides I will box of the top with some wood and fill with foam. That will give the deck a good platform on the edge and the bulkheads will in the center.

I will try to build from the deck up to the gunnels being prepared to make all new gunnels if the originals do not work right. If that be case will have to figure something out for the splash well.
Mans on a mission!
 
Top