1963 75hp Starflite Rebuild

yorab

Ensign
Joined
Jul 6, 2002
Messages
960
Re: 1963 75hp Starflite Rebuild

Thanks ezmobee. I just hope she runs as good as she looks ;)

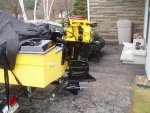
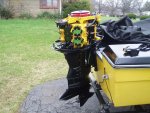
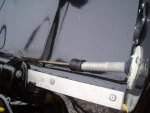
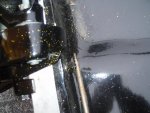
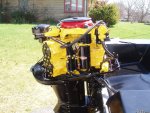
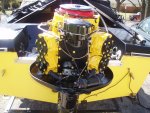
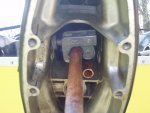
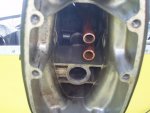
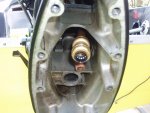
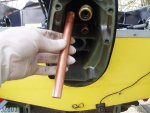
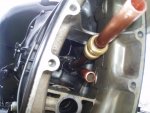
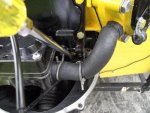
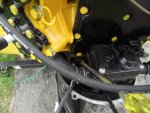
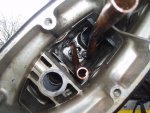
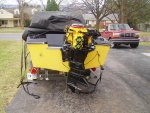
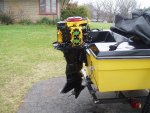
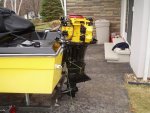
Next I attached the lower unit. I had some trouble with the inlet water pipe interfering with the inner exhaust cover plate through which the shift wires pass. The pipe must have been bent a bit when the motor was disassembled and was now routed just inside of the access hole, close enough to the hole so that I couldn't get the deep-profiled cover plate into position. It took me two tries with the help of a buddy but we were successful. The second time, I fed the cover onto the wires and slid the cover into place, securing it with one of the screws. Then my buddy and I guided the water pipes into the pump grommets as we slid the lower unit home. I also pulled the shift wires through the cover plate as the lower unit was slid up against the extension.

EDIT: As noted in post #98, the inlet and outlet water pipes were switched between the starboard and port sides of the adapter plate. This incorrect routing of the pipes explains why the I was having difficulty installing the deep-profiled cover plate.
 

Attachments

  • 008.jpg
    008.jpg
    133.3 KB · Views: 2
  • 012.jpg
    012.jpg
    137.4 KB · Views: 2
  • 002.jpg
    002.jpg
    149.5 KB · Views: 2
  • 001.jpg
    001.jpg
    149 KB · Views: 2
  • 003.jpg
    003.jpg
    148.1 KB · Views: 2
Last edited:

yorab

Ensign
Joined
Jul 6, 2002
Messages
960
Re: 1963 75hp Starflite Rebuild

...then the front lower motor tray and all of the hoses. I was lucky that some folks on the forum were able to steer me in the right direction as far as hose routing goes.
 

Attachments

  • 016.jpg
    016.jpg
    151.1 KB · Views: 2
  • 017.jpg
    017.jpg
    151.5 KB · Views: 2
  • 014.jpg
    014.jpg
    150.7 KB · Views: 2
  • 015.jpg
    015.jpg
    150.5 KB · Views: 2
Last edited:

Mas

Lieutenant Commander
Joined
Oct 3, 2006
Messages
1,656
Re: 1963 75hp Starflite Rebuild

By the way, how did you get the inside of the exhaust leg so clean??

Mas
 

yorab

Ensign
Joined
Jul 6, 2002
Messages
960
Re: 1963 75hp Starflite Rebuild

When I had everything disassembled, I used engine degreaser and a few rags on the exhaust tubes. Since they would not be seen after reassembly, I wasn't especially worried about the looks. I just wanted to clean them up so that I wouldn't get muck all over the place when it came time to reassemble.
 

Willyclay

Captain
Joined
Sep 8, 2006
Messages
3,273
Re: 1963 75hp Starflite Rebuild

Super job all around! Did you have this motor previously mounted on the same boat and connected to the steering system pictured? The reason I ask, although with everything painted black it is a little difficult to tell, is the bracket for connecting the steering cable telescopic ram to the motor looks like the older-style cable & pulley system bracket instead of the Teleflex part I used for my 1962 Johnson 75. The only downside may be the off-center connecting point which probably can be corrected by adjusting the support tube in the mounting bezel. Be very careful if the bracket was designed for a 40HP & under application. I can tell you that there was a big difference between the Teleflex parts for the higher and lower horsepower applications. I'll dig around my shop tomorrow and see what I can find that may help explain. Be safe!

EDIT: I looked everywhere but could not come up with the Teleflex bracket for a J&E V4 or a part number. Thinking I gave it away since my 100HP uses a "tiller arm bracket". However, did find the installation instructions for the bracket that fits J&E 40HP or less. The bracket for your motor is basically the same only heavier material and a longer reach. Send me a PM with your email address and I will send you a scanned copy if you are interested. Good luck!
 
Last edited:

yorab

Ensign
Joined
Jul 6, 2002
Messages
960
Re: 1963 75hp Starflite Rebuild

Thanks Willyclay, PM sent. I did indeed have the old pulley style steering setup on my boat. I had a guy at a marina give me an old steering system for free that he pulled off of an old boat. The connection for the motor was boogered up so I made some homemade fixes. I stripped the end of the cable down to the basic ram with the threaded end. Then I threaded on what was basically an eye connector to the end of the ram. Finally, I bolted a clevis pin to the motor and I connected the eye to the clevis pin and used a cotter pin to hold it on. The setup worked well except that it didn't allow for the motor to be tilted while everything was hooked up. No problem--I simply disconnected the eye from the clevis pin when I tilted the motor.

That being said, I don't really know much about the steering systems. If anybody has any ideas, I'd be happy to listen.
 

Attachments

  • 017.jpg
    017.jpg
    137.6 KB · Views: 0
  • 016.jpg
    016.jpg
    137.7 KB · Views: 0

yorab

Ensign
Joined
Jul 6, 2002
Messages
960
Re: 1963 75hp Starflite Rebuild

ezmobee, I didn't use that clamp block. I had a shop make a connector for me that threaded onto the end of my steering ram. It had a through hole drilled that allowed it to slip over the clevis pin that I had on my motor bracket. I mounted the clevis pin into a plate which I then bolted up to the holes that were originally intended for the steering pulley s-hooks. I've lost that connector and the plate with the clevis pin, so I'll have to either make a new one or else go with something that is more standard. How exactly does that clamp block in the above link work?
 

yorab

Ensign
Joined
Jul 6, 2002
Messages
960
Re: 1963 75hp Starflite Rebuild

Here's a quick and dirty sketch of the eye connector that I had. I've also shown how my motor bracket is set up. You can see the holes where the pulley s-hooks attach. I used those holes to mount a plate that held a clevis pin.

The ram also has an outer sleeve that is not shown in my earlier pic. After the connector is attached to the threaded end, the outer sleeve is slid over the end of the connector and a set screw is used to hold the outer sleeve in place.
 

Attachments

  • eye.bmp
    51.9 KB · Views: 0
  • bracket2.JPG
    bracket2.JPG
    37.2 KB · Views: 0

yorab

Ensign
Joined
Jul 6, 2002
Messages
960
Re: 1963 75hp Starflite Rebuild

Here's the motor with the coil and all of the wiring in place. The only thing left at that point was the spark plugs and high tension leads. If I had more time, I'd replace the wiring. I notice that some of the insulation is not great. I'll get to that someday, but I don't have time to make up a harness now.
 

Attachments

  • 003.jpg
    003.jpg
    149.8 KB · Views: 1
  • 005.jpg
    005.jpg
    150 KB · Views: 1
  • 004.jpg
    004.jpg
    154.6 KB · Views: 1
  • 001.jpg
    001.jpg
    150.6 KB · Views: 1
  • 002.jpg
    002.jpg
    151.5 KB · Views: 1

yorab

Ensign
Joined
Jul 6, 2002
Messages
960
Re: 1963 75hp Starflite Rebuild

I'd like to share a lesson that I learned here. I had a Helicoil backing out of the spark plug hole and I tried to fix it but I was unsuccessful. I took the old one out and replaced it without issue. However, when it came time to break off the installation tang, I reached for a pair of crappy needle nose pliers. Since it is so important that nothing drops into the cylinder, I strongly recommend that a very good gripping pair of pliers be used to break off the tang if you ever find yourself in this position. Of course the tang ended up dropping into my cylinder. I tried to feel for it with some pick tools, but I couldn't locate it. I thought that I had the piston at TDC so I decided to move the piston down into the bore so that then I could locate the tang and perhaps remove it. Turns out that the piston was not at TDC and the tang scratched the cylinder wall above the point where the piston ring seals against the cylnder wall. I was lucky that the scratch was not lower in the cylinder. I knew better but I didn't want to wait days for another head gasket to arrive by mail. I should have immediately removed the head, taken out the tang and been patient while my head gasket was being delivered instead of moving the piston with junk in the cylinder. I could have destroyed a lot of hard work in the blink of an eye simply because I wanted to get her started that day instead of waiting a few days longer. Patience truly is a virtue.

BTW, the pliers went immediately to the trash.
 

Attachments

  • 017.jpg
    017.jpg
    128.4 KB · Views: 0

yorab

Ensign
Joined
Jul 6, 2002
Messages
960
Re: 1963 75hp Starflite Rebuild

And don't forget the gear oil!
 

Attachments

  • 006.jpg
    006.jpg
    147.7 KB · Views: 1

yoster

Petty Officer 2nd Class
Joined
Aug 19, 2010
Messages
117
Re: 1963 75hp Starflite Rebuild

Well.... it has been about two weeks. You can't just leave us hanging with "I'm gonna start it today" - show us a pic of adding gear oil then leave! Come back, come back!! We want to hear and see this thing fire for the first time ever!!
 

yorab

Ensign
Joined
Jul 6, 2002
Messages
960
Re: 1963 75hp Starflite Rebuild

Okay, yoster, I'll get something up soon. I've had a few bugs lately that I've been working out. Once I get those worked out, I'll continue this thread until completion. If you want to know what's been going on, just search for yorab and you can read about some of the issues that I've been having. I'll condense them down and post final solutions to those problems in this thread once I have them worked out. Good to know that somebody besides me wants to see this thing scoot across the water.
 

Willyclay

Captain
Joined
Sep 8, 2006
Messages
3,273
Re: 1963 75hp Starflite Rebuild

Good to know that somebody besides me wants to see this thing scoot across the water.

What! You worried that ALL that yellow and black paint turned most people off?
 

yorab

Ensign
Joined
Jul 6, 2002
Messages
960
Re: 1963 75hp Starflite Rebuild

What! You worried that ALL that yellow and black paint turned most people off?

Well, not most people. Just those in Cleveland and Baltimore. Something tells me that they don't like Black & Gold so much ;)
 

yorab

Ensign
Joined
Jul 6, 2002
Messages
960
Re: 1963 75hp Starflite Rebuild

Okay, I'll try to get this finished up. So I had a problem with my starter. I disassembled it and found nothing wrong. After reassembling, the starter worked well. Perhaps it was an iffy connection.

I then took the boat to the lake for the first start. I didn't disconnect from the trailer; I just backed it in until the lower unit was submerged in order to get a large supply of cold water. Here's the video of the first start:

http://www.flickr.com/photos/jmm741/5651463647/in/photostream
 

yorab

Ensign
Joined
Jul 6, 2002
Messages
960
Re: 1963 75hp Starflite Rebuild

I noticed that after running for about 10 minutes that the top of the powerhead was getting much too hot. I didn't have an IR thermometer at the time, but when the paint starts to bubble, it's too hot. I disconnected the starboard-cylinder-bank-to-water-choke hose to watch for water flow. I was getting plenty of water flow but it was the wrong direction. I realized that I connected the inlet and outlet water tubes in reverse order during reassembly. On my motor, there is a shorter inlet pipe that connects the water pump body to the adapter plate and a longer outlet pipe that connects down behind the water pump and it also connects to the adapter plate. During reassembly, I couldn't remember if the inlet pipe connected to the port side or starboard side of the adapter plate. I guessed incorrectly. The shorter inlet pipe should connect to the starboard side.

This could have been a lot of work to remove the powerhead, pull the midsection and separate the adapter plate from the exhaust housing and then reverse the pipes. However, it must have been my lucky day because I was able to get a pipe cutter up into the exhaust housing to cut the longer pipe to size. I then used a copper push-fit connector to lengthen the shorter pipe. The shorter pipe was then routed to the starboard side of the adapter plate as it should have been. I replaced the lower unit and the pipes slid into the grommets nicely.
 

Attachments

  • 001.jpg
    001.jpg
    128.1 KB · Views: 0
  • 003.jpg
    003.jpg
    126.1 KB · Views: 0
  • 007.jpg
    007.jpg
    133.6 KB · Views: 0
  • 008.jpg
    008.jpg
    135.3 KB · Views: 0
  • 010.jpg
    010.jpg
    135.8 KB · Views: 0

yorab

Ensign
Joined
Jul 6, 2002
Messages
960
Re: 1963 75hp Starflite Rebuild

After switching the pipes, I took the boat back to the lake. Water flow was as it should be. I took the boat for it's maiden voyage. Following the break-in procedure in the FSM, I tried to run the motor at 3000 rpm for the first hour. All was well for the first 40 minutes until my girlfriend and I decided to stop and have a Subway sandwich about 2 miles down the lake from the launch. Of course, the motor would not start up again. The wind pushed us over to the side of the lake bordered by Bald Eagle Mountain and it was getting dark. 2 miles along a steep hillside in the dark didn't seem like fun but we got lucky that a passing boat recognized my ****-poor SOS signal from our flashlight and towed us back.

After testing for spark the next day, I traced the the problem to a bad ignition coil. I installed the ignition coil from my parts motor instead of the coil that only had a few hours on it that I originally had on my motor. It had been so long since I disassembled that I couldn't remember which was which.
 

yorab

Ensign
Joined
Jul 6, 2002
Messages
960
Re: 1963 75hp Starflite Rebuild

After replacing the ignition coil, I took it back to the lake to continue the break-in procedure. I finished the first hour at 3000 rpm with no problems. My girlfriend and I then stopped to eat a Subway sandwich.

The FSM says to run the motor at 4000 rpm for the second hour with 1-2 minute bursts of full throttle operation. Motor ran find at 4000 rpm. However, the first time I ran full throttle, the sound of the motor changed so I pulled back on the throttle. When I did that, it died. Upon restarting, I thought that the temps were too high so we rowed back to the launch. I also noticed water pooling on top of the thermostat housing mounting bracket as shown by the screwdriver in the pics and also shown in this video:

http://s952.photobucket.com/albums/ae10/yorab/?action=view&current=Leak.mp4

When I got back home, I found that the nut that secures the resistor wire to the positive terminal of the igntion coil was a bit loose. When I switched coils, I must have forgotten to tighten the nut. This was most likely the reason that the motor conked out.

I also retorqued the exhaust cover bolts. They needed it. That took care of the water leak. I also retorqued all the other powerhead bolts while I was at it as well as the flywheel nut.

Lastly, I was concerned with what I considered to be a "running too hot" condition. So I checked for water flow at the cylinder-to-water-choke hoses as well as at the head-to-thermostat-housing hoses. The water flow looked good as shown in these videos:

http://www.flickr.com/photos/29072032@N05/5694566851/in/photostream

http://s952.photobucket.com/albums/ae10/yorab/?action=view&current=DSCF0174.mp4

After buying an IR thermometer, I found that the cylinder bank reaches a temp of about 190 degrees at idle before the Vernatherm opens and allows cooling water to cool the cylinder bank back down to about 150 degrees. I've been told that the cooling is better while the boat is moving due to higher water pressure at the inlet . Therefore, I think that these temps are fine.
 

Attachments

  • Leak SB.jpg
    Leak SB.jpg
    141.7 KB · Views: 0
  • Leak Port.jpg
    Leak Port.jpg
    141.1 KB · Views: 0
Top