1963 75hp Starflite Rebuild

yorab

Ensign
Joined
Jul 6, 2002
Messages
960
Re: 1963 75hp Starflite Rebuild

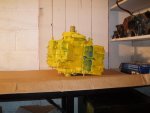
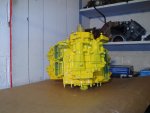
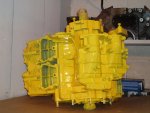
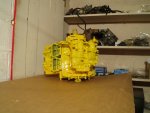
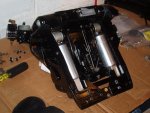
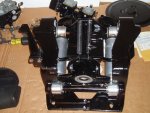
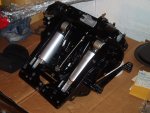
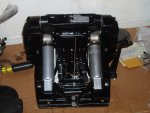
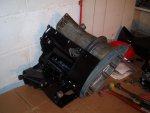
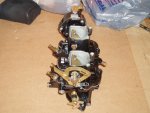
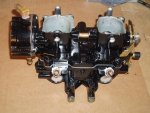
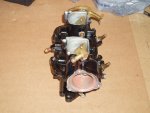
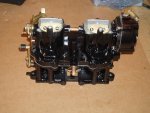
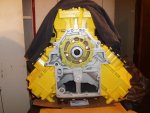
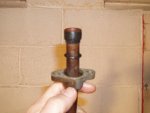
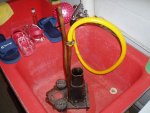
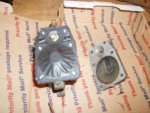
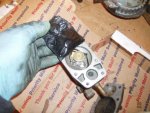
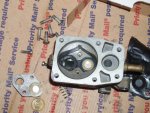
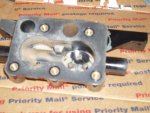
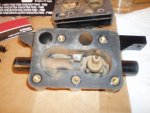
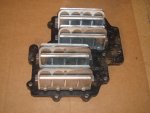
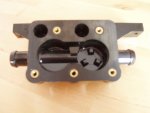
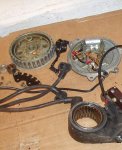
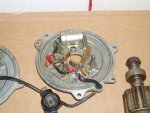
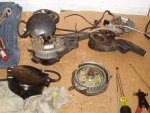
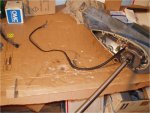
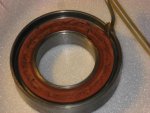
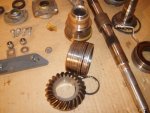
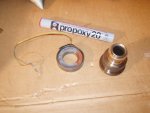
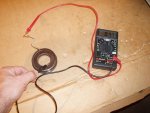
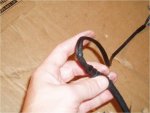
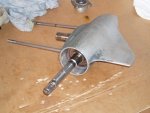
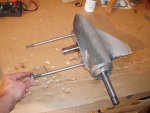
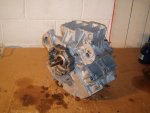
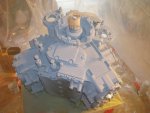
After bolting the powerhead back together, I attached the manifold and cylinder heads. Then I turned my attention to the swivel bracket. I pressed new pivot shaft seals and bearings into the swivel bracket. I replaced the shock absorber cylinders since the old ones had leaked and were useless. I also replaced my reverse lock lever since it was broken as well as the braided cable that attaches to it. I also learned that the braided cable should have a collar and a spring attached to it in order to prevent the lock lever from breaking when the motor hits a submerged object. Since my motor did not have the collar, this could be the reason that the lock lever was broken.
 

yorab

Ensign
Joined
Jul 6, 2002
Messages
960
Re: 1963 75hp Starflite Rebuild

I replaced the inner and outer exhaust tube to adapter plate gaskets as well as the water tube coupler gaskets. Instead of using a new OEM grommet where the water tube connects to the adapter plate, I used an oring. I connected a hose to each of the tubes to test this out and everything looked okay. No leaks. I also replaced the inner to outer exhaust tube gasket.

One thing that I learned was that the longer inlet water tube mounts to the port side of the adapter plate. At one point, I had both tubes disconnected and I didn't have any pics of how they connected. It was a bit of a challenge to find out how they connect, but somebody on the forum let me know.

I also learned that it is a bear to replace the large exhaust tube seal ring that is visible when the rear exhaust housing cover is removed. The first two that I tried to install broke. Finally, I was able to get the third seal installed but I needed help to get it into place. The extra set of hands helped to stretch the seal more uniformly so that it didn't break. One thing to remember: the seal must go over the top of the exhaust tube-not the bottom. It may look like the seal should go over the bottom, but it doesn't. The last pic shows one of the broken seal rings.
 

Attachments

  • P1010010.jpg
    P1010010.jpg
    144.2 KB · Views: 0
  • P1010029.jpg
    P1010029.jpg
    142.5 KB · Views: 0
  • P1010030.jpg
    P1010030.jpg
    146.5 KB · Views: 0

yorab

Ensign
Joined
Jul 6, 2002
Messages
960
Re: 1963 75hp Starflite Rebuild

I cleaned and rebuilt the carburetor. I followed the instructions in the service manual and everything went well. I made my own high speed jet removal tool instead of buying the OMC tool. It's simply a narrow-width and thick-bladed screwdriver. You can take a regular screwdriver and grind it down to fit the slot in the jet.

I also had to replace the throttle shaft spring. This required that I remove the throttle plates from the throttle shaft. I ground down the back side of the plate screws since they were staked. Then I removed the screws. Upon reinstalling, I used Loctite on the new screws.

I also rebuilt the fuel pump. Again, all went well by following the instructions in the service manual. One small problem that I ran into was that the fuel filter was wider than the glass bowl. This meant that I had to bend the filter in order for it to fit into the bowl. When I did, the bottom sealed edge of the filter cracked. I learned to bend the filter gently across its entire length before putting the fuel bowl into position.
 

Attachments

  • P1010053.jpg
    P1010053.jpg
    129.4 KB · Views: 0
  • P1010055.jpg
    P1010055.jpg
    136.5 KB · Views: 0
  • P1010062.jpg
    P1010062.jpg
    149.6 KB · Views: 0
  • P1010003 (2).jpg
    P1010003 (2).jpg
    137.4 KB · Views: 0

yorab

Ensign
Joined
Jul 6, 2002
Messages
960
Re: 1963 75hp Starflite Rebuild

I also checked out the reed box per the instructions in the service manual. Mine checked out so I didn't need to replace anything there except for the gaskets.

I noticed when I opened up the thermostat housing that one of the three nubs that support the Vernatherm was missing. The t-stat may have worked well without that one nub, but I didn't want to risk an overheat situation. I made a new nub from epoxy but it was bigger than the original nub. I was concerned that perhaps water flow would be restricted. I decided to replace the housing. As an added bonus, the newer housing had barbed hose connectors where the original did not even though the part number was the same.
 

Attachments

  • TStat 014.jpg
    TStat 014.jpg
    130.4 KB · Views: 0
  • TStat 012.jpg
    TStat 012.jpg
    128.5 KB · Views: 0
  • TStat 006.jpg
    TStat 006.jpg
    129.4 KB · Views: 0
  • 011.jpg
    011.jpg
    145.3 KB · Views: 0
  • March 008.jpg
    March 008.jpg
    152.3 KB · Views: 0

yorab

Ensign
Joined
Jul 6, 2002
Messages
960
Re: 1963 75hp Starflite Rebuild

I looked at the distributor assembly as well. I noticed that the bearings were not as smooth as they probably should be so I replaced the two distributor shaft bearings by pressing out the old bearings and pressing in the new ones. I also found a new distributor bracket with bearing on ebay that was not too expensive so I decided to replace it as well. However, when I looked closely at it, I noticed light rust on the outer race and dust collecting in the protective grease that the factory puts onto the needles. It turned out that the old bearing and bracket was better than the NOS one that I bought. Therefore, I cleaned up the old one and reused it.

I replaced the points, condensor and rotor. I also cleaned and tested the safety switch that mounts to the distributor bracket. Since my cap only had a few hours on it before I began this rebuild, I was able to reuse it but I did replace the high tension leads.

I also checked the condition of my distributor cam. The cam from my parts motor was cracked and would not have worked at all. You can see this in my first pic at the left side next to the pulley. If you zoom in, you can see the crack. I cleaned the cam that I was going to use and rubbed it with fine steel wool until it was smooth.
 

Attachments

  • Jan006.jpg
    Jan006.jpg
    142.6 KB · Views: 0
  • Jan008.jpg
    Jan008.jpg
    146.6 KB · Views: 0
  • Jan009.jpg
    Jan009.jpg
    147.6 KB · Views: 0
  • P1010068.jpg
    P1010068.jpg
    142.1 KB · Views: 0

yorab

Ensign
Joined
Jul 6, 2002
Messages
960
Re: 1963 75hp Starflite Rebuild

Then I reassembled the lower unit. Things went well following the directions in the service manual. I went with new bearings throughout as well as a new water pump. I reused the driveshaft, prop shaft, shift coils, shift springs, hubs and gears since they all checked out okay. I found two other problems though. First, the electric shift wires had a spot where the insulation was broken and the conductor exposed. I taped up that section well and used a good piece of shrink tube from the local electrical supply store. Secondly, I found that the epoxy insulation on the forward shift electromagnetic coil was cracked and chafed. I didn't want the damaged epoxy to break off an end up in the gearcase. I bought some new epoxy and applied it over the damaged areas of the original epoxy. This seemed to work well, but only time and use will determine how robust the repair really is. A handy trick that I learned was that the motor mount for my motor is perfectly sized to drive the forward coil into the torpedo.

When I put everything back together, I did a pressure test. I found that the propshaft seal was leaking. This surprised me since the gearcase head(this is often called the propshaft bearing carrier), seal and bearing were new. I've posted a video of the leak. I sprayed soap on the seal and bubbles began to form. The leak was around the OD of the seal. I contacted the place where I bought the gearcase head and they sent a new seal to me. When I installed the new seal, I used Scotchweld 847 on the OD. To my delight, all worked well with the new seal.
 

Attachments

  • Wires1.jpg
    Wires1.jpg
    111.6 KB · Views: 0
  • Coil.jpg
    Coil.jpg
    144.9 KB · Views: 0
  • Gear Reassembly 001.jpg
    Gear Reassembly 001.jpg
    135 KB · Views: 0
  • Gear Reassembly 035.jpg
    Gear Reassembly 035.jpg
    132.1 KB · Views: 0
  • Gear Reassembly 043.jpg
    Gear Reassembly 043.jpg
    144.4 KB · Views: 0

yorab

Ensign
Joined
Jul 6, 2002
Messages
960
Re: 1963 75hp Starflite Rebuild

and...
 

Attachments

  • Wires2.jpg
    Wires2.jpg
    65.3 KB · Views: 0
  • Gear Reassembly 042.jpg
    Gear Reassembly 042.jpg
    144.5 KB · Views: 0
  • Gear Reassembly 044.jpg
    Gear Reassembly 044.jpg
    143.5 KB · Views: 0
  • Leak 009.jpg
    Leak 009.jpg
    145.4 KB · Views: 0
  • Gear Dissasembly 040.jpg
    Gear Dissasembly 040.jpg
    145 KB · Views: 0

yorab

Ensign
Joined
Jul 6, 2002
Messages
960
Re: 1963 75hp Starflite Rebuild

Here are some vids. You may need Quicktime to play them. My camera creates movies in Quicktime format by default and my Windows Media Player wouldn't play them. Quicktime is available for free.

https://flic.kr/p/9u9yhg
 

yorab

Ensign
Joined
Jul 6, 2002
Messages
960
Re: 1963 75hp Starflite Rebuild

I also tested my stator for shorts and opens using the specs found in the service manual.

Well, that pretty much does it for the reassembly of the subsystems of my motor. I'll talk next about painting and the final assembly onto my boat.
 

Attachments

  • 019.jpg
    019.jpg
    145.1 KB · Views: 0

yorab

Ensign
Joined
Jul 6, 2002
Messages
960
Re: 1963 75hp Starflite Rebuild

I had my block bead blasted and it cleaned up very well--right down to bare metal. With all parts except for the block, I wanted the old paint to remain. I took the other motor parts to the local automotive shop to be cleaned in their spray cabinet. I didn't want them to be blasted because the blasting process removes all grime, grease and paint and takes the part down to bare metal. I figure that if the paint is still on there after 48 years, then it should make a great base coat so I didn't want it removed. Since I had the parts cleaned in one batch, the cost was very reasonable.

I used my buddy's shed for painting. I laid plastic on the floor and then I hung plastic from the rafters to make "walls" for my spray booth. Some of the parts such as covers could lay flat so I put a table in the spray booth. For the more 3-dimensional parts such as the lower unit, I used string to hang them from the rafters. The place looked like a meat locker for metal parts.
 

Attachments

  • Paint 001.jpg
    Paint 001.jpg
    148.2 KB · Views: 0
  • P1010001.jpg
    P1010001.jpg
    151.4 KB · Views: 0
  • P1010005.jpg
    P1010005.jpg
    133.7 KB · Views: 0
  • P1010003.jpg
    P1010003.jpg
    142.4 KB · Views: 0
  • P1010002.jpg
    P1010002.jpg
    140.1 KB · Views: 0

yorab

Ensign
Joined
Jul 6, 2002
Messages
960
Re: 1963 75hp Starflite Rebuild

I?m usually not a very good painter because I don?t have the supreme patience that it takes to get a good paint job and I simply don?t have much experience painting. But I was determined to give my motor a decent (though not perfect) paint job. I went with spray cans for the motor due to the ease of application and clean up. I?ve read that zinc chromate primer is the best primer to use but I didn?t want to deal with a spray gun so I bought self-etching primer in a spray can from the local auto parts store. I used the primer only on the areas that were down to bare metal. As I mentioned in an earlier post, I figured that if the original paint is still on there, then it should make for a good base coat so I didn?t cover it up with the new primer. Since the block was blasted down to bare metal, I had to completely coat it. I?ve shown the bare block and the block after primer.
 

Attachments

  • P1010145.jpg
    P1010145.jpg
    143 KB · Views: 0
  • Paint 006b.JPG
    Paint 006b.JPG
    109.5 KB · Views: 0

yorab

Ensign
Joined
Jul 6, 2002
Messages
960
Re: 1963 75hp Starflite Rebuild

I was born and raised in western Pennsylvania, close to Pittsburgh. Therefore, when I started the rebuild 3 and a half years ago, I had a picture in my mind of what I wanted the motor to look like when it was done. Sometime during my rebuild, I came across a thread started by jcsercsa that detailed his boat restoration. His restoration turned out really nice and it made me realize that it?s possible to make your boat or motor look like anything you want. I guess you could say that his detailed thread gave me some inspiration, though I still can?t figure out why anybody would paint a boat the color of the Detroit Redwings when there is so much Black & Gold paint out there ;)

Anyway, I bought Plastikote engine enamel in Hot Rod Yellow as well as Moeller Mercury Phantom Black. I painted the block yellow. One mistake that I made with the block was that I should have gone over the darker-colored self-etching primer with a light-colored primer before applying the yellow. The dark primer showed through the yellow even after 5-6 coats. My inexperience led to that mistake. But all in all, it turned out okay. I wasn?t worried about painting the various covers yellow as can be seen in my pics.

If you?re an outboard purist or traditionalist, you?ll probably find my color scheme to be shocking. No original colors here. But hey, when you rebuild your motor, you can do whatever you want with it. I chose something that makes me smile :)
 

Attachments

  • Paint 020.jpg
    Paint 020.jpg
    140.1 KB · Views: 0
  • Paint 011.jpg
    Paint 011.jpg
    140 KB · Views: 0
  • Paint 015.jpg
    Paint 015.jpg
    137.2 KB · Views: 0
  • Paint 018.jpg
    Paint 018.jpg
    134.9 KB · Views: 0
  • Apply Yellow.jpg
    Apply Yellow.jpg
    134.5 KB · Views: 0

yorab

Ensign
Joined
Jul 6, 2002
Messages
960
Re: 1963 75hp Starflite Rebuild

Since I had a parts motor, I had an extra set of exhaust and water covers to use. The covers that you see on the block in my previous post are the spares and were only used to cover the block during painting. The covers that I ended up using are shown on my paint booth table in the pic. Those were painted with the self-etching primer and the Moeller Mercury Phantom Black. Then I replaced the yellow covers with the black ones. The nice thing about this method is that the bolts that secure the black covers were painted yellow when they held the yellow covers on. This makes for a nice contrast.
 

Attachments

  • P1010003.jpg
    P1010003.jpg
    142.4 KB · Views: 0
  • Block02.jpg
    Block02.jpg
    96.9 KB · Views: 0
  • Block01.jpg
    Block01.jpg
    80.1 KB · Views: 0
  • Block03.jpg
    Block03.jpg
    68 KB · Views: 0

yorab

Ensign
Joined
Jul 6, 2002
Messages
960
Re: 1963 75hp Starflite Rebuild

I forgot to mention that I also applied clear coat over all my parts. I didn't do this so much for the looks since the paint that I bought was very glossy, but I did it for protection. I don't want to get a drop of gas on the motor and end up with all of my paint running off.
 

yorab

Ensign
Joined
Jul 6, 2002
Messages
960
Re: 1963 75hp Starflite Rebuild

Here's what some of the other parts look like:
 

Attachments

  • P1010022.jpg
    P1010022.jpg
    144.3 KB · Views: 0
  • P1010023.jpg
    P1010023.jpg
    146.1 KB · Views: 0
  • P1010021.jpg
    P1010021.jpg
    143.7 KB · Views: 0
  • P1010020.jpg
    P1010020.jpg
    142 KB · Views: 0
  • P1010024.jpg
    P1010024.jpg
    142.9 KB · Views: 0

yorab

Ensign
Joined
Jul 6, 2002
Messages
960
Re: 1963 75hp Starflite Rebuild

and...
 

Attachments

  • 015.jpg
    015.jpg
    143.8 KB · Views: 0
  • 012.jpg
    012.jpg
    147.2 KB · Views: 0
  • 013.jpg
    013.jpg
    141.1 KB · Views: 0
  • 014.jpg
    014.jpg
    144.7 KB · Views: 0
  • 016.jpg
    016.jpg
    143.5 KB · Views: 0

yorab

Ensign
Joined
Jul 6, 2002
Messages
960
Re: 1963 75hp Starflite Rebuild

My girlfriend said that I needed some red on my motor so I promised her that I would use red. I decided to make the flywheel red. I think it turned out nice. It goes well with the other colors.
 

Attachments

  • 004.jpg
    004.jpg
    137.4 KB · Views: 0
Top