1961 Lonestar Flamingo - SPLASHED w/Pics

Woodonglass

Supreme Mariner
Joined
Dec 29, 2009
Messages
25,927
Re: 1961 Lonestar "Flamingo" - I finally Started w/pics

Re: 1961 Lonestar "Flamingo" - I finally Started w/pics

Most excellently & well spent time w/ numb fingers:)

How tall is that pyramid? And the seat posts you'll use.

Right now they're 6.5 inches. I'll be cutting down to 4.5 to allow for the post and the spring on the post. I want a total of 5.5" lift for the seat. Weather man said colder tomorrow so we'll see how much I get done tomorrow.
 

Jon Sob

Master Chief Petty Officer
Joined
Jun 11, 2011
Messages
827
Re: 1961 Lonestar "Flamingo" - I finally Started w/pics

Re: 1961 Lonestar "Flamingo" - I finally Started w/pics

Great work on the bench seat woody ...... it looks factory. Those are some good looking couch cushions ..... lol. Nice job!
 

JDA1975

Lieutenant
Joined
Aug 27, 2011
Messages
1,385
Re: 1961 Lonestar "Flamingo" - I finally Started w/pics

Re: 1961 Lonestar "Flamingo" - I finally Started w/pics

Awesome job wood, so glad to see ya found some time, and made the most of it!
 

lakelover

Rear Admiral
Joined
Mar 26, 2003
Messages
4,386
Re: 1961 Lonestar "Flamingo" - I finally Started w/pics

Re: 1961 Lonestar "Flamingo" - I finally Started w/pics

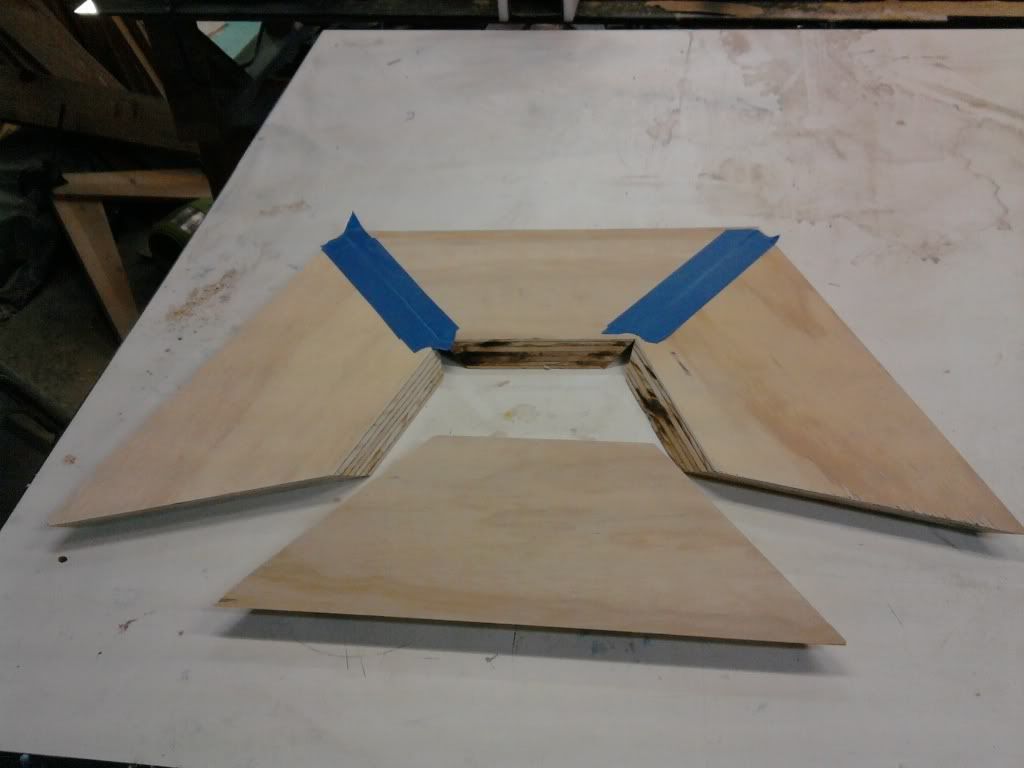
To make a pyramid you cut the bottom and top @ 45? and the sides are angled @ 30? and beveled @ 37.26? Here's a dry fit of how it turned out.

Is that all there is to it?! Why didn't I think of that? :D:D

All very impressive, Wood. I don't quite picture the finished pyramids, but I'll see the pics later. The seat frame looks great (as usual!) and I'm going to predict a "yes" on the center brace. If only for the reason that it can't hurt. I'd rather do something like that up front than fix it later.

Good luck on that weather!
 

Woodonglass

Supreme Mariner
Joined
Dec 29, 2009
Messages
25,927
Re: 1961 Lonestar "Flamingo" - I finally Started w/pics

Re: 1961 Lonestar "Flamingo" - I finally Started w/pics

The weather man LIED!!! I woke up to 10? windchill this morning. Looks like I'll have to fire up the Mr. Heater propane heat and MAYBE get out there this afternoon. We'll see.:rolleyes:
 

Jon Sob

Master Chief Petty Officer
Joined
Jun 11, 2011
Messages
827
Re: 1961 Lonestar "Flamingo" - I finally Started w/pics

Re: 1961 Lonestar "Flamingo" - I finally Started w/pics

Hey Woody .... what kind of heater are you using?
 

GT1000000

Rear Admiral
Joined
Jul 13, 2011
Messages
4,916
Re: 1961 Lonestar "Flamingo" - I finally Started w/pics

Re: 1961 Lonestar "Flamingo" - I finally Started w/pics

Weather Folk, Only good one's are long gone to the afterlife...
Learnt a loong time ago, best way to tell the weather is go outside...:rolleyes:
Glad to see you got some quality wood time, the seat bases and the bench frame are looking GRRRRR-8!:D
Hope it warms up for ya...
 

Woodonglass

Supreme Mariner
Joined
Dec 29, 2009
Messages
25,927
Re: 1961 Lonestar "Flamingo" - I finally Started w/pics

Re: 1961 Lonestar "Flamingo" - I finally Started w/pics

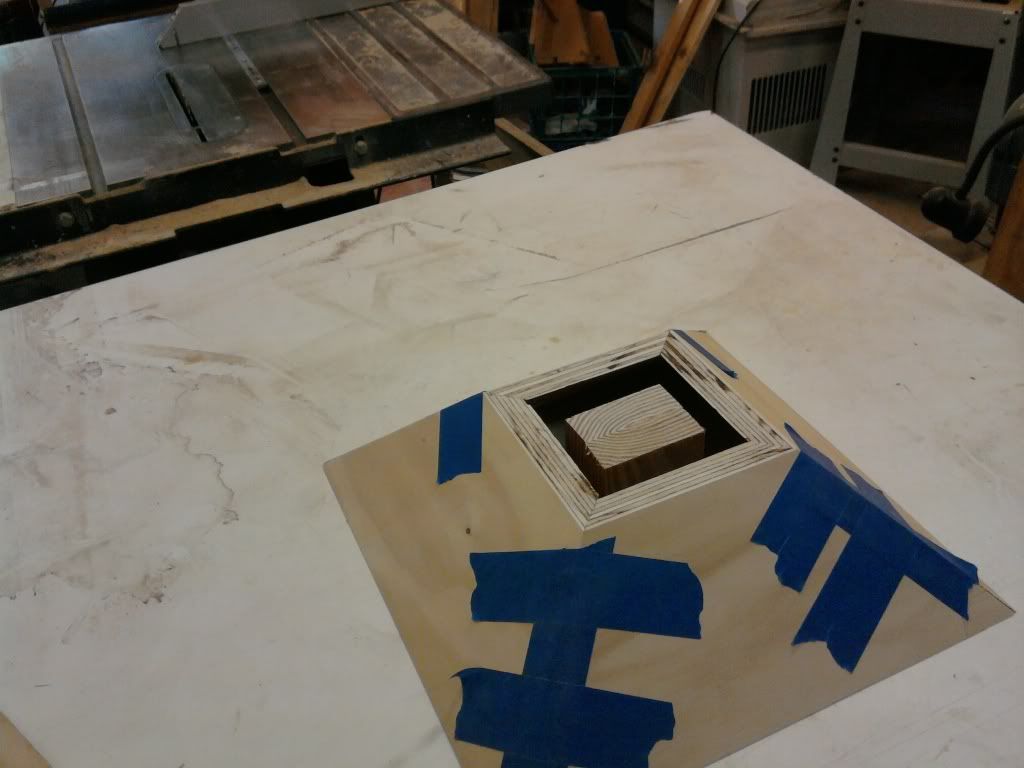
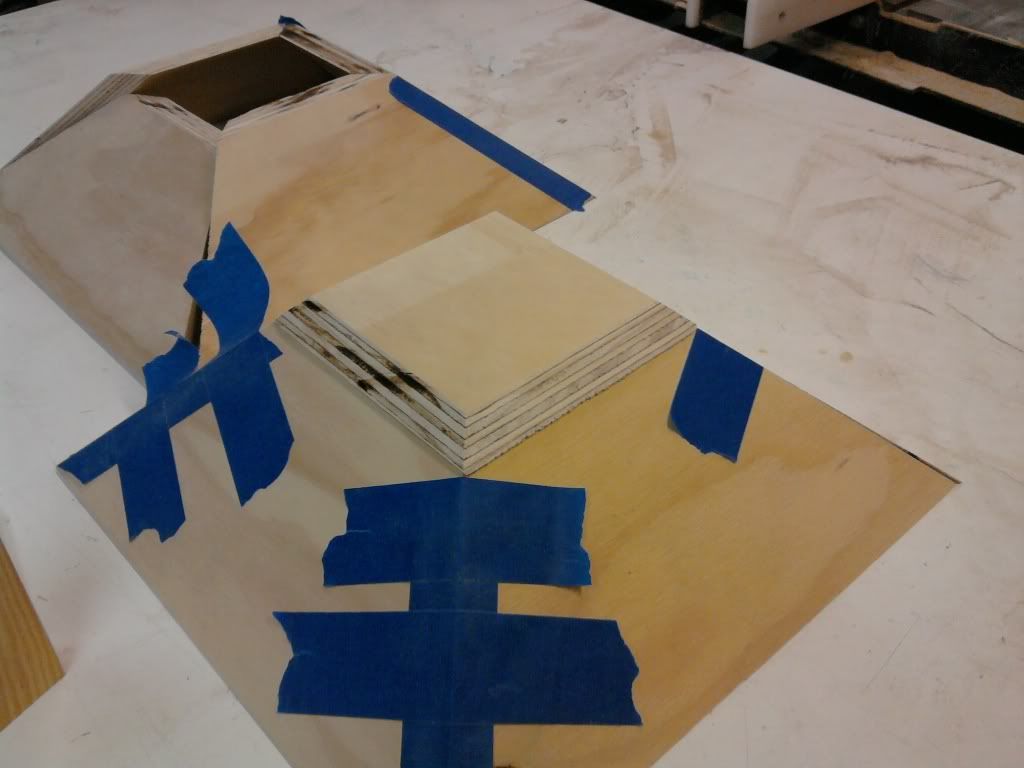
Well I got in a couple of hours today. Wife said since it was so cold I could do "Honey Do's" in the house. It finally got above 40 around 2:30 so I went to Lowes and bought some aluminum angle and stainless bolts and came home and hit the shop around 3:30. I cut out the other pyramid and the center block pieces and one of the top caps. Murphy showed up and I had to cut 6 triangles to get 4 that would work. Guess I was trying to hurry and make the best of the time I had. I then tried to use some masking tape to tape the pieces together. I learned from an old woodworker a while back that this was the best way to hold angled cuts in place for gluing and nailing. Here's some pics to illustrate the process.

Photo0365.jpg


This shows the center block it will have a 1" hold drilled into it and a 1" piece of pvc epoxied into it. It will then be glued and screwed to the top and bottom cap of the pyramid.
Photo0366.jpg


This shows the top cap. A bottom cap will be made as well.
As you can see, so cold that the tape won't stick worth a darn. To cold to glue and my Propane tank was almost empty. Didn't want to waste the time to go get it filled. Now the weather man says 50's tomorrow so maybe more work time then. 2 hours was NOT enuf time to get much done. But I guess it's better than nuttin.

Photo0367.jpg


This shows the top cap. A bottom cap will be made as well. 2 hours was NOT enuf time to get much done. But I guess it's better than nuttin.

JS, In my shop I use a Propane Mr. Heater and a regular Charcoal grill tank. It's this one.

Mr. Heater - America's Most Popular Portable Heaters

It heats my shop from 32? to 60? in less than an hour. My shop is 600 sq ft. I shut it off and since my shop is fully insulated 6" walls it holds the heat for 3-4 hours.
 
Last edited:

Mark_VTfisherman

Lieutenant
Joined
Nov 29, 2008
Messages
1,489
Re: 1961 Lonestar "Flamingo" - I finally Started w/pics

Re: 1961 Lonestar "Flamingo" - I finally Started w/pics

....I then tried to use some masking tape to tape the pieces together. I learned from an old woodworker a while back that this was the best way to hold angled cuts in place for gluing and nailing. .....As you can see, so cold that the tape won't stick worth a darn. ......

I don't use the blue/green/purple etc. tapes for tape-clamping as they don't stick well anyway. I suggest using real 3M regular manilla-colored paper masking tape. It will stick better and won't slip as the glue dries and it is more temperature tolerant. Plus, you can put it on "tight" and fold your edges together. Regular masking tape has a good enough hold to allow using a little 'stretch' while allowing glue to cure. (wood glue doesn't really dry- it cures.)
 

andgott

Master Chief Petty Officer
Joined
Sep 2, 2009
Messages
801
Re: 1961 Lonestar "Flamingo" - I finally Started w/pics

Re: 1961 Lonestar "Flamingo" - I finally Started w/pics

Those seat mounts are looking good- I can't wait to see them in the boat... I had to make some wood pyramids like that not too long ago, They were quite a pain in the *****... Thank god for wood filler :)

-Andrew
 

rrumba

Ensign
Joined
May 31, 2011
Messages
901
Re: 1961 Lonestar "Flamingo" - I finally Started w/pics

Re: 1961 Lonestar "Flamingo" - I finally Started w/pics

excellent work as usual WOG and thanks for the tip on the roll and roll. the roller made a HUGE difference
 

TruckDrivingFool

Lieutenant Commander
Joined
Jul 30, 2007
Messages
1,818
Re: 1961 Lonestar "Flamingo" - I finally Started w/pics

Re: 1961 Lonestar "Flamingo" - I finally Started w/pics

Nice progress for a couple hours work there Wood.

Two questions of curiousity - Why the epoxy vs. poly to seal these? Is the valspar clear coat or paint?
 

lakelover

Rear Admiral
Joined
Mar 26, 2003
Messages
4,386
Re: 1961 Lonestar "Flamingo" - I finally Started w/pics

Re: 1961 Lonestar "Flamingo" - I finally Started w/pics

Lookin' good, glad you were able to get some work in on it. Keep on truckin'!
 

kfa4303

Banned
Joined
Sep 17, 2010
Messages
6,094
Re: 1961 Lonestar "Flamingo" - I finally Started w/pics

Re: 1961 Lonestar "Flamingo" - I finally Started w/pics

Nice progress for a couple hours work there Wood.

Two questions of curiousity - Why the epoxy vs. poly to seal these? Is the valspar clear coat or paint?


when used without fiberglass, polyester resin is quite weak and can/will flake away in short order, whereas epoxy is more durable and does not require fiberglass. epoxy is usually a little more expensive up front, but most folks find that it's ease of use is worth it. plus, there are all sorts of things you can use any leftover resin used in the sealing of a transom, or the building a boat for (i.e. sealing seat pyramids, filling voids, etc...)
 

TruckDrivingFool

Lieutenant Commander
Joined
Jul 30, 2007
Messages
1,818
Re: 1961 Lonestar "Flamingo" - I finally Started w/pics

Re: 1961 Lonestar "Flamingo" - I finally Started w/pics

I guess what I was getting at was if he's valsparing it why even mess with the epoxy.
 

Woodonglass

Supreme Mariner
Joined
Dec 29, 2009
Messages
25,927
Re: 1961 Lonestar "Flamingo" - I finally Started w/pics

Re: 1961 Lonestar "Flamingo" - I finally Started w/pics

To install the pyramid bases I'm using epoxy for a couple of reasons. The angles of the bases makes layin mat and resin a difficult proposition at best. With epoxy I don't need mat or even cloth. Just two coats of resin and I'm good to go. I'll make some thickened epoxy to glue it to the deck an then use some 8 oz cloth to tab it to the deck @ about a 4" overlap. Sand and feather it all out and then give it two coats of Valspar with hardener and they should be there for decades. That's my theory at least.
 

MichaelP

Lieutenant Junior Grade
Joined
Apr 26, 2010
Messages
1,190
Re: 1961 Lonestar "Flamingo" - I finally Started w/pics

Re: 1961 Lonestar "Flamingo" - I finally Started w/pics

Nice work on those seat boxes, the joints look nice and tight. For extra strength you could make a batch of thick epoxy PB and shmeer it inside the corners and smooth out with a tounge suppressor. I would be tempted to loose the center support and cut a hinged hatch on one side and take advantage of the storage. As small as it may be it could be handy for CG stuff, a first aid kit or general dry storage.

Thanks for the tip on using the tape.
 

TruckDrivingFool

Lieutenant Commander
Joined
Jul 30, 2007
Messages
1,818
Re: 1961 Lonestar "Flamingo" - I finally Started w/pics

Re: 1961 Lonestar "Flamingo" - I finally Started w/pics

Never a doubt was just curious, sounds like a plan.
 

Woodonglass

Supreme Mariner
Joined
Dec 29, 2009
Messages
25,927
Re: 1961 Lonestar "Flamingo" - I finally Started w/pics

Re: 1961 Lonestar "Flamingo" - I finally Started w/pics

Nice work on those seat boxes, the joints look nice and tight. For extra strength you could make a batch of thick epoxy PB and shmeer it inside the corners and smooth out with a tounge suppressor. I would be tempted to loose the center support and cut a hinged hatch on one side and take advantage of the storage. As small as it may be it could be handy for CG stuff, a first aid kit or general dry storage.

Thanks for the tip on using the tape.

Michael,

When you see the final you'll see that your plan will not work. There's a center post on the seat mount that will be going in the center of the Pyramid mount. I am doing a lousy job of "splainin" things. Yer jest gunna haf to wait n' see whin I git er dun!
 
Top