Lund Nisswa Restoration

Status
Not open for further replies.

lundnisswa

Petty Officer 1st Class
Joined
Mar 2, 2008
Messages
245
Re: Lund Nisswa Restoration

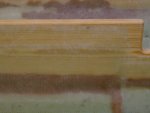
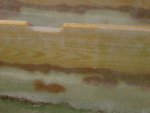
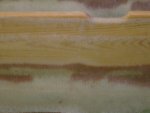
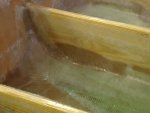
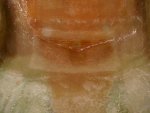
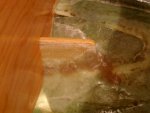
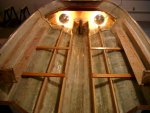
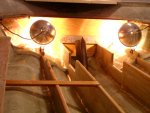
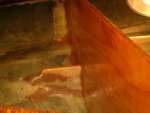
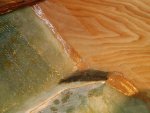
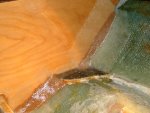
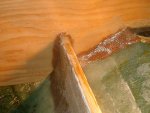
Oops, Thanks for filling me in on the vertical lines of the 1708.

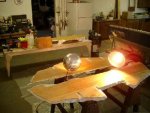
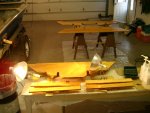
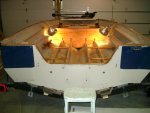
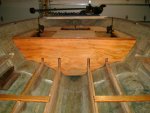
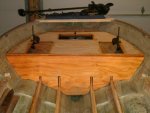
In those pictures, I had done alot of sanding/grinding toward the tops on all of the stringers except the inboards on the inboard sides 8 feet from the Transom, that was the last section I had to do that was done today.

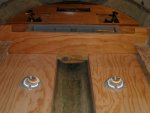
I had been cutting across the roll, 50" pieces and then cutting the size I need. I wish I would have known at some point prior to doing these four stringers and Transom.
Either way, it is only the very tops that need ground off, and luckily I had capped these with 8 oz prior to installing them.
So will try this technique on the next lay-up.........Live and learn.
Thank you

Lund
 

lundnisswa

Petty Officer 1st Class
Joined
Mar 2, 2008
Messages
245
Re: Lund Nisswa Restoration

As much as I hate to show my crappy workmanship, here are the
Close ups of my feeble attempt at fiberglassing. This is the last 8 feet of Stringer that I applied two layers of 1708 to yesterday, as you can see toward the tops I get the whitish effect going on. No matter what I did all of the stringers turned out this way, I am considering grinding the tops and reapply another layer but this time cut the biax the other direction as Oops suggested.
There is 8 oz cloth over the tops of all stringers, I did this prior to bedding them in the boat.
Any suggestions; anyone?

Lund:mad::mad::mad::confused:
 

Attachments

  • IMGP2953.JPG
    IMGP2953.JPG
    37 KB · Views: 1
  • IMGP2955.JPG
    IMGP2955.JPG
    40.7 KB · Views: 1
  • IMGP2954.JPG
    IMGP2954.JPG
    36.8 KB · Views: 1
  • IMGP2956.JPG
    IMGP2956.JPG
    41.5 KB · Views: 1

lundnisswa

Petty Officer 1st Class
Joined
Mar 2, 2008
Messages
245
Re: Lund Nisswa Restoration

Work is getting in the way of boat building for a few days, but I did manage to get a layer of 8oz fabric on one side of the 3 bulkheads today, man that stuff went on like butter, not a wrinkle or void in it.

I plan on glassing the other side and then painting resin on the end grains to help water proof the ply. Would you guys do any more to help waterproof these bulkheads?

Lund
 

Attachments

  • untitled.jpg
    untitled.jpg
    19.1 KB · Views: 0

ondarvr

Supreme Mariner
Joined
Apr 6, 2005
Messages
11,527
Re: Lund Nisswa Restoration

The drain out at the top of the layup is more common with epoxy and can be a real hassle at times. Try a little mat at the top, it will hold the resin better. Or you can just keep adding resin back to that area until it gels, but you have to keep checking on it untill it does.
 

lundnisswa

Petty Officer 1st Class
Joined
Mar 2, 2008
Messages
245
Re: Lund Nisswa Restoration

That certainly looks familiar Oops, just think; since I had no previous glassing experience I had nothing to compare the work to, so I thought this was just the way it was, So I did 112ft of Stringers "two layers" with the 25oz 1708 Biax cut the wrong way, I am telling ya, it was a major PITA.

I am still pressing on; managed to get the Bulkheads x3 waterproofed, 8oz cloth with two more thin layers of resin for waterproofing, especially on the end grains.

Also got boards cut that interconnect the stringers , they have 3coats of resin now too.

Yesterday I pulled the boat out, Donned the Grinding Gear and got alot of those nasty whitish Tops of Stringers off of there, also roughed and scuffed the areas where the bulkheads go in. I had a major air bubble in the large fillet build up around the garboard drain, ground all that off and reapplied a fillet and 1708 this A.M.

So I am installing Bulkheads as soon!

Finally got that Glass Splinter out of the Tip of my finger, it had been about 3 weeks, hurt like heck, was getting infected pretty bad, thought I was gonna have to get it cut out, Those glass splinters are NASTY.

Lund
 

Attachments

  • IMGP2959.JPG
    IMGP2959.JPG
    45.1 KB · Views: 1
  • IMGP2958.JPG
    IMGP2958.JPG
    42.5 KB · Views: 1
Last edited:

oops!

Supreme Mariner
Joined
Oct 18, 2007
Messages
12,932
Re: Lund Nisswa Restoration

awesome lund.

just one thing ive been thinking of lately......

dont know if this will apply to you.....the end of the stringers...

where they just stop......thats a major water collection area.....

make sure you gring those smooth....and add some peanut butter ....shape it so the water will flow smooth around the stringer...then just cover the peanut butter with some raw resin.....before you cover the strings.....do that to any where the water can pool....just make sure it flows to the bilge freely without pooling spots......

my simple theroy is ......if we build then like water is SUPPOSED to flow in there.....if it ever does happen ....it will be no big deal.

sorry to add another thing to your "thinking list"...:eek:

cheers
oops
 

lundnisswa

Petty Officer 1st Class
Joined
Mar 2, 2008
Messages
245
Re: Lund Nisswa Restoration

Thanks for the pointers Oops, If you are referring to the forward ends of the stringers, yes they were just sort of hanging out there, so I had previously gooped them up with peanut butter and wrapped with cloth so water would shed, see first two pics.

Stringer Cross Members are installed, these will help support the floor and give me some more area to glue the floor to (I plan on using very few if any screws in the floor sections).

Up front behind those lamps is the first Bulkhead, bedding (PL) is curing in place, that is one draw back with the PL, the 24 hour wait time for the cure, I think I may P-butter the next bulkhead in, but I do like the little cushion the PL gives when cured up, I dont know, what do you guys think?.

Before I got to far I wanted to get the forward upper deck cut/fitted/hatch holes in place, and now am waterproofing them too.

Lund
 

Attachments

  • IMGP2968.JPG
    IMGP2968.JPG
    47.4 KB · Views: 2
  • IMGP2962.JPG
    IMGP2962.JPG
    38.1 KB · Views: 3
  • IMGP2965.JPG
    IMGP2965.JPG
    46.7 KB · Views: 4
  • IMGP2967.JPG
    IMGP2967.JPG
    44.2 KB · Views: 4
  • IMGP2966.JPG
    IMGP2966.JPG
    44.9 KB · Views: 4
Last edited:

lundnisswa

Petty Officer 1st Class
Joined
Mar 2, 2008
Messages
245
Re: Lund Nisswa Restoration

I have a bunch of questions for you guys on waterproofing the Floor/Sole/Deck Boards;.

Is it best to have cloth on both sides of the wood?
Is Resin alone over wood 3 layers thick weak and tend to crack?
Does the underside need cloth or would 3 coats of resin do the same job? When I use 8 oz cloth, let it cure for 24hr. does it do any good to add two more layers of resin over the top of that cloth?
Is 8oz Cloth over/on top of the decking gonna give the strength/durability desired?
On those critical edges of the ply, should a person apply cloth, or go with 3 layers of resin.

The Decking will also be covered with spray Rhino Lining which is strong on its own, if it stays down.

All edges of decking will be tied to hull/Transom with 1708, will one strip of 1708 be strong enough here, or should I go two?

Erik, I am going to try the Spritz of water curing method for PL, I will let you know how it turns out. Using heat lamps, after 24 hours, the PL under the Bulk head is cured on the outside, but If I push on it I can tell it is still mushy on the insides on the thicker areas, the directions say you can bridge up to 3/8" gap with the PL Premium, but I think big gaps are best left to P-Butter.


Thanks
Lund
 

erikgreen

Captain
Joined
Jan 8, 2007
Messages
3,105
Re: Lund Nisswa Restoration

I have a bunch of questions for you guys on waterproofing the Floor/Sole/Deck Boards;.

Is it best to have cloth on both sides of the wood?
If you use polyester resin, or want lots of strength in your sole, yes. If your ply is thick enough not to need reinforcement then only the top side is needed to prevent abrasion.
Is Resin alone over wood 3 layers thick weak and tend to crack?
Poly resin yes, epoxy no.
Does the underside need cloth or would 3 coats of resin do the same job?
Poly needs cloth, epoxy doesn't.
When I use 8 oz cloth, let it cure for 24hr. does it do any good to add two more layers of resin over the top of that cloth?
Epoxy resin will add waterproofing, but no strength. Poly might fill a crack or two, but won't do much else unless you've got unsaturated cloth there.
Is 8oz Cloth over/on top of the decking gonna give the strength/durability desired?
It will do pretty well. I'm using 8 oz myself. If you want to be really certain, then use 2 layers. I'm going to use vinyl flooring over mine, so that'll help keep wear down.
On those critical edges of the ply, should a person apply cloth, or go with 3 layers of resin.
I'm going with resin. It's very hard to get cloth to wrap around the edges of the ply, and in my case the glue/fillets/cloth I used to hold down the deck will also protect the edges - they're completely covered with fillets, resin, and glass anyway.
The Decking will also be covered with spray Rhino Lining which is strong on its own, if it stays down.
With proper prep, it will. I'd just use 8 oz. cloth in a single layer with that, the RL will protect very well.
All edges of decking will be tied to hull/Transom with 1708, will one strip of 1708 be strong enough here, or should I go two?
I'd use 1 layer. Of course, for mine I ran out of 1708 and used one layer of 3208, which was excessive.
Erik, I am going to try the Spritz of water curing method for PL, I will let you know how it turns out. Using heat lamps, after 24 hours, the PL under the Bulk head is cured on the outside, but If I push on it I can tell it is still mushy on the insides on the thicker areas, the directions say you can bridge up to 3/8" gap with the PL Premium, but I think big gaps are best left to P-Butter.
Yeah, I'm agreeing with that. PL is moderately weak over large gaps anyway, I'd rather fill those with a PB mix including heavy chopped glass fibers.. basically solid fiberglass.

Keep going :)

Erik
 

lundnisswa

Petty Officer 1st Class
Joined
Mar 2, 2008
Messages
245
Re: Lund Nisswa Restoration

Thanks Erik, Thats just what I needed to know. I am using all Epoxy.

Got the forward Bulkhead Glassed up today, very enjoyable doing small pieces and areas in comparison to the 50" chunks for stringers, I also tried to make sure the threads of the 1708 were running Horizontal and they seem to hold resin better at the tops.

Bulk head #2 up next!

Lund
 

Attachments

  • IMGP2972.JPG
    IMGP2972.JPG
    47.8 KB · Views: 1
  • IMGP2971.JPG
    IMGP2971.JPG
    42.6 KB · Views: 1
  • IMGP2977.JPG
    IMGP2977.JPG
    48.2 KB · Views: 1
  • IMGP2976.JPG
    IMGP2976.JPG
    47 KB · Views: 1
  • IMGP2975.JPG
    IMGP2975.JPG
    46.6 KB · Views: 1

lundnisswa

Petty Officer 1st Class
Joined
Mar 2, 2008
Messages
245
Re: Lund Nisswa Restoration

Fitting Bulkhead#2, couldn't resist putting the forward deck up just to see.

The Light is flickering at the end of the Tunnel, still a Month away I am afraid at the pace I get tasks done.
Boat building is a very time consuming venture.

Lund
 

Attachments

  • IMGP2983.JPG
    IMGP2983.JPG
    45 KB · Views: 1
  • IMGP2985.JPG
    IMGP2985.JPG
    48 KB · Views: 1
  • IMGP2986.JPG
    IMGP2986.JPG
    45.8 KB · Views: 2

lundnisswa

Petty Officer 1st Class
Joined
Mar 2, 2008
Messages
245
Re: Lund Nisswa Restoration

Ok this is killing me, my goal was to go with "NO SCREW HOLES" in the new outboard flooring. But how can I get around it really, the original seat bases were the flush type, they need a big 3 inch hole in the floor, and then seven more bolt holes, so I picked up this type that does not require a big 3 inch hole, my original idea was to use a smaller peice of 3/4" under it, bolted down, taper the edges and then glued/glass that smaller piece to the floor, but that seems pretty shoddy.
I guess seven 1/4" holes can be sealed up pretty with 5200, I just hope they do not leak.
Considered making those boxes but decided against that too.
Any ideas, anyone.
I am drilling in the A.M.

Lund
 

Attachments

  • IMGP2987.JPG
    IMGP2987.JPG
    46.4 KB · Views: 2
  • IMGP2988.JPG
    IMGP2988.JPG
    44.5 KB · Views: 2
  • IMGP2989.JPG
    IMGP2989.JPG
    46.1 KB · Views: 2

erikgreen

Captain
Joined
Jan 8, 2007
Messages
3,105
Re: Lund Nisswa Restoration

Make the holes, but seal them with epoxy before you mount anything. That way if anything gets in past the seal it won't rot. It will take an extra day or so to drill out the holes, fill them back in with peanut butter, epoxy the edge of the big hole, and wait for it to dry before re-drilling though.

Alternatively, you could make seat boxes instead of the pedestals, but that's a design change.


Personally, I decided to be ok with drilling holes in my deck provided I gave them the above treatment... of course, I want to keep the number of holes down since that's a lot of work...
 

lundnisswa

Petty Officer 1st Class
Joined
Mar 2, 2008
Messages
245
Re: Lund Nisswa Restoration

Erik/Oops-Thanks for the Input - as always.

Oversized holes;
I am using 1/4" Bolts, I was thinking a 7/16 hole would be big enough.
Then, fill holes with Runny P-Butter, let cure good.
Then re-drill 1/4" holes, install bolts gooped with 5200.
I am gluing a doubler under the deck prior to drilling these holes as well.

Thanks
Lund

Oops, Ummmmm after 22 years of owning this boat is definately in Charge of me, otherwise it would have been gone long ago!
I am just doing what she tells me, whats New!
 
Last edited:

lundnisswa

Petty Officer 1st Class
Joined
Mar 2, 2008
Messages
245
Re: Lund Nisswa Restoration

So what have I gotten done
1. All Decking (Sole) pieces are triple waterproofed
2. Made the fuel Tank support and Triple waterproofed
3. Glassed in Bulkhead #2
4 Bulkhead #3 is PL'd in and curing

May 1st is our annual "Paddle-Fish Snagging" trip that I had to pack up for, Great Fun! Montana/North Dakota Border where the yellowstone and little missouri meet, very short season, hopefully we will catch a few, will post some pix if we do.
Wont get back on her until next week now, maybe get that second wind-needed a break anyway-and a beer or two-enty.
Lund
 
Last edited:

ddrieck

Senior Chief Petty Officer
Joined
Jul 12, 2007
Messages
655
Re: Lund Nisswa Restoration

Hello,
May be to late for you to use this idea but I'll toss it in anyway.

On the back side of the decking you could use a t-nut (its a treaded insert that has spikess that grab the wood and keep it from spinning. They are installed fron the bottom. Be real easy to seal them. They are available in various sizes at most any box store like Home Depot.
 

lundnisswa

Petty Officer 1st Class
Joined
Mar 2, 2008
Messages
245
Re: Lund Nisswa Restoration

Had a great time "Paddle Fishing",
My son caught a 57lber, and I caught a 28 lber.
Back to boat building this week.

Lund
 

Attachments

  • IMGP3024.JPG
    IMGP3024.JPG
    53 KB · Views: 1
  • IMGP3026.JPG
    IMGP3026.JPG
    54.6 KB · Views: 1
  • IMGP3027.JPG
    IMGP3027.JPG
    70.7 KB · Views: 1

lundnisswa

Petty Officer 1st Class
Joined
Mar 2, 2008
Messages
245
Re: Lund Nisswa Restoration

Redfury; for the seat bases I am over size drilling and filling, then redrill, may use locknuts or those T-Nuts, I am going to check into them, either way they need to be stainless steel, I have a website that TD provided on my home computer for the stainless T-nuts.
The center floor section, I have predrilled and filled holes in the stringers to mount aluminum rails.

Lund
 
Last edited:

lundnisswa

Petty Officer 1st Class
Joined
Mar 2, 2008
Messages
245
Re: Lund Nisswa Restoration

Oops-
Paddlefish are a prehistoric fish, therefore I believe they taste like dinosaur, not sure though- ---LOL----
Coat it in spicy beer batter-small chunks-deep fry-chase em with a beer and they are pretty good-a bit fishy though-the key is to remove all red meat.

Your boat looks Sweeeeet on that trailer.
Lund
 

redfury

Commander
Joined
Jul 16, 2006
Messages
2,655
Re: Lund Nisswa Restoration

Purpose? Hinging the entire thing for storage or ??? I'd love to have the ability in my boat to have that, but my center stringer prevents that. If I were, I'd have to cut down my center stringer, put in a floor with drains at the bilge and put a hinged lid on it. Great place to store rods/life jackets, etc. My front seats have little storage due to the nature of this trihull, so it's at a premium.

After looking at all these boats, and realizing that there really isn't "one true hull design", I've started to reassess the use for my boat once I'm done with it. I think I'll be closer to the Bass Boat/family ski boat range, than a big water boat that can hit the shallows.

Any way you put it though, I just can't wait to see some of these "close to done" projects hit the water and stay floating :D
 
Status
Not open for further replies.
Top