Ooo! Sparkly! Redfury's Grinding again!

redfury

Commander
Joined
Jul 16, 2006
Messages
2,655
Re: Ooo! Sparkly! Redfury's Grinding again!

Yeah, I got it worked out. 100ft of 1708 biax tape and a yard of brand new mat. I'm not going to fight this other stuff. John managed to get it to work apparently on his Scarab, but I'm just not that patient.

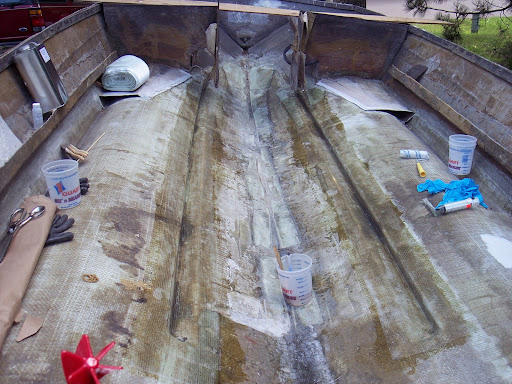
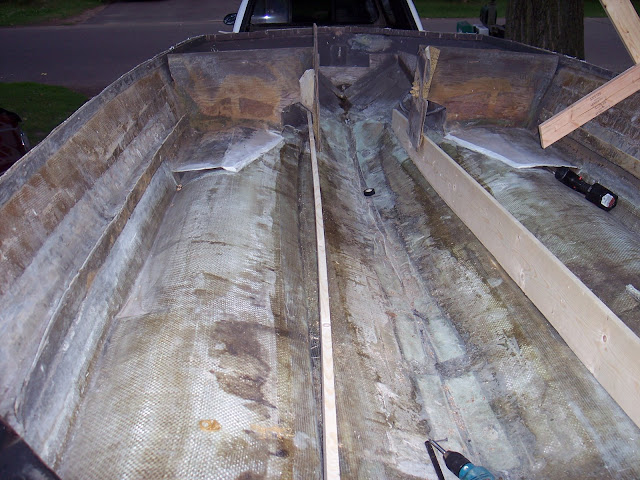
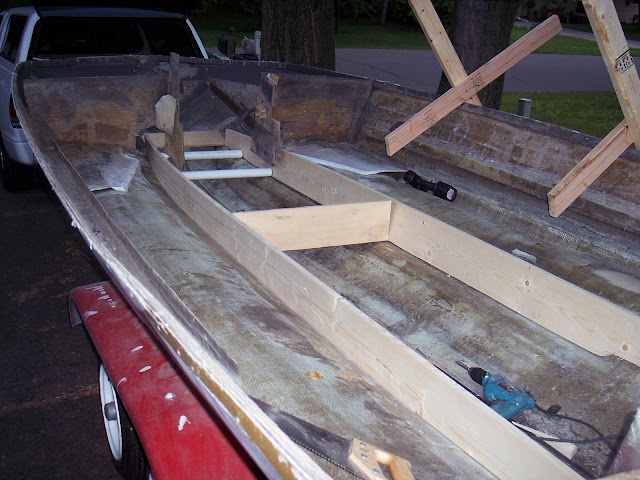
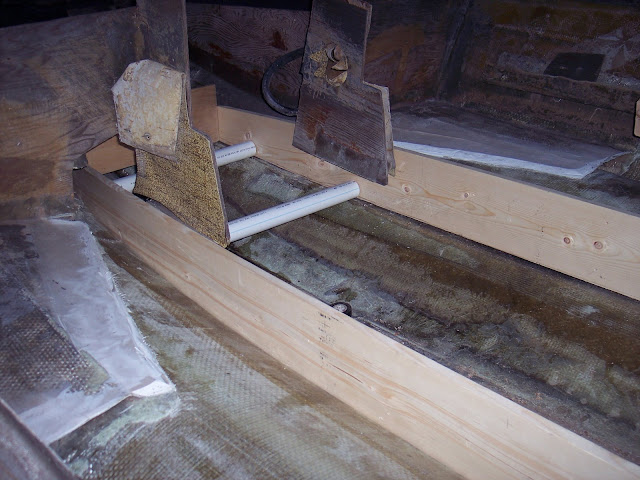
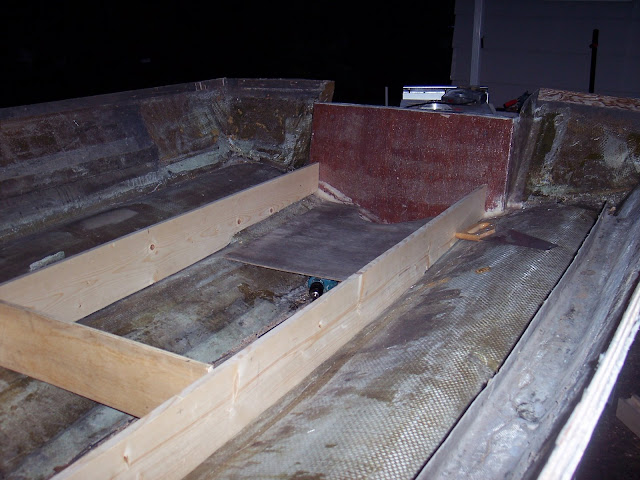
I'm going to start fixing the holes I made with the grinder and then start working on the stringers.
 

jcsercsa

Captain
Joined
May 21, 2007
Messages
3,401
Re: Ooo! Sparkly! Redfury's Grinding again!

Sounds good there Mike !! Move ti something else and vome back to it !! I didnt use that 1708 started with the 8 oz eglass two layers then the 10 1/2 oz eglass !! so I really cant help with the 1708!!

But it sounds good moving to something else for now !! John
 

redfury

Commander
Joined
Jul 16, 2006
Messages
2,655
Re: Ooo! Sparkly! Redfury's Grinding again!

My luck gets even better! My wife's dead Blackberry Pearl Flip which was deemed dead by T Mobile is resurrected by yours truely and is now my new work phone! :D
 

lowkee

Lieutenant Commander
Joined
Dec 13, 2008
Messages
1,890
Re: Ooo! Sparkly! Redfury's Grinding again!

I kept rolling it! The more I rolled, the more air bubbles I got! If I SATURATED the glass with resin, it would wet out and look like it should. If I started to brush out the resin, I would get air in the glass. If I started to roll the air out, I'd get air in the glass.

What's the trick? I thought perhaps if I used the wax paper and then rolled it out, it wouldn't allow air back into the glass ( poor mans vacuum bagging? :D )

I wasted 1000 ml of resin on this already. and the stupid mat did NOT want to conform to any corners at all. Isn't this stuff supposed to be the easiest to work with? How much resin should I be expecting to use on a 20x30 inch transom?

Heya Redfury,

Good to see you back on your project. it has been a while, now. I recently finished my transom (your transom gave me the gonads to git er done), and i used mat. here is what I have learned about mat thus far:

  • The 'bubble-buster' rollers make things worse when applying mat. The first layer of mat I applied was perfect, then I used the roller, and it was air pockets galore. Not big ones, but hundreds of tiny ones. The rollers must be meant for cloth and biax only.
  • Using a 3-4 inch brush, dabbing the resin on at an angle (as mentioned in a previous post) seems to wet out best and also has the benefit of getting out air bubbles and creases easier.
  • Mat does not do angles.. ever. You must round off all side with a 3/8" roundover router bit (or just grind it until it is very rounded). To imagine what a 3/8" roundover looks like, it is the radius of a 3/4" PVC pipe. Anything sharper and it will lift and you will be grinding it off.
  • Mat sucks a ton of resin. Mat is heavy, and it just plain requires more resin than cloth. 1.5oz mat is equiv to 14oz cloth in weight and resin-soaking ability. It is also heavy enough to require a few seconds for resin to actually soak in, so you must go back over some sections in order to fully wet it and conform it nicely.
  • Mat cannot be 'spread'. Spreaders will just make giant glass globs. You must dab it with a brush or (maybe, I'm guessing) roll on the resin with a foam roller.
  • Mat creases easily. Be sure to tear it (tearing is much better than cutting) anywhere a crease can happen before it gets wet. Practice laying it flat as though it were in place. If it creases, tear along the crease.
  • Be sure to work from the center out. This way you can slide the mat fibers outward and, in doing so, removing all air pockets and getting a more form fitting glass job.


Hope that helps. You can check out my restore thread if you need some inspiration. The least I can do, since you inspired my transom :)

Cheers
 

redfury

Commander
Joined
Jul 16, 2006
Messages
2,655
Re: Ooo! Sparkly! Redfury's Grinding again!

Thanks Lowkee, I looked through your whole thread..the videos were great ( I liked how you kept having to clean up the mess throughout the video ).

I'm on the boat now, laying glass. I really liked how the 1708 lays out. It was really easy to work with.

I am going to say one thing though....Oops! is 100% right about making sure that the surface that you are laying the glass on is SMOOTH and has only light deviations to avoid getting air bubbles. I found a couple of places that didn't want to release the air pocket due to this, but they are in areas that aren't critical, so I'm not that concerned.

So, I laid glass along my strakes where my stringers will go to take care of the loss of fiberglass from grinding to heavily. Once the wood and the rest of the fiberglass is in, I won't have to worry about being so overzealous there.

Next up is 2 layers of Mat on the transom. The cloth conformed nicely to the bottom of the hull, but I filleted the transition for the two layers of mat going across there. I'd rather be safe than sorry this time around again. Hopefully it will be darn near bullet proof when I'm finished.

My success so far has renewed my faith in my ability to do the fiberglassing work, so I will be getting the stringers built very soon, which is extremely exciting for me.

I'll be sure to post some pictures of my work tonight when everything has set and I'm done for the day.
 

redfury

Commander
Joined
Jul 16, 2006
Messages
2,655
Re: Ooo! Sparkly! Redfury's Grinding again!

100_2070.jpg

1708 in! 500ml of resin per side approx. 10 inches X 10ft.
100_2071.jpg

Filleted the bottom of the transom for a better contour for the fiberglass...
100_2072.jpg

...Success! I got 2 layers of fiberglass mat on the front and 3 on the sides.
This took 1000ml of resin to wet out properly. A word on the bubble buster ( roller ). It does work on mat. Once the mat is properly wetted out, you can just roll it back and forth and the bubbles break. The brush was pushing the mat around too much for me, so I figured I'd give it a go. It worked great. I had it soaking in acetone, so that may have helped. Occasionally it would snag a few strands, but then a few rolls and it was cleaned up again. I'm a happy dude right now! Next step....STRINGERS!

I've got most of a gallon of resin left, so I will have to buy at least one more gallon to do the stringers and perhaps 2 for the deck. We'll have to wait and see on that when we get there. For now, I get to scribe wood for STRINGERS! Yay! :D
 

Lightnig

Petty Officer 2nd Class
Joined
Jun 7, 2009
Messages
189
Re: Ooo! Sparkly! Redfury's Grinding again!

Awww, that beautiful piece of wood don't look near so nice now. :(


But then, it's got some real 'inner Beauty'...


Looking good there man
 

chrishayes

Senior Chief Petty Officer
Joined
Apr 9, 2009
Messages
691
Re: Ooo! Sparkly! Redfury's Grinding again!

Man, as I was reading about how "easy" it is to work with 1708 I just laughed and cussed you outloud! It is NOT easy man. Wait till you have to use it on a contour then you will cuss yourself for saying it was easy! It takes soooo much resin to wet out and I will give it to you, on a horizontal flat surface on the first layer 1708 is easy to use. BUT, try laying another piece on top of it now, just try a little piece. Let me know how that works out for ya! The first layer has to almost be ground smooth as it takes forever with a sander to knock down the stiching. Then you will have all these little areas that just wont wet out no matter what you try. Maybe your results will be better with poly as I am using epoxy. Looking good man and I love your enthusiasm it is infectious! It makes me want to lay glass even though it hurts me like hell (bad back). Keep up the good work and let me know what you think once you try 1708 on a compound area. Later!:D
 

chrishayes

Senior Chief Petty Officer
Joined
Apr 9, 2009
Messages
691
Re: Ooo! Sparkly! Redfury's Grinding again!

Oh I forgot to mention why it is easy on a horizontal surface. It is that you can use your weight to press on it. on a vertical surface it is strength not weight. You have to WORK to get it bubble free instead of just lazily rolling with a bubble buster!
 

erikgreen

Captain
Joined
Jan 8, 2007
Messages
3,105
Re: Ooo! Sparkly! Redfury's Grinding again!

Heya Redfury,
  • Mat does not do angles.. ever.
Hmm... I've found that mat takes angles better than almost any other type of glass. Maybe you need to use a thinner mat?
It is also heavy enough to require a few seconds for resin to actually soak in, so you must go back over some sections in order to fully wet it and conform it nicely.
Mat does use a lot of resin, but the quote about going back over sections is true for most glass. Trying to rush a wet-out usually just makes sure you use too much resin. For any fabric or mat, spread some resin on and wait a couple minutes for it to flow... you'll be surprised how well it wets out.
  • Mat cannot be 'spread'. Spreaders will just make giant glass globs. You must dab it with a brush or (maybe, I'm guessing) roll on the resin with a foam roller.
I use a foam roller. You're right that mat tends to form globs of loose fibers. You can spread resin in it and push out bubbles with a spreader if you put a piece of thin plastic over it though. By the way, wetting out with a foam roller I use about half as much resin as I would with a brush and get the same strength in the end.
  • Mat creases easily. Be sure to tear it (tearing is much better than cutting) anywhere a crease can happen before it gets wet. Practice laying it flat as though it were in place. If it creases, tear along the crease.
Why tear? I cut mat with a roller knife, which I consider better than just about anything for cutting glass. Tearing would seem to lead to lots of ragged edges. Mat does crease easily, and it can create ridges in layup requiring lots of rolling out or later sanding. Use mat from a roll if possible, or if not be sure to cover curing mat with plastic and press down the ridge during cure if you can. The roller knife can easily cut out a crease before wet out, but it won't help if that leaves you with pieces of mat too small to use...
  • Be sure to work from the center out. This way you can slide the mat fibers outward and, in doing so, removing all air pockets and getting a more form fitting glass job.
Worth repeating for anyone working on glass. Work from the center out, and be aware of the pattern of the weave when using fabrics. Spreading and rolling certain ways will remove bubbles, other ways will create them.

Erik
 

redfury

Commander
Joined
Jul 16, 2006
Messages
2,655
Re: Ooo! Sparkly! Redfury's Grinding again!

Man, as I was reading about how "easy" it is to work with 1708 I just laughed and cussed you outloud! It is NOT easy man. Wait till you have to use it on a contour then you will cuss yourself for saying it was easy! It takes soooo much resin to wet out and I will give it to you, on a horizontal flat surface on the first layer 1708 is easy to use. BUT, try laying another piece on top of it now, just try a little piece. Let me know how that works out for ya! The first layer has to almost be ground smooth as it takes forever with a sander to knock down the stiching. Then you will have all these little areas that just wont wet out no matter what you try. Maybe your results will be better with poly as I am using epoxy. Looking good man and I love your enthusiasm it is infectious! It makes me want to lay glass even though it hurts me like hell (bad back). Keep up the good work and let me know what you think once you try 1708 on a compound area. Later!:D

Heh, I laid out the 1708 in the strake with little problem actually! If you look at the picture of the hull bottom, you can see the two areas that I glassed ( the dark lines )

The problem I've got now, is that I wnat to make dead sure that I've got my boat dimensionally correct so that I can scribe and cut the stringers, and glass them in. I can't really seem to see where I can take measurements on my hull to verify how it sits. It would be great if I had a level garage floor to work with, but I don't even have a driveway I can really use for this.

The only thing I could think of would be to dig some post holes and put some 4x4's in the holes and then build a level frame on top of it and slide the boat off the trailer onto a "boat lift" style support system. I just don't know if that would be the way to go, or if there would be a way to verify symmetry on my bunk trailer. I'm a horrible engineer when it comes to these kinds of things.

But, at the point I'm at, I HAVE to get this right.

Thoughts?
 

lowkee

Lieutenant Commander
Joined
Dec 13, 2008
Messages
1,890
Re: Ooo! Sparkly! Redfury's Grinding again!

I can't really seem to see where I can take measurements on my hull to verify how it sits. It would be great if I had a level garage floor to work with, but I don't even have a driveway I can really use for this.

...

I just don't know if that would be the way to go, or if there would be a way to verify symmetry on my bunk trailer. I'm a horrible engineer when it comes to these kinds of things.

Thoughts?

Put an angle finder on the keel and adjust the trailer leg until the keel is level, then you have one part set. The next part involves hanging the stringers from a string, hovering the same distance from the cap and scribing them. You do this be placing two boards perpendicular to the keel and tying both stringers (suspended) to them. Make sure each stringer is hovering above the position it will be mounted to the hull.

The reason to hang them from the cap is each side of the hull may not be perfectly even and you want a known value, which is the distance from your future deck to the gunwales. If you think about it, your deck is like a bridge, who cares what the supports look like as long as the deck is level. If one stringer is shorter than the other, only you will know your boat isn't perfectly symmetrical.

Only thing I would consider if you are doing this on your trailer is.. make sure the bunks are not causing hooking or your scribe will have the same hook. Jack the boat up in the rear if you see hooking happening while on the bunks.
 

redfury

Commander
Joined
Jul 16, 2006
Messages
2,655
Re: Ooo! Sparkly! Redfury's Grinding again!

I suppose I'll see a hook in the stringer scribe line if there is a problem. Right now, I can lay some length of plywood on end along where the stringers are going and can see a gap from the rear of the boat to the front where it ends....I know the keel is strong as hell, I could probably eliminate the center stringer if I wanted to.... was actually thinking about moving the fuel tank to below the floor...I'll decide that after the two outer stringers are in though.
 

chrishayes

Senior Chief Petty Officer
Joined
Apr 9, 2009
Messages
691
Re: Ooo! Sparkly! Redfury's Grinding again!

On my boat it is impossible to see a hook due to the stepped hull about 2/3 of the way from bow to stern...I wish there was a better way for me but I just had to accept that there either was one or wasnt:eek: I did verify that the hull was not twisted by measuring from tip of the bow back to each corner of the transom. I winged it due to not having any good options. Hopefully I dont have any problems. We shall see. Your boat should be easier to see a hook being one plane from bow to stern on all your strakes. Wish ya luck!
 

redfury

Commander
Joined
Jul 16, 2006
Messages
2,655
Re: Ooo! Sparkly! Redfury's Grinding again!

Yeah, the hard part about stringing the bow to the corners of the stern is the wood bracing that sticks up above the lower hull ( another reason why I haven't flipped the hull )
 

chrishayes

Senior Chief Petty Officer
Joined
Apr 9, 2009
Messages
691
Re: Ooo! Sparkly! Redfury's Grinding again!

Yeah, the hard part about stringing the bow to the corners of the stern is the wood bracing that sticks up above the lower hull ( another reason why I haven't flipped the hull )

Yeah, my cap is off so it is much easier! I really couldnt think of a good way to measure with the cap on...but really, you shouldnt have to if you havent removed the cap. Should be good:confused:
 

redfury

Commander
Joined
Jul 16, 2006
Messages
2,655
Re: Ooo! Sparkly! Redfury's Grinding again!

Holy garbage I got an interesting project going on. I went out and bought dimensional lumber because my stringers are short of 12' on the two outers, so I figured why splice 8 ft plywood together when I can get 2 boards for $16 that will be easier to deal with.

Here's the rub though...my stringers are not straight. They curl at the ends under the bow....I'm going to have to cut some reliefs on the inside of the boards and bend them, or I'm going to have to induce a bend in them some other way....what fun!

The only thing I can think of is to cut wood to wedge against both stringers as a bulkhead to force them into place while the PL is setting up.

I wonder what the factory did originally :confused:
 

chrishayes

Senior Chief Petty Officer
Joined
Apr 9, 2009
Messages
691
Re: Ooo! Sparkly! Redfury's Grinding again!

My guess is that they arent supposed to curl...can you take a picture of them so we can understand exactly what you mean by "curled"? Hell, I used ply for mine and they are far from perfectly straight:rolleyes: My starboard outside one has quite a curl at the bow edge. I cant see it being a prob.
 

redfury

Commander
Joined
Jul 16, 2006
Messages
2,655
Re: Ooo! Sparkly! Redfury's Grinding again!

100_2076.jpg

100_2077.jpg
100_2078.jpg
100_2079.jpg


Picture 1: straight wood, curved stringers!
Picture 2: cut some wood and pvc pipe to force the wood to conform
Picture 3: closer shot of wood stringer
Picture 4: rear of stringers mating to transom.

Thoughts: While the boat came with a center stringer originally, I've toyed with the idea of under floor storage for fishing rods. The keel is strong enough, I'm pretty sure the center stringer was for floor support primarily.

The real quandry is cutting the stringers to the proper floor height. I'm not really sure what the best way to do it with this hull is. I want to scribe them in the boat and then pull them, straight edge them and cut them with my router, but I'm stuck with getting the proper height.

One thought was to make a series of cuts into the top of the stringers and then run a string line from each side of the boat where the floor should meet. Where the line stops in the cut line is where I mark the stringer and then after a few marks are made, pop a chalk line and cut.

I don't remember how it's been done on some of the other projects here...:confused:
 

chrishayes

Senior Chief Petty Officer
Joined
Apr 9, 2009
Messages
691
Re: Ooo! Sparkly! Redfury's Grinding again!

So, am I right in saying that you used the PVC to push the straight wood into the curved position? I really have no idea why the factory would have been curved like that.

I too have been having a really hard time trying to cut all my wood to the same correct height. A lot of it was luck and finding the one stringer that was right then popping a chalk line. My method is WAY to convoluted and bizarre for me to tell you. You would be better to find someone elses thread that makes sense. Please post it when you find it though. I would like to read it.
 
Top