1997 Bombadier Celebrity 200 Deck, Stringer and Transom Replacement

FBCoach

Petty Officer 2nd Class
Joined
Jun 16, 2018
Messages
141
1st: This is the best site on the internet. Awesome. Thanks much.
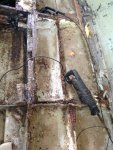
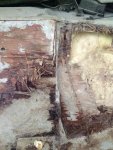
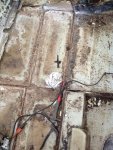
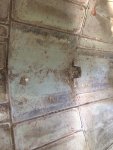
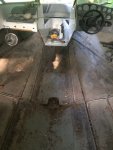
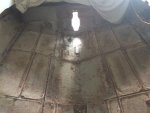
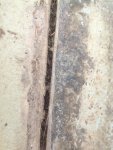
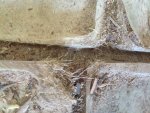
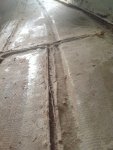
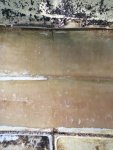
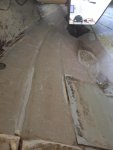
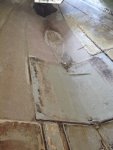
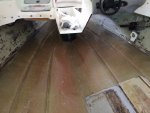
Boat was basically a gift. Been in storage the last four years. Only 67 water hours ever.
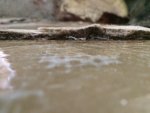
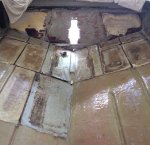
When picked up it was quickly discovered the deck was soft. So is everything else.
Thus the second boat rebuild has begun. Did a bass boat 15 years ago.
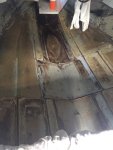
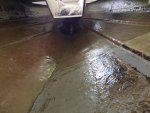
It looks like the center portion of the transom is glassed upon the full length back portion.
Is this the case and is this how the replacement should be done? Thanks
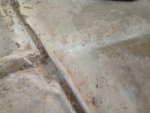
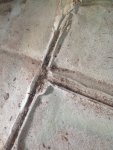
 

Attachments

  • photo293210.jpg
    photo293210.jpg
    1.3 MB · Views: 2
  • photo293211.jpg
    photo293211.jpg
    1 MB · Views: 2
  • photo293212.jpg
    photo293212.jpg
    1.4 MB · Views: 2
  • photo293213.jpg
    photo293213.jpg
    1.5 MB · Views: 2

Woodonglass

Supreme Mariner
Joined
Dec 29, 2009
Messages
25,924
Yup, iBoats has the worlds best restoration experts. If you need anything the guys on here will be Johnny on the Spot with answers.

WelcomeAboard.jpg
 

FBCoach

Petty Officer 2nd Class
Joined
Jun 16, 2018
Messages
141
About to be to the grinding stage. Scared to grind to deep. Couple of questions:

1. How do you know when you’ve ground appropriately? Will the sides of the old stringer groves be flush to the bottom of the grove?

2. When reinstalling the stringers, is it best to follow the original outline? This boat had a lot of staggered compartments.
 

Attachments

  • photo293396.jpg
    photo293396.jpg
    1.5 MB · Views: 1
  • photo293397.jpg
    photo293397.jpg
    1.8 MB · Views: 1
  • photo293399.jpg
    photo293399.jpg
    1.3 MB · Views: 1

Woodonglass

Supreme Mariner
Joined
Dec 29, 2009
Messages
25,924
Yup grind em flush so you have a flat surface and then grind some of the flat to cuz you'll be extending the glass out onto the hull approx. 6" on both sides of the stringer. I would try to put her back like she was but, you might be able to cut back on some of the bulkheads. Stringers should be the same
 

FBCoach

Petty Officer 2nd Class
Joined
Jun 16, 2018
Messages
141
Yeah! Finally no more wood in the boat. Nothing like working in a heat index of 108. Its hot in SC this week!
Start grinding tomorrow. Sorry for the overkill but i need one more verification. Want to do this only once and correct. Some of the stringer grooves are almost an inch below the surface. See pics. Do i grind all of this flat. And once i re glass stringers do i need to build the corners as thick as they were? Thanks for the help.
 

Attachments

  • photo293558.jpg
    photo293558.jpg
    1.2 MB · Views: 1
  • photo293559.jpg
    photo293559.jpg
    1.1 MB · Views: 1
  • photo293560.jpg
    photo293560.jpg
    2 MB · Views: 1

Woodonglass

Supreme Mariner
Joined
Dec 29, 2009
Messages
25,924
Hmmm interesting . Do the grooves inside show up as ridges on the bottom of the hull??
 

FBCoach

Petty Officer 2nd Class
Joined
Jun 16, 2018
Messages
141
That's the thing. In some areas yes, in others no. Hopefully these pics show what i mean. It looks like on the starboard side the stringers are set just below the groove. The port side looks to possibly be in it.
 

Attachments

  • photo293624.jpg
    photo293624.jpg
    1.4 MB · Views: 2
  • photo293625.jpg
    photo293625.jpg
    955.9 KB · Views: 2
  • photo293626.jpg
    photo293626.jpg
    1.5 MB · Views: 1
  • photo293627.jpg
    photo293627.jpg
    1.4 MB · Views: 1

Woodonglass

Supreme Mariner
Joined
Dec 29, 2009
Messages
25,924
Ok the ridges on the hull are called strakes. On the inside if a stringer was mounted on top of a strake channel then I'd fill the channel with either a strip of foam (cut pieces of Pool Noodle or from a 4x8 sheet of blue foam insulation) or PB and then set the stringer on top. The stringer channels will appear to be small walls above the flatness of the hull and will need to be ground down to the flat. The stringers don't have to be in the exact spots but within an inch or so. The Engineers that designed the hull and supporting structures did it for a reason and as a rebuilder you should try and follow their plan as best you can.
 

FBCoach

Petty Officer 2nd Class
Joined
Jun 16, 2018
Messages
141
Nothing like making snow on a 97 degree day! It all started making sense once i started grinding. Went slowly to learn exactly what i was doing. The corners between the stringers and bulkheads are extremely thick and high. The stringers are in and beside the strakes so i was careful there. Still need to hit some of those spots again. But, I’ve at least started... WOG thanks for the help. I’m sure I’ll have many more questions soon.
 

Attachments

  • photo293681.jpg
    photo293681.jpg
    1.2 MB · Views: 1
  • photo293682.jpg
    photo293682.jpg
    1.2 MB · Views: 2
  • photo293683.jpg
    photo293683.jpg
    1.2 MB · Views: 1

Woodonglass

Supreme Mariner
Joined
Dec 29, 2009
Messages
25,924
Well that looks like some good progress. Listen, this ain't brain surgery cuz for sure if it was, I would never have been able to do it. Each step will bring you more experience and knowledge and before long you'll be teaching me and others all the best ways to "Git er Dun!!!" Keep at it and try to remember that any progress gets you that much closer to being on the water!!!
 

Mad Props

Lieutenant Commander
Joined
Jul 8, 2016
Messages
1,766
Looks like you're gettin it fingered out! I don't miss that part... everytime I come across some glass I need to grind out I shed a little tear... lol
Its really not that bad actually... To be honest, I kinda liked doing it if it wasn't brutally hot out.. get the tyvek on, the baby powder and all the other PPE, and crank up the headphones and get at it...!
 

kcassells

Fleet Admiral
Joined
Oct 16, 2012
Messages
8,598
Same as WOG's comments!
If your strakes are next to the new stringer placement then you could fill thhe strake w/PB.
That will make glassing the stringers/bulkheads alot easier cause you rolling over a FLAT surface with tabbing vs. valley. Me included alot of guys simply fill in the strakes front to back.
 

FBCoach

Petty Officer 2nd Class
Joined
Jun 16, 2018
Messages
141
Awesome advice - i was wondering if i could peanut butter the strakes. Slow going. Yet going none the less. Life and work keep getting in the way. Few questions as i prepare for the future and make purchases.
1. Do i resin the hull before adding the stringers. Feel like I've cut the hull thickness in half removing the old stringer fiber glass. Want to make sure i strengthen the boat not weaken it.
2. A few spots the grinder went slightly deeper than i want, do i just peanut butter here?
3. What type or resin: polyester or epoxy? Buying from US Composites. Have product # recommendations?
4. Going to gel coat the deck and sides when i finish. Do i need to use chop strand or woven for the deck covering?
Thanks so much.
 

Attachments

  • photo293939.jpg
    photo293939.jpg
    1.1 MB · Views: 1
  • photo293940.jpg
    photo293940.jpg
    1.3 MB · Views: 1

kcassells

Fleet Admiral
Joined
Oct 16, 2012
Messages
8,598
Awesome advice - i was wondering if i could peanut butter the strakes. Slow going. Yet going none the less. Life and work keep getting in the way. Few questions as i prepare for the future and make purchases.

1. Do i resin the hull before adding the stringers. Feel like I've cut the hull thickness in half removing the old stringer fiber glass. Want to make sure i strengthen the boat not weaken it.
-No waste of time and $$. Resin adds no strength at all. You can glass over the pb filled strakes if you want but more than likely they will get covered by the tabbing on the stringers and bulkheads.

2. A few spots the grinder went slightly deeper than i want, do i just peanut butter here?
-Build up with pb then some glass to level out.

3. What type or resin: polyester or epoxy? Buying from US Composites. Have product # recommendations?
-Most guys use poly with 1708/csm already on the back. Do not mix poly and eeeeeppppoooxxy. Start with 1 and finish with it.


4. Going to gel coat the deck and sides when i finish. Do i need to use chop strand or woven for the deck covering?
Thanks so much.
-Geez....let's wait about that till you get there. Don't forget the foam. Neither...of your above suggestions. Lets get to that point 1st.
-Don't forget to add some spacers under bulkhead and stringers so you don't have HARD SPOTS.

Take your time ask away....but read Woodonglass suggestions. They rule!

1961 Lonestar Flamingo - SPLASHED...Kinda!!
Fabricating Decks, Stringers, and Transoms
Paint Your Boat with Tractor Paint...Say What!!!
eek.gif

KC
 

FBCoach

Petty Officer 2nd Class
Joined
Jun 16, 2018
Messages
141
Gotcha. I’m studying now for things to be done later. The other reasons i am asking for things ahead is when i get to that point, i want to have the materials on hand, not waste my random available working days waiting for them to be shipped. Basically making my order list. Thanks for the foam reminder. Thanks again for the help.
 

FBCoach

Petty Officer 2nd Class
Joined
Jun 16, 2018
Messages
141
Two hours here, two hours there. Getting there. Any thing you can see that i need to different from the pics? Thanks.
 

Attachments

  • photo294157.jpg
    photo294157.jpg
    2.1 MB · Views: 1
  • photo294158.jpg
    photo294158.jpg
    852.9 KB · Views: 1
  • photo294159.jpg
    photo294159.jpg
    1.6 MB · Views: 2

Woodonglass

Supreme Mariner
Joined
Dec 29, 2009
Messages
25,924
Looking good. You need to grind the sides of the hull too. You'll be tabbing the deck to them and the glass needs to be clean and fresh. I'd say it's time to start fabrication on some stringers!!
 

Mad Props

Lieutenant Commander
Joined
Jul 8, 2016
Messages
1,766
Looks like one more good session and you'll have a nice clean canvas there! Looks good.
 

FBCoach

Petty Officer 2nd Class
Joined
Jun 16, 2018
Messages
141
Deck height on starboard side was .25-.5 inches higher than the port...
Question, should the deck sit in the corner of the hull and sides or be slightly elevated? The original was rotten mush, so i couldn't tell. based off of 3/4" decking it likes it sat a little above. See pics. Making sure i measure my stringer ht correctly.
Thanks.
 

Attachments

  • photo294278.jpg
    photo294278.jpg
    1.4 MB · Views: 1
  • photo294279.jpg
    photo294279.jpg
    1.7 MB · Views: 1
Top