1987 Searay Seville Cuddy Restoration - stringer and engine mounts

Broaters

Petty Officer 2nd Class
Joined
Jul 31, 2017
Messages
139
Thanks I guess we will figure it out soon :)

any advices on how to do the final cut on the transom keyhole?
It will most probably be glued in tonight.
 

chevymaher

Commander
Joined
Mar 29, 2017
Messages
2,915
I used basically porting stones on a drill for the turning radius. It eats it out of there pretty quick. Wal mart has them in the tool dept cheap. Once I had the rough shape of the keyhole there with the jigsaw. I know what you mean about the blade bowing. I used the grinder to even it out. Then a hand file. I started the turning radius with the grinder to. Then got in the tight spots with the porting stones.

I found just go slow and it keeps the blade form pulling sideways as much. Cut a little back up and redo that cut.
 

Panoguy

Petty Officer 2nd Class
Joined
Jul 29, 2011
Messages
150
I made my 1st "cuts" with a spade drill (large bit, I think around 1-1/2"), the 2 sides at top of the keyhole... drilled at an angle. I then used a jigsaw to cut the rest, then grinder to make finishing touches. I admit - it was a "stressy" procedure, but it came-out well! I used the old transom as a template.
 

JASinIL2006

Vice Admiral
Joined
Feb 10, 2012
Messages
5,548
I put my transom in the boat to figure out approximately where the keyhole should be located. Then I used a template to draw the actual keyhole outline and hole locations when the transom was on sawhorses. (I have the template in .pdf form. If you want it, just PM me and I'll send it to you.)

Cut the keyhole with a sabre saw, after cutting the 'wings' out (for clearance for the steering arm) using a hole saw. If you go slow and are careful with the saw, you shouldn't have to do any cleanup with a grinder.
 

Broaters

Petty Officer 2nd Class
Joined
Jul 31, 2017
Messages
139
Hello guys,

Thanks for all the advice on the transom keyhole.

Our transom wood went in the boat yesterday and I have to say that i was way more stressfull than anticipated.
The room temp was quite low (18°C) and we mixed the poly on the low side to get more time but we had to do 3 different batches to glue it in and it was barely enough.

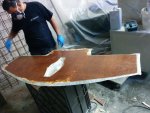
We started with a dry fit to ensure that nothing gets in the way once glued.
we trimmed again the keyhole and rounded off the edges. The little pieces that we glued back in place from the wrong keyhole cute is holding strong, you can hardly notice the seam on the side

2018-04-18 17.46.58_r.jpg

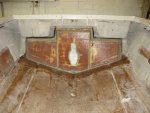
We also waterproofed the back side for added peace of mind with a layer of CSM. This part went very well.

2018-04-18 20.23.22_r.jpg

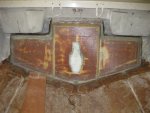
We din't get the glue squirt all around that I was expecting, we should probably have put more glue on the piece of wood for that.
Altough I'm quite sure that the center section is correctly filled I think that the 2 side portion may have had a little bit more glue on them.

We will see how it sound with the clamps off as it was difficult to assess it with the woods in the way.

I also checked the outer skin flatness after clamping and it is way better than when the hull was without wood I believe it will be within spec.

If I had to do it again I would:
- put more glue on both side
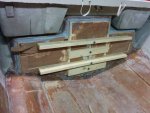
- add a long clamping wood to increase the pressure on the side parts
- probably add more thickness on the side clamps between the 2x4s and the piece of wood to add more pressure on the side as it is difficult to get clampage there with only a center screw pulling on the woods.

For those who will read this before doing their transom I would like to stress that preparation is the key, don't take shortcuts and recheck it twice if needed, once the poly resin is in, the clock will be ticking...
 

Attachments

  • 2018-04-18 18.47.27_r.jpg
    2018-04-18 18.47.27_r.jpg
    293.9 KB · Views: 1
  • 2018-04-18 20.22.31_r.jpg
    2018-04-18 20.22.31_r.jpg
    347.4 KB · Views: 1

Broaters

Petty Officer 2nd Class
Joined
Jul 31, 2017
Messages
139
Hello,

We have finished to tab and glass the transom plate.
The result is pretty decent I think given the fact that it is our first glas job ever (everyone has to start somehow :) )

IMG_1275_r.JPG

one question about tabing layup:
We have done it with the narrom ab first and the going larger and larger for every next layer. eventough we have done it "wet on wet" it is difficult to get it perfect where the second layer overlap the first one edge.
did someone already did it the opposite way? bigger tab first and the gong to narrower one?
It seems that West System literature recommends it this way.

Next time we move on to the stringer.
 

Attachments

  • IMG_1274_r.JPG
    IMG_1274_r.JPG
    352.3 KB · Views: 0
  • IMG_1276_r.JPG
    IMG_1276_r.JPG
    315.7 KB · Views: 0

mickyryan

Rear Admiral
Joined
Apr 18, 2016
Messages
4,210
i always go widest to narrowest because that's just how i did it to avoid air bubbles from the first piece edge, i have heard it being done both ways and there is a argument for both i reckon but in the end i think either way boat will be way stronger then when it was built from factory anyways!
 

kcassells

Fleet Admiral
Joined
Oct 16, 2012
Messages
8,600
Ahhh...I go from start to larger @ 3". But like Micky said 2 sides to that coin. Looks great to me!:D
 

rad1026

Chief Petty Officer
Joined
May 1, 2006
Messages
443
Hmmm, I also started narrow and over lapped with wider layers. Really didn't even think about going the other way. I think if you went wider to narrower you would have several raw edges to deal with. Not a big deal, but I think the cleaner way is to start narrow and go wider so when finished all the edges are covered except for the last layer. Did that make any sense at all?
 

Mad Props

Lieutenant Commander
Joined
Jul 8, 2016
Messages
1,766
I'm also in the narrower to wider camp... I can't think of a mechanical reason why it would be better, but to the point above... its less raw edges to deal with, and 1708 has a tendency to run if you catch an edge..
 

Woodonglass

Supreme Mariner
Joined
Dec 29, 2009
Messages
25,924
Woodonglass : Hello Wood, I have been reading through your post about how to fabricate deck, stringer and transom. The link send us to the page 42 of your main thread which has been recently updated but I cannot find any stringer or deck glassing layout suggestion. Those can however been found on other threads.
Would it be possible that you gather all of these super usefull info at one single location? maybe on new thread or new post?
I think the whole community would be very gratefull to you :)

Hope I'm not asking too much work, best regards

This link should get you there. It's also in the forum sticky section
https://forums.iboats.com/forum/boa...lamingo-splashed-w-pics?p=5550980#post5550980
 

Broaters

Petty Officer 2nd Class
Joined
Jul 31, 2017
Messages
139
Thanks everyone for the advice on tabbing I guess I will stick with the narrow to wider option and see how it goes.
I consider that the transom was one hard piece to glass given all the round edges and the surfaces to attach to.

Thanks Woodonglass for the feedback. I've seen this post already and it is very helpful. I tought that you had other one with stringer and deck glassing layout, hence my suggestion. anyway your link and all posts are very good source of knowledge.

Thanks again to all fellows boaters and rebuilders of iboats, your posts help us to sleep at night instead of wondering how to do the next step :)
 

Broaters

Petty Officer 2nd Class
Joined
Jul 31, 2017
Messages
139
The stringers are glued in and waiting to cure.

IMG_1282_r.JPG

They are actually joining the remaining part of existing one in the section between the cabin and the fuel tank so that we sill be able to re-inforce them on both side.
We cut the bulkhead and used them on random location to stiffen the structure and get them straight during the glue cure time. after that we will remove the bulkhead and install in the correct location.

We have used a "cordex" tool (chalk impregnated rope) to get a line on the transom to align the stringer to and also to mark the stringer to appropriate height before cutting them. It turned out pretty well.

IMG_1283_r.JPG
 

Attachments

  • IMG_1277_r.JPG
    IMG_1277_r.JPG
    359.8 KB · Views: 1

Broaters

Petty Officer 2nd Class
Joined
Jul 31, 2017
Messages
139
ok separate post for further questions:

- when tabbing the stringer do you cut the glass from the roll width (approx 1,25m / 50 inches ) and do some overlaps or do you use a single piece of the entire stringer length?

- we plan on tabbing the stringer before installing the bulkheads with 2 objectives, make the job more easy and create a water barrier between parts if water ever gets in. odes it make sense?

- 2 tabs of 1708 on each side is it enough ?

- what technique do you use for caping them? I saw some guys using clothes pins to maintain the CSM on the stringer while curing but hen how do you prevent it from sticking to the poly once cured?

- do you put the cleats after full encapsulation to the stringer or do you install before caping and glass them in?

well that's all for this time :)
 

chevymaher

Commander
Joined
Mar 29, 2017
Messages
2,915
I cut all mine full length. By the time you do that there is no waste. If you do the math first that is. A 6 inch and 12 inch rip eats it up.

I sealed and capped the stringers before they went in on the benches. So tabbing was all that was needed in the boat.

I glued and screwed the cleats on. Then grinded the edges so the glass would go on with out bubbles. Tapered rounded edges and angles into them at the bottoms. Then encapsulated the whole mess.

Charlie A. helped me with mine.
 
Top