You Guys Inspired Me!!!!

cpdchap

Petty Officer 2nd Class
Joined
Mar 2, 2013
Messages
162
Re: You Guys Inspired Me!!!!

Lakelover and Ezmobee
Both of you have eluded to this being the incorrect foam, please clarify. I would not have a problem changing it at this point and chalk it up to lesson learned. But as you know, to figure it out later would NOT be good.

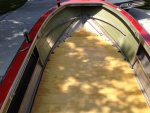
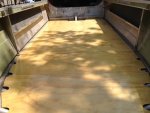
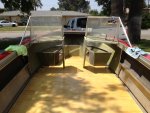
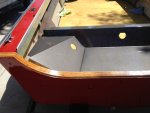
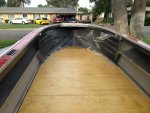
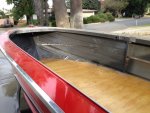
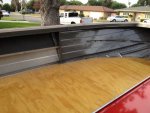
Before purchasing it I did look at the specs. and it is closed cell and is used for water proofing purposes, among other things. Also, I understand that we want it for water displacement and in theory should not be saturated in water for extended periods of time (I.E. if its stored covered and bilge pump works correctly......). Here are the specs.
 

Attachments

  • foam specs..jpg
    foam specs..jpg
    55.1 KB · Views: 3

lakelover

Rear Admiral
Joined
Mar 26, 2003
Messages
4,386
Re: You Guys Inspired Me!!!!

You look good to go, it should be OK as long as it says closed cell. Especially if you have good drainage and store it covered as you say.

The older ones, mine included, had regular old styrofoam from the factory. Mine was stored under a good tarp a long time before I got to removing it, so it was mostly dry, but several on here have had lots of saturated foam to remove, heavy stuff!
 

GA_Boater

Honorary Moderator Emeritus
Joined
May 24, 2011
Messages
49,038
Re: You Guys Inspired Me!!!!

It's closed cell - That's good. It's as good or better than the beer cooler foam Starcraft used in the factory. I wouldn't worry, CP.
 

cpdchap

Petty Officer 2nd Class
Joined
Mar 2, 2013
Messages
162
Re: You Guys Inspired Me!!!!

Thanks guys, I will proceed with my deck modifications.:)
 

cpdchap

Petty Officer 2nd Class
Joined
Mar 2, 2013
Messages
162
Re: You Guys Inspired Me!!!!

2 coats of spar varnish applied, going to get 2 more on and start securing the deck. As I said in my previous post it seems that the forward section tapers down, so I will secure the first 2 sections and then straight edge off of them and see what my issues are. I picked up my rivets for the deck.They are 3/16"x1 1/4" and have a 5/8 head, so they should hold good. Hopefully I will have a complete deck installed this weekend.
 

Attachments

  • rivet.JPG
    rivet.JPG
    133.8 KB · Views: 0
  • rivet 2.JPG
    rivet 2.JPG
    67.6 KB · Views: 0

InMotion

Commander
Joined
Nov 3, 2011
Messages
2,080
Re: You Guys Inspired Me!!!!

2 coats of spar varnish applied, going to get 2 more on and start securing the deck. As I said in my previous post it seems that the forward section tapers down, so I will secure the first 2 sections and then straight edge off of them and see what my issues are. I picked up my rivets for the deck.They are 3/16"x1 1/4" and have a 5/8 head, so they should hold good. Hopefully I will have a complete deck installed this weekend.

Ya... it is likely just that your rib cutouts are a tad to deep --- thus the floor tapering off. If anything you will want the opposite so that there is no chance of water pooling up at the front. In one of your previous pic's of the floor it looks like your cutouts might be a little large and especially towards the front... but it is really hard to tell. I can't remember, but did you cut the wood at a 45 including the cutouts? If not, it will sit high where there are no cutouts and too deep where you have cutouts --- if your cutouts are cut too far into the ply.

Hmmmm.... Just a thought here... but you could run a thinner doubler along both sides, re cut the cutouts for the ribs and see if that raises the floor up a bit. Try with a scrap piece at the front. Just trying to save you having to re-cut another piece. Prolly also need to counter sink your rivets more than usual to reach the ribs.

J.
 

cpdchap

Petty Officer 2nd Class
Joined
Mar 2, 2013
Messages
162
Re: You Guys Inspired Me!!!!

Ya... it is likely just that your rib cutouts are a tad to deep --- thus the floor tapering off. If anything you will want the opposite so that there is no chance of water pooling up at the front. In one of your previous pic's of the floor it looks like your cutouts might be a little large and especially towards the front... but it is really hard to tell. I can't remember, but did you cut the wood at a 45 including the cutouts? If not, it will sit high where there are no cutouts and too deep where you have cutouts --- if your cutouts are cut too far into the ply.

Hmmmm.... Just a thought here... but you could run a thinner doubler along both sides, re cut the cutouts for the ribs and see if that raises the floor up a bit. Try with a scrap piece at the front. Just trying to save you having to re-cut another piece. Prolly also need to counter sink your rivets more than usual to reach the ribs.

J.

Thanks Jim, hindsight is 20/20, I actually used the old floor as a template of course without straight edging it before zealously tearing it out. So to big of cut outs may be the issue. There is only 2 stringers past the center supports so I thought about putting a piece of 1"x1" aluminum angle straight across at the right elevation to support the last little bit. I will see very clearly what my issue is with the back to pieces secured tomorrow. I started to try and check it unsecured but obviously it is very inaccurate without the plywood tight to the runners. And yes the front is cut out at a 45 deg. angle.
 

cpdchap

Petty Officer 2nd Class
Joined
Mar 2, 2013
Messages
162
Re: You Guys Inspired Me!!!!

So I got the deck installed today and cut out and sparred the transom also. Once I got the back secured the front was not as bad as I thought. I was able to get a support across the last stringer and bring the front up on the exact plane as the rest of the floor. The rivets worked awesome. At all the joints I made 6" wide doublers the entire length of the joint, water proof glued and used epoxy coated, square drive screws. Overall I am very happy with the floor! Started dry fitting the consoles and front section to verify locations, I will prep all the interior aluminum parts for paint this week and shoot the interior next Sat. Today was another one of those times that I feel like I passed another significant milestone. Now alot of fun stuff!
 

Attachments

  • deck1.JPG
    deck1.JPG
    107.2 KB · Views: 3
  • deck3.JPG
    deck3.JPG
    98.2 KB · Views: 3
  • deck4.JPG
    deck4.JPG
    122.2 KB · Views: 3
  • deck5.JPG
    deck5.JPG
    104.4 KB · Views: 3

cpdchap

Petty Officer 2nd Class
Joined
Mar 2, 2013
Messages
162
Re: You Guys Inspired Me!!!!

Couple more pics. and a piece of advice. Projects go better with GOOD help!
 

Attachments

  • helper.JPG
    helper.JPG
    131.2 KB · Views: 3
  • deck6.JPG
    deck6.JPG
    133 KB · Views: 3
  • getting there.JPG
    getting there.JPG
    115.6 KB · Views: 3

GA_Boater

Honorary Moderator Emeritus
Joined
May 24, 2011
Messages
49,038
Re: You Guys Inspired Me!!!!

CP - You've gone to the dogs. :lol: Looking good! I'll say a milestone, you can walk inside the boat:joyous:.
 

classiccat

"Captain" + Starmada Splash Of The Year 2020
Joined
Dec 20, 2010
Messages
3,411
Re: You Guys Inspired Me!!!!

it's all starting to come together! lookin' like a SuperSport again!
 

InMotion

Commander
Joined
Nov 3, 2011
Messages
2,080
Re: You Guys Inspired Me!!!!

Looks terrific! Nice work man! Looking forward to see the interior come together!!

J.
 

lakelover

Rear Admiral
Joined
Mar 26, 2003
Messages
4,386
Re: You Guys Inspired Me!!!!

Really coming together & looking great! Great pic of your helper too.
 

cpdchap

Petty Officer 2nd Class
Joined
Mar 2, 2013
Messages
162
Re: You Guys Inspired Me!!!!

GA, Bluefin, IM, LakeLover Thanks guys! Ordering Nautolex today. Also..........looks like I am picking up a glasser:facepalm:It has an 80hp merc. on it that was just rebuilt and a bunch of other parts I can scavenge and they want to trade for a car hauler I have. So we will see if it works out.
 

dozerII

Admiral
Joined
Oct 25, 2009
Messages
6,527
Re: You Guys Inspired Me!!!!

Looking real cpd. It's always nice to be back to the stage where you can walk on the deck.
 

jbcurt00

Moderator
Staff member
Joined
Oct 25, 2011
Messages
24,995
Re: You Guys Inspired Me!!!!

Awesome score on the glasser donor.:watermelon:

Looks like the 'help' is all supervision, very little 'work'. Course you pay him w/ kibble & bits, so it's to be expected!

Excellent looking deck work!
 

cpdchap

Petty Officer 2nd Class
Joined
Mar 2, 2013
Messages
162
Re: You Guys Inspired Me!!!!

Consoles, front seating group, and rear splash deck are all prepped and ready to shoot in the morning......will post some pics tomorrow afternoon. Hope everyone has a great weekend.
 

cpdchap

Petty Officer 2nd Class
Joined
Mar 2, 2013
Messages
162
Re: You Guys Inspired Me!!!!

Quick update, interior pieces are done, and brought home the material and gun to shoot the last little bit on the inside that is exposed.........added a couple pics of the pieces just setting there. Almost time for some flooring.
 

Attachments

  • splash well.JPG
    splash well.JPG
    104.8 KB · Views: 3
  • splash well2.JPG
    splash well2.JPG
    115.4 KB · Views: 3
  • painted consoles.JPG
    painted consoles.JPG
    131.7 KB · Views: 3
  • painted consoles2.JPG
    painted consoles2.JPG
    119.5 KB · Views: 3

InMotion

Commander
Joined
Nov 3, 2011
Messages
2,080
Re: You Guys Inspired Me!!!!

First rate mate!!! Looks wicked! Really like where this is going...

J.
 

cpdchap

Petty Officer 2nd Class
Joined
Mar 2, 2013
Messages
162
Re: You Guys Inspired Me!!!!

Well I actually got the interior painted this morning, I have been crazy busy so the SS has suffered neglect and since the interior was not painted I couldn't sneek out and tinker on anything. So now I can install vinyl and start to reassemble. Hopefully we can show some regular progress for awhile.
 

Attachments

  • interior prepped.JPG
    interior prepped.JPG
    115.8 KB · Views: 2
  • prepped interior.JPG
    prepped interior.JPG
    135.8 KB · Views: 2
  • painted interior.JPG
    painted interior.JPG
    127.5 KB · Views: 2
  • painted interior 2.JPG
    painted interior 2.JPG
    135.2 KB · Views: 2
  • painted inerior 3.JPG
    painted inerior 3.JPG
    119.9 KB · Views: 2
Top