Where do I belong? Alum Goods 1687, SS16 Clone?

ShoestringMariner

Lieutenant Commander
Joined
Apr 18, 2015
Messages
1,593
My splashwell is already flat in that area, so that could work for me too. I think some add-ons will need to wait for 2023 though. Maybe we'll see how many times the portable ladder that just hangs over the side gets used. Off to roll a slightly thicker coat #2 shortly, if I can find my way to the shop in the fresh snow!
Crazy weather. I had mine In the driveway, put it away for the possible ice storm we were supposed to get a never did. Now I just shoved it back outside into the tundra so I can continue varnishing floorboards.

I think you and I are the in same boat , not literally, but in the “get it done and get it useable” boat. Leave further upgrades for next winter
 

renns

Petty Officer 1st Class
Joined
Dec 20, 2017
Messages
316
Still poking away at the boat painting process. Three coats on exterior (top three strakes), and 2 on most of the interior trim/gunnels/splashwell. One more coat on everything, and I think I'll call it done - looking forward to peeling the masking tape off, and getting on with assembly.
I had a can of the same colour aerosol Rustoleum(Tremclad), so I thought I'd use it for the awkward deep corners of the splashwell, and ended up with a disaster. Strange in that I was following the same 24 hr cure time between coats, but whatever the solvent was in the aerosol it didn't play nice with the rolled coat below. Will need to sand those spots out and try again. Hopefully it didn't mess up the primer below as well.
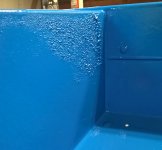
WP_20220330_10_39_27_Pro (2).jpg

My last bit of painting was on a windy day, and there's some dust that made it into the finish. I think just be exiting the shop after painting, or perhaps air exchange from a leaky building caused those issues. I'll be wet-sanding and polishing once fully cured.
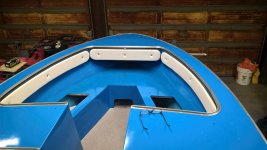
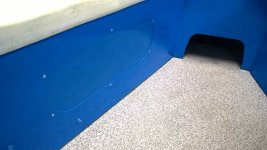
Consoles and front seat boxes are now back in for good, I hope. I'm looking at the bow area, and that section below the bow cap is really useless. The thicker-than-SS gunnels make the gap too narrow for an adult foot. It could be filled with more floatation foam and boxed shut I suppose.
Also the aluminum seat tops and front triangle were all closed in the top, requiring jamming of stuff through the side-holes. Given plywood-backed padded seats are in there providing some rigid structure already, I cut open the aluminum seat tops to give access from above that storage area. I need to find some trim to use around that cut edge. I'd like to do something similar for the bow triangle to give access to that area from above as well. Maybe a hatch is in order. The stock arrangement has another block of eps foam clipped to the underside. WP_20220401_11_38_28_Pro.jpg
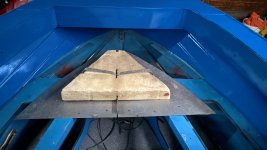
I almost got myself into some serious trouble the other day, with fresh paint on exterior of hull, splashwell, gunnels, etc, leaving me no dry exit strategy! Fortunately I was able to channel my inner gymnast and arched my way over to the workbench, and down to ground level with no wet paint contact.
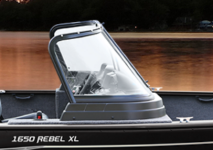
Still haven't decided if I'm going to stick with the flatter replacement windshield, or modify it to keep the steeper stock look. I was also considering some sort of elevated windshield setup, like the Lund below, but need to keep the 'feature-creep' in check or it'll not sail this season!
1648834933606.png
 

renns

Petty Officer 1st Class
Joined
Dec 20, 2017
Messages
316
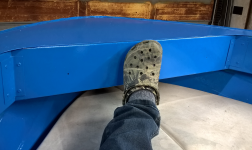
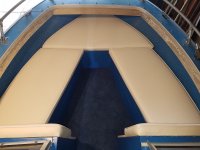
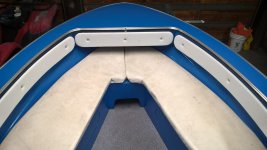
Here's a couple more pics. Here's the size of an adult foot on the cushion - no way it fits under the gunnel! These tall gunnels probably give lots of rigidity to the hull, but do take up space. What's the point of having these cushions extend way up to the bow?
1648846538854.png

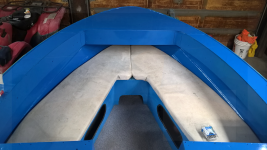
BTW, shown below are the old cushions, build by previous owner - not original. Zoom in to those notched corners to see some high-tech upholstery skills! I don't know what originally came in the boat, although I'd image he copied those. If I were to make two seat cushions, that stopped at notch and perhaps a single 'triangular' shaped cushion, it would be far easier. These currently are held in place by gravity. Not sure if the shorter cushion would be more apt to pop loose. I'd like them easily removable so I can access the storage underneath. In fact, I may use the cutouts from the top of the seating area to close in those side ovals completely.1648846615418.png

And yes, that's a lot of blue! Can't wait to get some side cushions installed. Will work on that this weekend. Our whole family has been taking turns with the latest variant this week, so energy available for boat projects is sub-optimal.
 

classiccat

"Captain" + Starmada Splash Of The Year 2020
Joined
Dec 20, 2010
Messages
3,412
Did somebody bake cookies??!

1648851670360.png

I'm sorry to hear about your family dealing with Covid...wishing you all a full and swift recovery!
 

ShoestringMariner

Lieutenant Commander
Joined
Apr 18, 2015
Messages
1,593
Oh that sucks. It’s running through our workplace also. Hopefully it’s minor like a lot of people are reporting. Still nasty to have that go through the household. But onto your baby. That blue looks like it’s still wet! Looking great!!

You know you might be able to trim that piece of bulkhead up for foot access. I really don’t think it needs to be that beefy considering your v bench seats are adding a fair bit of rigidity. And trim it out with some light aluminum. Home Depot sells half by half and three-quarter by three-quarter aluminum extrusion angle As you have probably seen.
I picked up some of that t molding. Looks great on your boat.
 

renns

Petty Officer 1st Class
Joined
Dec 20, 2017
Messages
316
CC & SSM - Thanks. Like a bad cold for us so far. Hopefully that's it and we'll have supercharged immunity afterwards! CC - didn't get the cookie monster joke at first - thought there was crumbs on the jeans or something! I'm thinking now it's the colour! Yeah, it's "Medium Blue", a highly creative name for that standard mix colour that was a pretty close match to the original. I preferred navy, but admiral says she likes the vintage look of the original. Will need to trade the camo crocs for some 70's deck shoes to fit the part.

@ShoestringMariner : I had considered trimming up that bulkhead as you mention, but that along with the other tweaks I'd been dreaming of are being set aside as spring arrives. I hope to find time to do a quick sand, and then put one more coat of paint on everything this weekend. Then it's cushion time, and starting to put stuff back together. Our lake still had almost 2 ft of ice last weekend, but it'll go quick with the warmer temps and rain in the forecast, it'll be open in no time.
 
Last edited:

ShoestringMariner

Lieutenant Commander
Joined
Apr 18, 2015
Messages
1,593
I had to go back and reread your thread. Was rather rushed. That’s a real bummer about the crinkly paint. The thinners in the aerosol have attacked the base paint. I’m going to guess that the primer may be OK. Tremclad paints are alkyd based, with slower drying solvents.

The rustoleum might have been be their industrial line of paints?

I had a laugh over your inner gymnast comments. Made for a good visual. Funny
 

renns

Petty Officer 1st Class
Joined
Dec 20, 2017
Messages
316
They were both Tremclad, but the 1st coat was roll & tip with Tremclad from the can mixed with Krylon reducer and Krylon hardener. For the second coat I thought I'd try the aerosol can as all those inside corners were a pain with the foam roller. Lesson # 36 on the project. Stick with what you know works!
 

renns

Petty Officer 1st Class
Joined
Dec 20, 2017
Messages
316
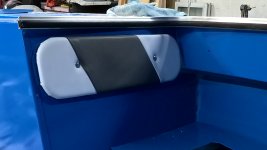
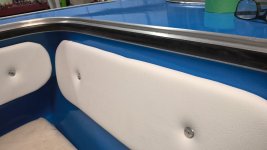
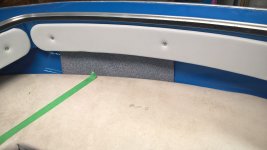
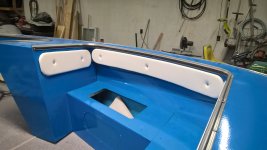
This weekend I made applying last coat of paint, ripping off masking tape, polishing trim and making up side panels for the bow seating area. The previous side panels were rotten, held in place by steel machine screws that had corroded away to nothing.
For replacement panels, I used 1/4" baltic birch plywood, liberally soaked in OTF. The console and bow sides are flat, but the two port and starboard gunnel side cushions are curved. Those curves were achieve by bending the hot wet plywood strips just past the desired curvature, and allowing to dry.
WP_20220404_09_37_44_Pro.jpgWP_20220404_09_45_13_Pro.jpg
For foam, we used more of the closed cell foam underlayment we had in the basement. The stuff is about 1/8" thick, so we laminated 4 pieces together using 3M spray adhesive. The first three layers were trimmed to match the plywood after bonding. The fourth layer was bonded after, and trimmed to extend beyond the ply enough to fold over the foam and ply edge when the vinyl was pulled overtop.
WP_20220404_09_46_07_Pro.jpg
WP_20220404_09_37_32_Pro.jpg
Vinyl was pulled over, stapled with stainless staples, starting at the bottom. In a couple of the panels a center overlapping piece was used at the back, layered like roof shingles to prevent any water intrusion.
WP_20220404_09_45_39_Pro.jpg
These panels were then riveted in place with the large-flange 3/16" rivets left over from the deck replacement. That trim is just laid in place currently, as it's getting a final clean and polish before it gets riveted back in place.
WP_20220403_17_26_10_Pro.jpg
A couple of versions were tried, including the two-tone with diagonal grey stripe. Surprisingly admiral voted for the one that was less effort! This was one of the first attempts. Later versions with refined technique almost completely eliminated those corner puckers that are visible on the two-tone version below.
WP_20220403_17_16_57_Pro.jpg
Bow seat cushions are next on the list.
 

renns

Petty Officer 1st Class
Joined
Dec 20, 2017
Messages
316
To make the storage areas under the seats more accessible, I cut open the tops of the bow seats, and used the drop from there to plug the original side openings. The 'mousehole' at the front is still there for now. That space in the bow isn't very accessible unless I modify and reinforce the seat panel in the bow to allow overhead access. Will leave as-is for this season at least.
WP_20220404_19_13_06_Pro.jpg

WP_20220404_19_17_06_Pro.jpg

I'm happy with how the aluminum trim turned out. I didn't want flashy chrome look, but definitely needed to clean up the dings and corrosion. Wet-sanding up to 600 did the job, and a coat of Sharkhide protectant was applied afterwards.
WP_20220404_19_18_36_Pro.jpg
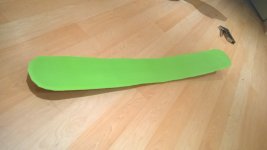
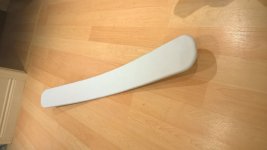
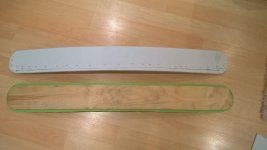
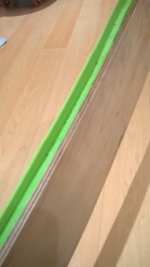
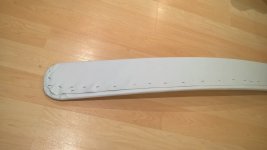
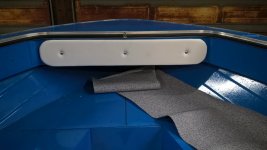
The bow seat cushions need work as well, so that's also on the list for pre-splash. I'm not a fan of the long seat cushion with the odd shape, and am considering two side cushions, and one triangle (green tape forward). Also thinking of applying the remaining Nautolex to the exposed hull sides, like the sample below.
WP_20220404_19_24_01_Pro.jpgWP_20220404_19_15_27_Pro.jpg
 

SHSU

Lieutenant Junior+Starmada Splash Of The Year 2019
Joined
Mar 8, 2017
Messages
1,725
Looks really good!!! Impressed with your thought to detail on the curvature. I didn't install my padding back as I didn't think people would be resting against it, but love the finished look.

The front access hole, my PO cut a whole in it to get to the front area too. I don't know why Starcraft made such a difficult place to get to. Personally it has grown on me, but that is probably because it is hidden under the removable casting deck since we mostly fish. lol

SHSU
 

ShoestringMariner

Lieutenant Commander
Joined
Apr 18, 2015
Messages
1,593
That looks so good! Your cushions look so neat and tidy. Very pro! I can’t believe the mountainous amount of work you can chew through. I think the grey nautolex will look really good between the seat and side cushions.
 
Last edited:

renns

Petty Officer 1st Class
Joined
Dec 20, 2017
Messages
316
Thanks for checking in guys. Looking for advice on those cushions. Currently they go all the way up under the closed bow area, and are awkward to remove. But, that also means they tend to stay put on their own as well; not likely to leave the boat in choppy windy conditions. If I make two side cushions separate from the 'triangle' up under the bow, will they need to be restrained somehow? Snaps/clips? I'm thinking the underside of the seat would have a wooden 'plug' the same shape as the hole in the aluminum support underneath so the cushion stays in place laterally. It's the vertical movement I'm worrying about - picturing the cushions bouncing up and getting caught by the wind. And @ShoestringMariner claims he overthinks things. We need to have an "OverThinkOff" challenge sometime!
 

Attachments

  • WP_20220404_19_13_27_Pro.jpg
    WP_20220404_19_13_27_Pro.jpg
    1.5 MB · Views: 4

ShoestringMariner

Lieutenant Commander
Joined
Apr 18, 2015
Messages
1,593
“overthinkoff”, awesome…

Mine are 2 pc just like yours. They had a fold on the outer edge with snaps.

Because they are deteriorated and always waterlogged and were always pulled out stood up to drain, so never snapped.

And they never ended up on the 400 series Hwy at a buck twenty. (My mooring cover likes to blow up so I travel with no covers)

But my new seat pads will be 3 piece to access 3 hatches, and like you I will probably want to snap them somehow. AND have the cushions reversible.
Overthink-overdrive time…

Maybe a 1pc travel cover will fix that.

Or a small perimeter ledge to keep cushions from bouncing in floor during wave pounding?
 

Michigan Lakes

Petty Officer 3rd Class
Joined
Dec 20, 2018
Messages
86
If I make two side cushions separate from the 'triangle' up under the bow, will they need to be restrained somehow?
I was initially worried about this same thing when I replaced the Starcraft fixed bow "seats" (zero padding) with three removable padded seat cushions. With the original underside access holes now covered, there is very little space for wind to create any lift from the seats. I have no hardware securing the cushions down. That being said, they are a slight "resistance fit" and not at all loose once in place. I'd probably add some sort of hold down device if I did any freeway towing but the current setup has had zero issues on my usual 40-50mph tows to the launch.
Bow From Top.jpg
 

ShoestringMariner

Lieutenant Commander
Joined
Apr 18, 2015
Messages
1,593
That’s nice and clean M.L.
I think looking at your photo I figured what I’m going to do and perhaps an idea for Renns;

What about putting snaps on the backside of the cushions? The snaps that the cushions attach to could be on nylon mesh tabs (like seatbelt material). Out of view when cushions are installed and the cushions might be able to be reversible (?)
 

renns

Petty Officer 1st Class
Joined
Dec 20, 2017
Messages
316
@ShoestringMariner - not sure I'm clear on what you're describing yet. By reversible - you mean the cushion would have no integral plywood base, but would be like a sofa cushion that can be flipped over and used the other way? What's the advantage there? Different style one side vs the other (like the mullet - business up front, party in the back!)? My thought was just to make these with plywood bottom in part for weight to hold them in place, but also to provide a more rigid seating surface. I did just cut holes in the aluminum seat panels, so a soft cushion with no other support would be no bueno.
 

renns

Petty Officer 1st Class
Joined
Dec 20, 2017
Messages
316
I was initially worried about this same thing when I replaced the Starcraft fixed bow "seats" (zero padding) with three removable padded seat cushions. With the original underside access holes now covered, there is very little space for wind to create any lift from the seats. I have no hardware securing the cushions down. That being said, they are a slight "resistance fit" and not at all loose once in place. I'd probably add some sort of hold down device if I did any freeway towing but the current setup has had zero issues on my usual 40-50mph tows to the launch.
View attachment 358379
That's a nice tidy look. I like it! Did you do your own upholstery work? How are they attached to the hull? Is that an SS16? From that view, it looks like the covered bow section is bigger on mine. Not sure why they did that, as it's just wasted space up under there. Should fill with foam blocks and close it in. I could probably get another 2 ft^3 of floatation foam in there.

Just brainstorming here... if I was to have a lip extended forward from the underside of the side cushions, then the bow cushion could drop in overtop, capturing those lips. Maybe a vinyl strap mounted to the bow cushion could hang down and snap to the aluminum below, holding all three cushions in place?
 

ShoestringMariner

Lieutenant Commander
Joined
Apr 18, 2015
Messages
1,593
@ShoestringMariner - not sure I'm clear on what you're describing yet. By reversible - you mean the cushion would have no integral plywood base, but would be like a sofa cushion that can be flipped over and used the other way? What's the advantage there? Different style one side vs the other (like the mullet - business up front, party in the back!)? My thought was just to make these with plywood bottom in part for weight to hold them in place, but also to provide a more rigid seating surface. I did just cut holes in the aluminum seat panels, so a soft cushion with no other support would be no bueno.
Hah, No mullet, No I did sport one of those back in the 80s…

Reversible to get double the amount of we’re out of it. The ones I have now are Identical front and back. No plywood at all. Don’t think you need plywood in case your substrate isn’t strong enough. Even though the dome snaps I have on mine are intended to snap on the front edge of the seat they’re technically not reversible as in flip them over to double the life of the cushion. White tends to get all scratched up, stained and crappy looking. When that happens, you’ve got another 50% of life left on the other side. That’s my thrifty/Scottish side coming out.
 

Michigan Lakes

Petty Officer 3rd Class
Joined
Dec 20, 2018
Messages
86
That's a nice tidy look. I like it! Did you do your own upholstery work? How are they attached to the hull? Is that an SS16?
1975 SuperSport 16'
Negatory on my own upholstery work. I removed the original fixed seats (1/2" ply w/ a vinyl cover riveted directly the bow interior structure), cut new boards of the same size/shape, and had those upholstered along with the vertical cushions directly below the windshield. $500 materials and labor (2019 prices).
 
Top