transom leak

rickasbury

Senior Chief Petty Officer
Joined
Jul 13, 2011
Messages
787
Huh....yes two go through the plug and there were butt connectors for those, one male and one female. I will have to look again because I think I have two sets of two wires that go to the bravo....two I unhooked by the motor and the other two appear to go up into the harness...I have clipped the wire ties to follow them up about 3 feet and see no connectors which is why I asked...will look again...
 

mr300z87

Senior Chief Petty Officer
Joined
Sep 15, 2010
Messages
694
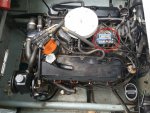
As Rick said 2 are for the trim sender, those snake up the engine and connect to the engine harness at the Merc Cathode (Blue Box) mine is on top of the engine next to the carb Merc Cath.jpg see circled. Not sure where your is as the one on my 5.7L it is on the front of the engine near the mechanical fuel pump. The other 2 wires are for the trim limit switch and they go to the trim pump and they connect in line with the trim switch on the throttle to limit how far up the drive goes while trimming the drive at speed. The trailer switch by passes the limit switch. BTW if the limit and trim senders have not been replace recently I would recommend you do it while you have this apart as it is much easier with the engine out. Hope you get those exhaust botls off soon. Not sure where you are located but I saw a couple of exhaust tubes for sale on Central Jersey or Jersey shore c-list cant remember which. Good luck.
 

rickasbury

Senior Chief Petty Officer
Joined
Jul 13, 2011
Messages
787
Thanks mr300z87 I will have to look again but I do have a different set up. I had the two wires I could plug in near the main engine harness on top of the motor. The other two wires go into another harness that runs along the top of the transom, over towards the trim pump and the dash etc. I opened up a section of that, did not find any connectors and perhaps it just runs over to the trim pump and not a big deal. For sure concentrating on getting these friggin bolts off so I can pull the transom assy apart and see what the transom looks like. Come hell or high water, it will be off this weekend if not before!
 

rickasbury

Senior Chief Petty Officer
Joined
Jul 13, 2011
Messages
787
so, no good on getting those lower two bolt heads off...small diamond cutting wheel...larger drill bit which just walked off the side....only thing I can think is a reciprocating saw and go to cutting the y pipe down until I can pull whats left through the key hole, anyone have a better idea for me?
 

alldodge

Moderator
Staff member
Joined
Mar 8, 2009
Messages
42,079
A true carbide drill bit will cut thru stainless, but not being able to keep it on the bolt is the issue with that thought.

Even if the Y pipe is cut there can still be an issue getting the transom assembly off. My thought is the housing around lower Y pipe will still keep it from coming off clean. Might have to cut the transom assembly also, but this is uncharted waters so to speak for me
 
Last edited:

Rick Stephens

Admiral
Joined
Aug 13, 2013
Messages
6,118
Wow. Impossible situation, I really feel for you.

You have a small welding shop close by you can get a little help from? Anyone with a plasma torch can start carving a heck of a lot easier than sawing on it. Like using a hot knife on butter, a plasma on aluminum. Plasma torch might also just whack the heads off the bolts, although I can't picture things down there well enough to know if there is room or not. Welding shop should have a fire blanket they can toss in the bilge to keep hot stuff from sticking.
 

rickasbury

Senior Chief Petty Officer
Joined
Jul 13, 2011
Messages
787
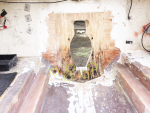
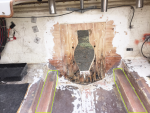
Well, to late now! The reciprocating saw actually cut through those pipes fairly quickly. I bought one at the old harbor freight. Guess the cheap tools from China will stop following so good I got one now! Tried some "diamond" blades for metal but the 14 TPI for heavy metal actually did pretty well. Here are some pictures. It has obviously been leaking for some time- good thing it did not sit in water or I'm sure I would have much more problems than I do. I have a buddy, same one I borrowed tools from to do the bellows, that will come by and look at the transom with me. It seems to be fairly solid. The edges around the holds have lost some material but when you poke around in the holes, the wood seems to be solid. The seal on the gimbal looks like it is completely flat and level with the gimbal ring. I really don't see how it sealed anything. So, I hopeful One ear off.jpgtwo ears off.jpgtwo ears on the ground.jpgseal is completly flat!.jpgtransom 2.jpg that the transom is ok, I need a seal, I need a Y pipe, I need a couple of other things I screwed up and the healing will soon begine!
 

Rick Stephens

Admiral
Joined
Aug 13, 2013
Messages
6,118
Now's the time for a few test holes low down on the transom.

Those seals are always flat. Wait till you see them when they're round. Foamy stuff that doesn't seem likely to seal anything.
 

rickasbury

Senior Chief Petty Officer
Joined
Jul 13, 2011
Messages
787
I will wait for my buddy to come over before I touch anything more on it and will check it out together. Will get stuff picked up- Easter next weekend so this painfully slow project will continue! I can work on getting the now studs out of the gimbal, clean up the motor....work on the risers...plenty to do for sure. Would love to yank the genny out- frame is just rusting away but I don't think I can add much more to this. I need to be back in the water!
 

rickasbury

Senior Chief Petty Officer
Joined
Jul 13, 2011
Messages
787
well, never heard back from my buddy, think he has some home issues and I don't want to be a pest so I guess it is me and you all! I will break out my palm sander and sand the paint off the edges in the key hole and clean everything up a bit. I THINK if I have any issues at all, it will be at the very bottom of the transom. There is something that is covering that wood more than just paint, perhaps a little fiber glass was rolled over it. It is not delaminated from either side of the transom. When you pick at it, the wood underneath obviously has been wet as it is dark coloured but I don't know how deep that is. It does still seem solid however. I did not want to disturb anything before my buddy looked at it. I will so some cleaning up, determine how deep that darker coloured wood is and post some pictures. As far as the drilling, how far away from the edge of the key hole do I need to go to determine transom condition?
 

Rick Stephens

Admiral
Joined
Aug 13, 2013
Messages
6,118
Take a 3/8 drill bit and drill some holes. You gotta go out until you hit dry wood to know. No one can tell you how far. If water has been getting to wood, capillary action takes the water as far as it can go, uphill, around corners. The only way to know what you have is to drill until you find clean wood.

Those holes are easy as can be to plug back up. So don't be too shy about it. Doesn't take an expert.
 

rickasbury

Senior Chief Petty Officer
Joined
Jul 13, 2011
Messages
787
Thanks Rick- I will drill some holes then an inch or so from the keyhole and see what I have. As far as the bottom, I will drill straight down into that and see if I have clean wood beyond what I can see from the surface. I won't even go into speculation where I go from there until I have some results to post!
 

alldodge

Moderator
Staff member
Joined
Mar 8, 2009
Messages
42,079
As far as the bottom, I will drill straight down

NO, don't do that, no drilling in the bottom

You can drill in the transom or the stringers but not the bottom
 

Rick Stephens

Admiral
Joined
Aug 13, 2013
Messages
6,118
Absolutely, only straight back into transom or to the side into stringer wood. Be especially careful into the stringers since the hull slants up.

In the pic below I started with 3/8th drill bit at the lowest spot I could reasonable reach and found wet wood. Then I moved up under the keyhole to see if the problem came from there - the wood was nearly dry.. After the first hole I went to a small hole saw so I could see what the wood structure looked like, not just how dark it was. I then moved higher to see how far up it went. Finally out towards starboard stringer and figured out where the water was coming from. I did cutaway the stringer fiberglass later on to make sure the wood inside was in decent shape before building new motors mounts to hang twice as much power back there. I wanted to be sure I had good structure to stay safe. AllDodge kept me focused on what the reality was as opposed to what I wanted to see.

After drilling the holes I started grinding off the glass so I could get to the wood. I don't have a picture from this angle earlier in the process.


testholes.png
 

rickasbury

Senior Chief Petty Officer
Joined
Jul 13, 2011
Messages
787
Yikes! I did not mean drill down through the hull! I meant at the bottom of the key hole- your picture the bottom of the key hole is much much higher than my boat- I will drill only horizontally and no drilling down into that.
 

rickasbury

Senior Chief Petty Officer
Joined
Jul 13, 2011
Messages
787
Also, I'm not sure I understand what/where the stringers are I need to check.. I am assuming a stringer runs across the bottom of the hull and ties and supports the hull and the sides. I have one way up in front of the motor and the fuel tank is on the other side.I don't have a stringer that runs from side to side for the motor mounts. I will post a picture tonight of the blige area.and you can tell what else to check in there. I am still optimistic (praying) that it is only the bottom of the keyhole that is dark and the structure of the wood is good.
 

rickasbury

Senior Chief Petty Officer
Joined
Jul 13, 2011
Messages
787
dang, how much glass really holds the transom to the boat? Your picture above does not look like much. Also (never built a hull) but if you had a lot of glass on the out side of the transom and you brought those sheets of glass around the corner, you would have to build up the sides of the boat with glass the same amount so you don't have a big bump coming around the corner? I really need to get on you tube and understand how that is constructed! I don't see any stringers in your picture the way I would understand a stringer to be- so the large parts of the floor that run the length of the boat are the stringers?
 

Rick Stephens

Admiral
Joined
Aug 13, 2013
Messages
6,118
Stringers are the fore and aft hull stiffeners. Typically built with a couple of 2x6 or 2x8 glassed down onto the bare hull to give it lengthwise rigidity. The ends of the stringers are often wood to wood contact with the transom wood. So water in one can get into the other. A couple of holes drilled into them a inch or two up from the bottom of the bilge will tell you if they are water logged. Often see even the motor mounts water logged from transom leaks.

stringers.png
 

Bondo

Moderator
Staff member
Joined
Apr 17, 2002
Messages
70,958
Also, I'm not sure I understand what/where the stringers are I need to check.. I am assuming a stringer runs across the bottom of the hull and ties and supports the hull and the sides. I have one way up in front of the motor and the fuel tank is on the other side.I don't have a stringer that runs from side to side for the motor mounts.

Ayuh,...... Bulkheads run from side to side,.....

Stringers run fore, 'n aft,.....
 
Last edited:
Top