transom leak

rickasbury

Senior Chief Petty Officer
Joined
Jul 13, 2011
Messages
787
I always over think everything! But, that also gets me prepared for the worst. I don't want to remove the hatch, I always disconnect the ram and open it fully when I am working down there....question is, with the motor out, will the power still work to lower and raise it or is everything grounded to the motor? Cannon ;plug, it that what I took a picture of , a round plug?? I'll get it done....
 

rickasbury

Senior Chief Petty Officer
Joined
Jul 13, 2011
Messages
787
Here is what I'm dealing with as far as size....I don't think that hatch can easily come off and be handled...
 

Attachments

  • photo285218.jpg
    photo285218.jpg
    301.8 KB · Views: 1
  • photo285219.jpg
    photo285219.jpg
    365.5 KB · Views: 1
  • photo285220.jpg
    photo285220.jpg
    242.2 KB · Views: 1

Bondo

Moderator
Staff member
Joined
Apr 17, 2002
Messages
70,958
Ayuh,.... The hatch has nothin' to do with the motor,....

Ya might have to temporarily wire the hatch lift directly to the battery,.....
Depends on how it was wired in the 1st place,.....

Ya, the motors wirin' harness disconnects from the hull wirin' harness at that big round rubber plug, 'n socket, the cannon plug,....
 

Maclin

Admiral
Joined
May 27, 2007
Messages
6,761
I just did an R&R last fall. I did not see a lot of details in the manual for removal of the engine. Just 17 steps, kind of like using a roadmap in Texas, they only make sense after you get there. Removing key parts of the boat was almost as much work.

From service manual 32 that I used to remove a 2002 model 4.3, for your reference...

1. Disconnect the battery cables.
2. Remove the engine cover.
3. Loosen the clamp and remove the instrument wiring harness plug from the engine wiring harness receptacle.
4. Loosen the hose clamp retaining the fuel line to the fuel inlet.
5. Close the fuel shutoff valve, if equipped.
6. Disconnect and plug the fuel line to prevent fuel in the line from leaking into the bilge.
7. Disconnect the throttle cable and retain the fasteners.
8. Disconnect the shift cable from the shift plate and retain the fasteners.
9. Disconnect the power steering hoses.
10. Disconnect the seawater inlet hose from the transom.
11. Loosen the hose clamps at the bullhorn.
12. Remove the gear lube monitor and the hose and place out of the way.
13. Disconnect any grounding wires and accessories that are connected to the engine.
14. Support the engine with a suitable sling through the lifting eyes on the engine.
15. Remove the rear engine mounting bolts.
16. Remove the front lag bolts. Retain the fasteners.
17. Carefully remove the engine.

There are some drawings in the manual along the way for orientation and referencing.

For step 10 pertaining to the inlet hose, I decided ahead of time to replace that hose and just cut the current one figuring it would be easier to install the new one than finagle the access to remove the old one and keep it, and it was. Extra cost but was worth it to me, plus now that is new.

There was a small cooling hose from the power steering cooler on the back of the engine to the transom rack, it was not called out in the instructions. It got stretched a little before I saw it.

Be sure to get all new rear mounting kit for bolts, nuts fiber washers and double wound lock washers.

Never waste an opportunity like this to justify some new tools :) For this effort I got the full 5 pc. set of hose removal picks, they were vary valuable when it came to the exhaust.
 

Rick Stephens

Admiral
Joined
Aug 13, 2013
Messages
6,118
I just did an R&R last fall. I did not see a lot of details in the manual for removal of the engine. Just 17 steps, kind of like using a roadmap in Texas, they only make sense after you get there. Removing key parts of the boat was almost as much work.

From service manual 32 that I used to remove a 2002 model 4.3, for your reference...


Spot on.
 

rickasbury

Senior Chief Petty Officer
Joined
Jul 13, 2011
Messages
787
sweet! This was what I was looking for.....it looks like such an impossible task- I just can't pay someone to do this one. There are things I will have to pay to have done and when I get the motor out, might well have to pay someone to do some transom work if that is the issue- I just have to do what I can feasibly do myself, myself. I've gotten this far.....I will take the boat back today to storage while I fabricate my dolly and keep moving forward, will come back to this info during the week and study it carefully.
Thanks all for the imput
 

rickasbury

Senior Chief Petty Officer
Joined
Jul 13, 2011
Messages
787
So, this is the start of my engine dolly. The 20" opening in the middle is the same as the space in the hull and I will build up with with 10" x 10" for the front mounts to rest on. I want to keep the engine low but perhaps get to the oil pan if need be. I am a little at a loss for how to support the rear of the motor so it does not teeter totter. I have to get this off a trailer into my garage and then back on the trailer to re install the motor so I need to make sure it is tied down well. I will put some brackets on it so I can run some straps across, perhaps with just some blocks in the rear, the straps across it and I can run a couple of lag bolts down through the front engine mounts to hold it all together.
 

Attachments

  • photo285292.jpg
    photo285292.jpg
    262.3 KB · Views: 1

Bondo

Moderator
Staff member
Joined
Apr 17, 2002
Messages
70,958
I am a little at a loss for how to support the rear of the motor so it does not teeter totter.

Ayuh,..... As I've said,.....

There are pallet mountin' tabs cast into the flywheel cover,....
The fully dressed motor sits squarely on a flat pallet, with wood blocks, 7" tall for the front mounts to set on,....
 

rickasbury

Senior Chief Petty Officer
Joined
Jul 13, 2011
Messages
787
Bondo- thanks for the info- keep in mind I have never seen one of these motors out of a boat so I don't necessarily understand what I'm sure is very easy for you to try and explain with your experience. So, if I have 7" blocks under the front mounts, that same block runs to the back of the motor and will align with the tabs in the fly wheel cover? So I just need the one block on both sides and I'm good? The only tabs I can see and I guess you would call that the fly wheel or coupler cover are higher and where that cover bolts to the inner transom plate- that's not what your talking about correct? I just want to make sure when I get it yanked out I can secure it for the trip home....not that far but it is on the highway.
 

rickasbury

Senior Chief Petty Officer
Joined
Jul 13, 2011
Messages
787
Plus I don't want the bottom of the motor to hit anything and mess something up....got enough mess already!
 

Maclin

Admiral
Joined
May 27, 2007
Messages
6,761
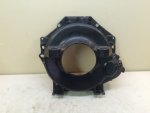
This is the engine bellhousing from the rear, showing the shipping tabs at the bottom, I was thinking that maybe some inboards may use them for mounting but that is just a feeling...:

s-l640.jpg
 

Bondo

Moderator
Staff member
Joined
Apr 17, 2002
Messages
70,958
So, if I have 7" blocks under the front mounts, that same block runs to the back of the motor and will align with the tabs in the fly wheel cover?

Nope,.... The 2, 7" blocks go Only under the front mounts,....

The flywheel cover tabs sit directly on the flat pallet,....

Mac posted a picture for ya to see the tabs,.....
Thank you Mac,..... ;)
 

rickasbury

Senior Chief Petty Officer
Joined
Jul 13, 2011
Messages
787
Sweet- So these will align horizontally with the front mounts and are what would appear to be the same vertical center line as the mounting holes to the transom above. I think they would be used only for transporting and not mounting. They are a little closer together than the front mounts so I will have to make sure there is a pad on my "pallet" for that to rest. Whew, I was really worried about this!
 

rickasbury

Senior Chief Petty Officer
Joined
Jul 13, 2011
Messages
787
sorry, Bondo, your post was added while I was reading the other...7" blocks in the front and have a pad in the back for those feet to sit on and I"m good. I like to be as prepared as I can cause I know I will still get my ass bit!
 

rickasbury

Senior Chief Petty Officer
Joined
Jul 13, 2011
Messages
787
Hey, it's how do you eat an elephant? One bite at a time....this is my elephant!

Thanks for the help all- should bring it home this weekend and start undoing some stuff, will work on a shop next week fof the pull the following weekend.....wife willing anyway....
 

rickasbury

Senior Chief Petty Officer
Joined
Jul 13, 2011
Messages
787
Hey, when I pull the motor out, will the hatch still work or is it grounded to the motor? I have a battery switch so would that be grounded to the battery? But then I assume the battery is grounded to the motor? Me and electricity.....
 
Top